1. Introduction
This manual provides detailed instructions for the safe installation, operation, and maintenance of your KCO Lighting Modern Globe Bubble Chandelier, Model L1102. Please read this manual thoroughly before beginning installation and retain it for future reference.

Image 1.1: KCO Lighting Modern Globe Bubble Chandelier, Model L1102.
The KCO Lighting Modern Globe Bubble Chandelier features a unique design with six clear glass globe shades of varying sizes, creating a distinctive aesthetic. It includes a built-in LED light source for energy-efficient illumination and an adjustable hanging cord for versatile placement.
2. Safety Information
WARNING: Risk of electric shock. Disconnect power at the circuit breaker or fuse box before installation or servicing.
- All electrical connections must be in accordance with local codes, ordinances, or the National Electric Code (NEC). Consult a qualified electrician if you are unfamiliar with proper electrical wiring connections.
- Ensure the mounting surface can support the weight of the fixture.
- Do not connect this fixture to an ungrounded electrical system.
- Handle glass components with care to prevent breakage.
- Do not exceed the specified wattage for replacement bulbs, if applicable. This fixture uses an integrated LED light source.
3. Package Contents
Carefully unpack your fixture and check that all parts are included. If any parts are missing or damaged, contact KCO Lighting customer service.
- Chandelier main body with integrated LED light source
- Clear glass globe shades (1 large 11.8", 1 medium 5.9", 2 small 4.7", 2 small 3.9")
- Mounting hardware kit (crossbar, mounting screws, wire nuts, canopy screws)
- Instruction manual
4. Specifications
| Feature | Specification |
|---|---|
| Brand | KCO Lighting |
| Model Number | L1102 |
| Color | Clear-B |
| Material | Glass |
| Style | Modern |
| Light Fixture Form | Pendant |
| Product Dimensions (L x W x H) | 11.81" x 5.91" x 78.74" (Adjustable Height) |
| Item Weight | 10.23 Pounds |
| Power Source | AC |
| Installation Type | Semi Flush Mount |
| Light Source Type | LED (Integrated) |
| Voltage | 110 Volts |
| Wattage | 60 Watts (Maximum Compatible) |
| Bulb Base | E26 (for integrated LED) |
| Special Features | Adjustable Height, Sloped Ceiling Compatible |
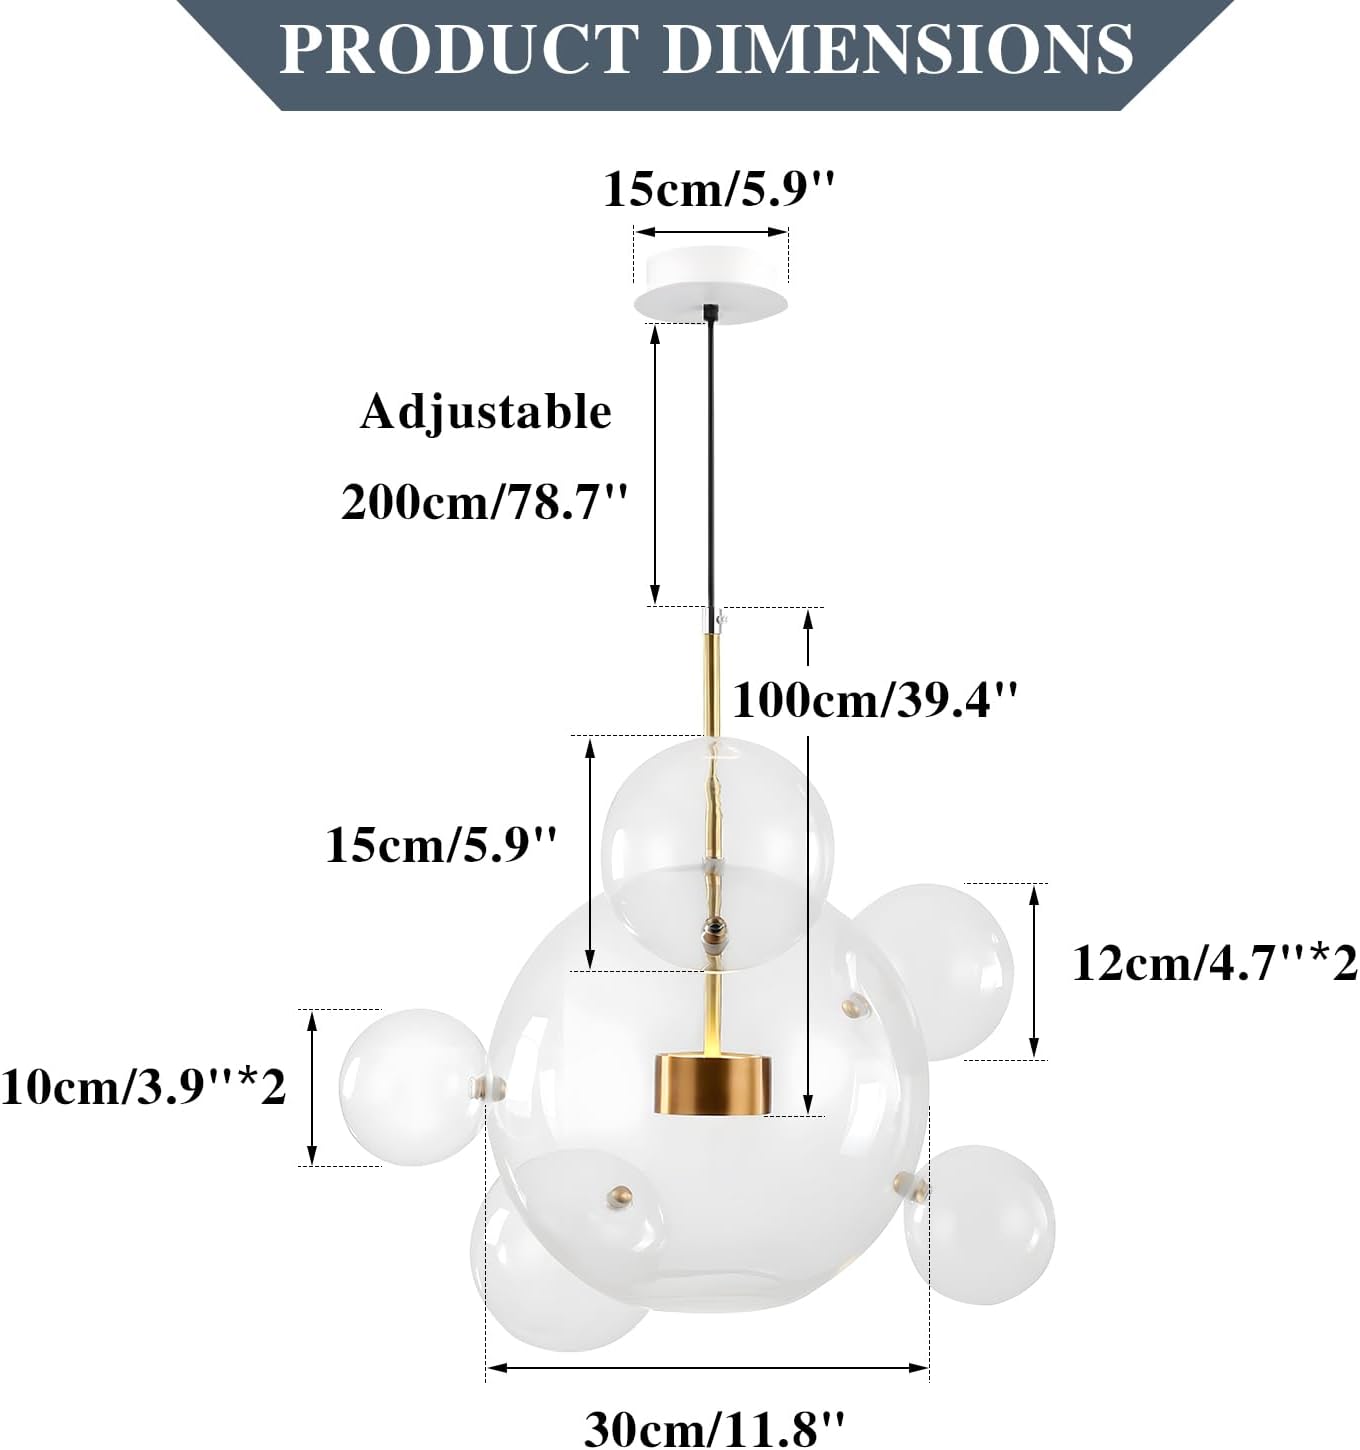
Image 4.1: Product Dimensions. The hanging cord is adjustable up to 78.7 inches (200 cm).
5. Setup and Installation
Professional installation is recommended. Ensure power is disconnected before proceeding.
5.1 Pre-Installation
- Turn off power at the circuit breaker or fuse box.
- Carefully remove the old fixture (if applicable).
- Unpack all components and inspect for damage.
5.2 Mounting the Fixture
- Attach the mounting crossbar to the junction box using the provided screws. Ensure it is securely fastened.
- Connect the fixture's wires to the house wires:
- Connect the black wire (live) from the fixture to the black wire from the junction box.
- Connect the white wire (neutral) from the fixture to the white wire from the junction box.
- Connect the green or bare copper wire (ground) from the fixture to the ground wire from the junction box.
- Carefully tuck all wires into the junction box.
- Attach the canopy to the mounting crossbar, securing it with the canopy screws.

Image 5.1: Product Details showing the sloped ceiling adapter and LED light source.
5.3 Attaching Glass Globes and Adjusting Height
- Gently screw each clear glass globe shade onto its designated arm. Do not overtighten.
- The hanging cord length can be adjusted to suit your ceiling height and desired aesthetic. To adjust, loosen the set screw on the canopy, slide the cord to the desired length, and then retighten the set screw.
- The fixture is compatible with sloped ceilings. Ensure the mounting hardware is correctly installed to accommodate the angle.

Image 5.2: Chandelier installation on sloped ceilings.
6. Operating Instructions
Once installed, operate the chandelier using a standard wall switch connected to the fixture's electrical circuit. The integrated LED light source provides immediate illumination.
6.1 Power On/Off
Flip the wall switch to the 'ON' position to illuminate the chandelier. Flip it to the 'OFF' position to turn off the light.
6.2 Adjusting Light Output
This fixture features an integrated LED light source. If dimming functionality is desired, ensure your wall switch is a compatible LED dimmer switch. Consult a qualified electrician for dimmer switch installation.
7. Maintenance
Regular maintenance ensures the longevity and appearance of your chandelier.
7.1 Cleaning
- Always disconnect power before cleaning.
- Wipe the metal parts with a soft, dry cloth.
- Clean the glass globes with a soft, damp cloth and a mild glass cleaner. Avoid abrasive cleaners that may scratch the glass or damage the finish.
- Ensure globes are completely dry before restoring power.
7.2 Bulb Replacement
This fixture uses an integrated LED light source designed for long-term use. If the LED light source fails, contact KCO Lighting customer service for assistance. Do not attempt to replace individual LED components yourself.
8. Troubleshooting
Review the following common issues and solutions before contacting customer service.
| Problem | Possible Cause | Solution |
|---|---|---|
| Light does not turn on | No power to the fixture; loose wiring; faulty wall switch. | Check circuit breaker. Ensure all wire connections are secure. Test wall switch functionality. |
| Light is dim or flickers | Incompatible dimmer switch; loose wiring. | Ensure dimmer switch is compatible with LED fixtures. Check all electrical connections. |
| Glass globes are loose or fall off | Globes not securely tightened. | Gently tighten each glass globe onto its arm. Do not overtighten to avoid cracking. |
| Fixture arms do not stay in position | Arms not securely tightened or internal mechanism issue. | Ensure any adjustable joints are tightened. If the issue persists, contact customer support. |
| Broken or cracked glass globe | Accidental damage. | Contact KCO Lighting customer service for replacement parts. |
9. Warranty and Support
KCO Lighting offers a 3-year after-sales service for this product. This warranty covers manufacturing defects and significant operational failures under normal use.
9.1 How to Obtain Service
If you encounter any issues, receive broken, damaged, or missing parts, please contact KCO Lighting customer service directly via your order number. Our team is committed to providing a solution within 24 hours.
For support, please visit the KCO Lighting Store on Amazon or contact the seller directly through your purchase history.