1. Introduction
This manual provides detailed instructions for the safe and efficient operation of your Lane PMX-802DU Stereo Powered Mixer. Please read this manual thoroughly before using the device to ensure proper setup, operation, and maintenance. Retain this manual for future reference.
The Lane PMX-802DU is an 8-channel stereo powered mixer designed for various audio applications, featuring a built-in digital effect device, 3-band channel equalizers, a 7-band master equalizer, and USB connectivity.
2. Safety Instructions
- Power Supply: Connect the mixer only to the specified power source. Ensure the voltage matches the device requirements.
- Ventilation: Do not block ventilation openings. Ensure adequate airflow around the unit to prevent overheating. The mixer includes an effective cooling system by fan.
- Moisture: Do not expose the mixer to rain, moisture, or excessive humidity. Avoid placing liquid-filled objects on the unit.
- Cleaning: Disconnect the power before cleaning. Use a dry, soft cloth. Do not use liquid cleaners or aerosols.
- Servicing: Do not attempt to service this product yourself. Refer all servicing to qualified service personnel.
- Placement: Place the mixer on a stable, level surface. Avoid placing it near heat sources.
3. Product Overview
The Lane PMX-802DU features a comprehensive control panel for managing audio inputs, outputs, and effects. Below are images illustrating the main components of the mixer.
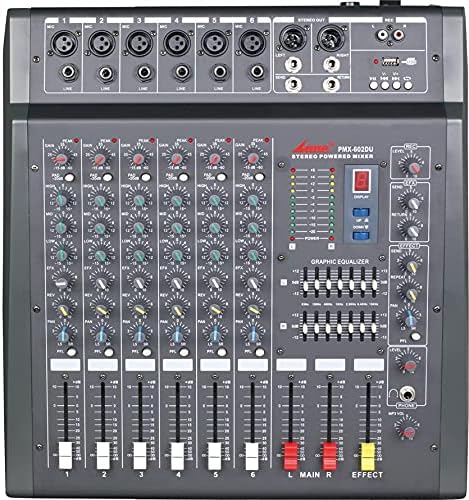
Figure 3.1: Front Panel Overview. This image displays the main control surface of the Lane PMX-802DU mixer, showing all input channels, faders, knobs for equalization and effects, the master section, and the digital display for effects.

Figure 3.2: Angled View. This image provides an angled perspective of the mixer, highlighting the depth and layout of the controls, including the side panels and overall form factor.
4. Setup
4.1 Power Connection
- Ensure the mixer's power switch is in the "OFF" position.
- Connect the power cord to the mixer's power input.
- Plug the other end of the power cord into a suitable AC power outlet.
4.2 Input Connections
The PMX-802DU features 8 mono input channels. Each channel typically includes XLR (microphone) and 1/4-inch (line) inputs.
- Microphones: Connect microphones to the XLR inputs.
- Line-Level Devices: Connect instruments (keyboards, guitars with preamps), CD players, or other line-level audio sources to the 1/4-inch line inputs.
- USB Connection: Connect a USB cable from the mixer's USB port to a computer for audio playback or recording (functionality depends on specific model features and drivers).
4.3 Output Connections
The mixer provides various output options for connecting to amplifiers, powered speakers, or recording devices.
- Main Outputs: Connect the main L/R outputs to your main amplifier or powered speakers.
- Aux Output: Use the Aux output to send a separate mix to an external effect device or a monitor speaker.
5. Operating Instructions
5.1 Channel Controls
Each of the 8 mono input channels features the following controls:
- GAIN/TRIM: Adjusts the input sensitivity for the connected microphone or line-level device. Set this to achieve a strong signal without clipping.
- 3-Band Equalizer (HIGH, MID, LOW): Adjusts the treble, midrange, and bass frequencies for the individual channel.
- EFFECT/AUX SEND: Controls the amount of signal sent from this channel to the internal digital effect processor or the external Aux output.
- PAN: Positions the channel's signal within the stereo field (left to right).
- CHANNEL FADER: Controls the overall volume level of the individual channel.
5.2 Master Section Controls
- Digital Display Effect Device: Select and adjust built-in digital effects (e.g., reverb, delay). Use the associated controls to choose effect type and parameters.
- 7-Band Master Equalizer: Provides overall tonal shaping for the main stereo mix. Adjust these sliders to fine-tune the sound of your entire output.
- MAIN L/R FADERS: Control the overall output volume of the left and right main stereo channels.
- EFFECT FADER: Controls the overall return level of the internal digital effects.
- USB Controls: Buttons and/or knobs for controlling USB audio playback (e.g., play, pause, track skip) and potentially recording functions.
5.3 Basic Operation Sequence
- Turn on all connected devices (microphones, instruments, amplifiers) after the mixer.
- Set all channel faders and the main L/R faders to their lowest position.
- Turn on the mixer's power.
- Gradually increase the GAIN/TRIM for each active input channel until the signal indicator lights show a healthy level without clipping (red light).
- Adjust the 3-band EQ for each channel to achieve the desired tone.
- Slowly raise the channel faders for active inputs.
- Gradually raise the MAIN L/R faders to the desired overall volume level.
- If using effects, adjust the EFFECT/AUX SEND on individual channels and the master EFFECT FADER.
- Use the 7-band master equalizer to fine-tune the overall sound.
- When finished, lower all faders, turn off the mixer, and then turn off all connected devices.
6. Maintenance
- Cleaning: Regularly wipe the mixer's surface with a soft, dry, lint-free cloth. Do not use abrasive cleaners or solvents.
- Ventilation: Ensure the fan and ventilation grilles remain clear of dust and debris to maintain effective cooling.
- Storage: When not in use for extended periods, store the mixer in a cool, dry place, protected from dust and extreme temperatures.
- Cable Management: Avoid bending or crimping cables excessively. Store cables neatly to prevent damage.
7. Troubleshooting
| Problem | Possible Cause | Solution |
|---|---|---|
| No power | Power cord disconnected; Power switch off; Outlet fault | Check power cord connection; Ensure power switch is ON; Test outlet with another device. |
| No sound output | Main faders down; Amplifier off; Cables disconnected; Incorrect input selection | Increase main faders; Turn on amplifier/powered speakers; Check all audio cable connections; Verify correct input source. |
| Distorted sound | Input gain too high; Output level too high; Faulty cable/device | Reduce input GAIN/TRIM; Lower main faders; Test with different cables/devices. |
| No effect sound | Effect send/return levels low; Effect not selected | Increase channel EFFECT SEND and master EFFECT FADER; Select an effect on the digital display. |
8. Specifications
| Brand | Lane |
| Model | PMX-802DU |
| Number of Channels | 8 (Mono Input) |
| Equalizer | 3-band per channel, 7-band master controlling equalizer |
| Effects | Built-in digital display effect device |
| Connectivity | Auxiliary, USB |
| Power Source | Corded Electric |
| Power Consumption | 30W |
| Cooling System | Effective cooling system by fan |
| Item Weight | 15 Kilograms |
| Package Dimensions | 55 x 50 x 20 cm |
9. Warranty and Support
For warranty information and technical support, please refer to the documentation provided at the time of purchase or contact your authorized Lane dealer. Keep your proof of purchase for warranty claims.
For further assistance, visit the official Lane website or contact their customer service department.