1. Introduction
Thank you for choosing the ENVENTOR Green Laser Level Class II, Model Y011G. This device is designed to provide precise horizontal and vertical leveling for various construction, renovation, and DIY projects. Featuring a bright green laser, 360° rotation capability, magnetic support, and multiple operating modes, it offers versatility and accuracy for your tasks. Please read this manual thoroughly before use to ensure safe and optimal operation.
Package Contents
- ENVENTOR Green Laser Level (Model Y011G)
- Magnetic Pivoting Base
- USB Charging Cable
- Carrying Pouch
- User Manual
2. Safety Instructions
Always follow these safety guidelines to prevent injury and damage to the device.
Laser Safety
- This product is a Class II laser device. Do not stare directly into the laser beam.
- Avoid directing the laser beam at people or animals.
- Do not modify the laser device. Unauthorized modifications can increase laser radiation.
- Keep the device out of reach of children.
General Safety
- Operate the device only in well-ventilated areas.
- Do not operate the device in explosive atmospheres, such as in the presence of flammable liquids, gases, or dust.
- Use only the specified USB charging cable and a compatible power adapter (e.g., smartphone charger, computer USB port).
- The device has an IP54 rating, meaning it is protected against dust ingress and splashing water from any direction. It is not waterproof and should not be submerged in water.
- Protect the device from extreme temperatures, strong vibrations, and impacts.
3. Product Overview
Familiarize yourself with the components of your ENVENTOR Green Laser Level.

Figure 1: ENVENTOR Green Laser Level with Magnetic Bracket
- Laser Aperture: Emits the green laser beams.
- Power/Mode Button: Turns the device on/off and switches between laser modes.
- Pendulum Lock Switch: Locks the pendulum for manual mode or transport.
- 1/4" Mounting Thread: For attaching to tripods or other mounting accessories.
- USB Charging Port: For recharging the internal battery.
- Magnetic Pivoting Base: Allows for easy attachment to metal surfaces and 360° rotation.
4. Setup
4.1 Charging the Battery
The laser level is equipped with a rechargeable battery. Before first use, fully charge the device.
- Connect the USB charging cable to the device's USB port.
- Connect the other end of the USB cable to a compatible USB power adapter (e.g., smartphone charger, computer USB port).
- The charging indicator light will show the charging status. Once fully charged, disconnect the cable.
4.2 Mounting the Device
The laser level can be mounted in several ways.
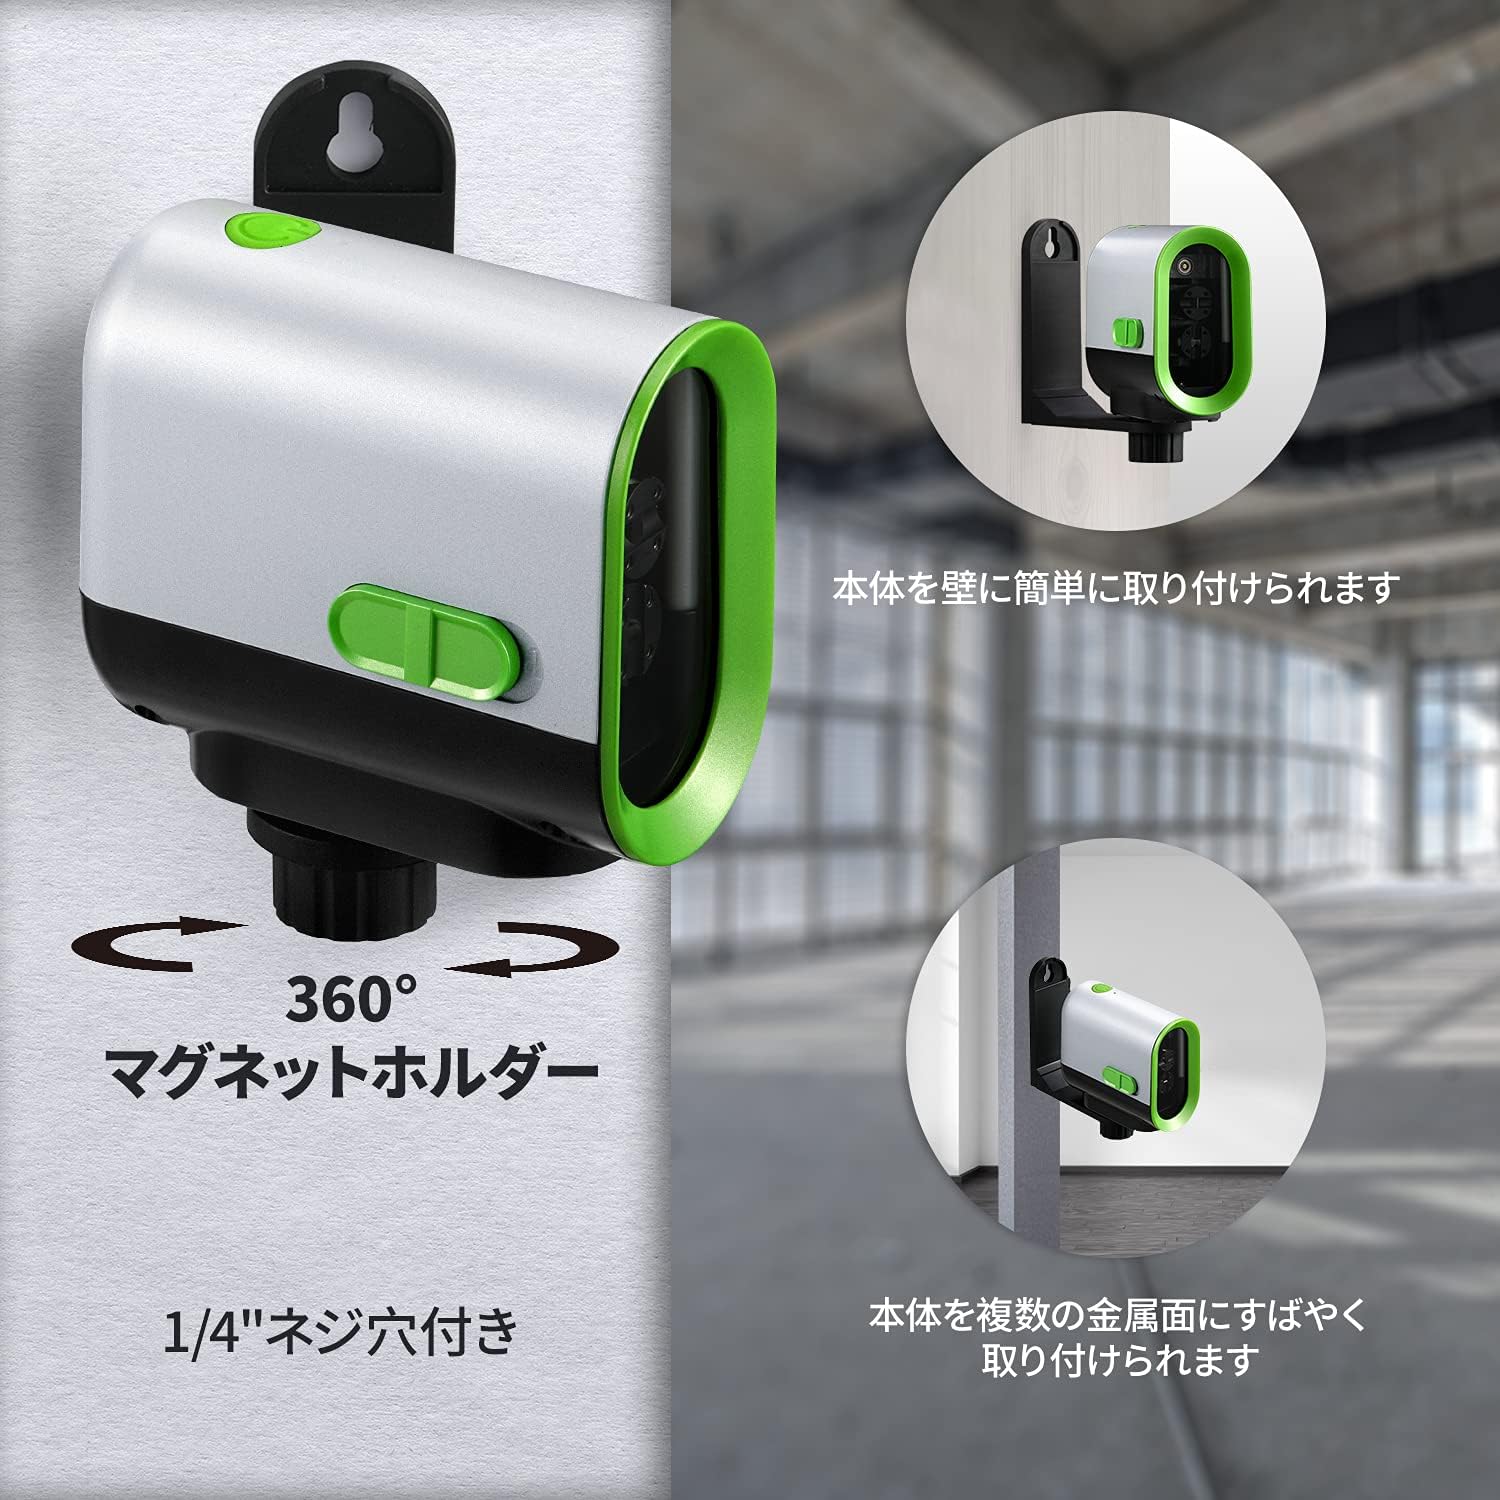
Figure 2: Magnetic Mounting and Rotation
- Magnetic Attachment: The included magnetic pivoting base allows you to attach the laser level to metal surfaces. The base also enables 360° rotation for precise alignment.
- Tripod Mounting: Use the 1/4" mounting thread at the bottom of the device to attach it to a standard tripod (not included) for stable positioning.
5. Operation
The ENVENTOR laser level offers automatic leveling, manual mode, and a pulse mode.

Figure 3: Operating Modes Overview
5.1 Automatic Leveling Mode (Self-Leveling)
This mode is used for projecting perfectly horizontal or vertical lines. The device will self-level within its specified range.
- Slide the pendulum lock switch to the unlocked position (usually to the right).
- Press the Power/Mode button to turn on the laser. The device will automatically self-level.
- If the device is outside its self-leveling range (3° ± 1°), the laser beam will flash continuously, indicating it cannot level. Adjust the device's position until the laser beam becomes steady.
- Press the Power/Mode button repeatedly to cycle through horizontal line, vertical line, and cross-line modes.
Figure 4: Automatic and Manual Mode Visuals
5.2 Manual Mode (Locked Mode)
Manual mode allows you to project laser lines at any angle, useful for tasks like stair railing installation.
- Slide the pendulum lock switch to the locked position (usually to the left).
- Press and hold the Power/Mode button for a few seconds to activate manual mode. The laser lines will be projected, and they will not self-level.
- You can now tilt the device to project lines at your desired angle.
- Press the Power/Mode button repeatedly to cycle through horizontal line, vertical line, and cross-line modes.
5.3 Pulse Mode (for use with Laser Receiver)
Pulse mode extends the working range of the laser level, especially in bright conditions or outdoors, when used with a compatible laser receiver (not included).
- Ensure the device is in Automatic Leveling Mode (pendulum unlocked).
- Quickly press the Power/Mode button twice to activate Pulse Mode. The laser beam may appear dimmer, but it will be detectable by a laser receiver.
- To exit Pulse Mode, quickly press the Power/Mode button twice again.
5.4 Turning Off the Device
- To turn off the laser level, slide the pendulum lock switch to the locked position.
- Then, press and hold the Power/Mode button for a few seconds until the laser turns off.
6. Maintenance
6.1 Cleaning
- Keep the laser aperture clean to ensure clear and accurate laser lines. Use a soft, lint-free cloth.
- Do not use abrasive cleaners or solvents.
- Wipe the device with a damp cloth to remove dust and dirt.
6.2 Storage
- Always lock the pendulum switch before storing or transporting the device to protect the internal components.
- Store the laser level in its carrying pouch in a dry, dust-free environment, away from direct sunlight and extreme temperatures.
- If storing for extended periods, charge the battery every 3-6 months to maintain battery health.

Figure 5: IP54 Protection and Carrying Pouch
7. Troubleshooting
| Problem | Possible Cause | Solution |
|---|---|---|
| Laser does not turn on. | Battery is depleted. Pendulum lock switch is in the locked position. | Charge the battery. Slide the pendulum lock switch to the unlocked position. |
| Laser beam flashes continuously in automatic mode. | Device is outside its self-leveling range. | Place the device on a more level surface or adjust its position until the flashing stops. |
| Laser beam is dim or unclear. | Laser aperture is dirty. Operating in very bright conditions. Pulse mode is active. | Clean the laser aperture. Use a laser receiver in bright conditions. Exit Pulse mode if not using a receiver. |
| Inaccurate leveling. | Device is not calibrated (rare). Significant impact or drop. | Contact customer support for calibration instructions or service. |
8. Specifications

Figure 6: Accuracy and Range
| Brand | Enventor |
| Model | Y011G |
| Laser Color | Green |
| Laser Class | Class II |
| Leveling Accuracy | ±3mm/10m |
| Self-Leveling Range | 3° ± 1° |
| Maximum Working Range | Approx. 50m (with receiver) |
| IP Rating | IP54 (Dust and Splash Resistant) |
| Power Source | USB Rechargeable Battery |
| Material | Metal |
| Weight | 580 grams |
9. Warranty & Support
9.1 Warranty Information
ENVENTOR products are manufactured to high-quality standards. This product comes with a standard manufacturer's warranty against defects in materials and workmanship. Please refer to the product packaging or the official Enventor website for specific warranty terms and duration.
9.2 Customer Support
If you encounter any issues or have questions regarding your ENVENTOR Green Laser Level, please contact our customer support team. For the quickest assistance, please have your model number (Y011G) and purchase information ready.
Contact Information:
- Website: www.enventor.net (or refer to product packaging for regional contact details)
- Email: service@enventor.net