1. Product Overview
This manual provides detailed instructions for the installation, operation, and maintenance of the Mintu Water Valve Replacement. This component is designed to restore proper water flow and temperature control in compatible washing machines and dryers.
The water valve is a critical component that controls the flow of hot and cold water into your appliance. A malfunctioning valve can lead to issues such as no water fill, slow fill, or incorrect water temperature.
2. Compatibility
This replacement water valve is compatible with a range of Maytag and Whirlpool appliance models. Please verify your appliance's model number against the list below to ensure compatibility.
Compatible Maytag Washing Machine Models:
- MVW6230HC0
- MVW6230HW0
- MVW6230RHW0
Compatible Whirlpool Appliance Models:
- 7MWTW7000EW0
- 7MWTW7000EW1
- 7MWTW7300EW0
- 7MWTW7300EW1
- WED7000DW1
- WED7000DW2
- WED7300DC1
- WED7300DC2
- WED7300DW0
- WED7300DW1
- WED7300DW2
- WGD8000DW3
- WGD8000DW4
- WTW6120HC0
- WTW6120HW0
- WTW7000DW0
- WTW7000DW1
- WTW7000DW2
- WTW7000DW4
- WTW7040DW0
- WTW7040DW1
- WTW7040DW2
- WTW7120HC0
- WTW7120HW0
- WTW7300DC0
- WTW7300DW0
- WTW7300DW1
- WTW7300DW2
- WTW8000DW0
- WTW8000DW1
- WTW8000DW2
- WTW8000DW3
- WTW8000DW4
- WTW8040DW0
- WTW8040DW1
- WTW8040DW2
- WTW8040DW3
- WTW8040DW4
- WTW8120HC0
- WTW8120HW0
- YWED7300DW1
- YWED7300DW2
- YWED7500GC0
- YWED7500GW0
Note: This list is based on the product description. Always cross-reference with your appliance's specific model number.
3. Safety Information
Before attempting any repair or replacement, always prioritize safety. Failure to follow these instructions could result in personal injury or property damage.
- Disconnect Power: Always unplug the appliance from the electrical outlet before beginning any work.
- Turn Off Water Supply: Shut off the hot and cold water supply valves to the appliance.
- Drain Water: Ensure any residual water in the hoses or appliance is drained to prevent spills.
- Wear Protective Gear: Use appropriate personal protective equipment, such as gloves and eye protection.
- Professional Assistance: If you are unsure about any step, consult a qualified appliance repair technician.
4. Installation (Replacement)
This section outlines the general steps for replacing a water inlet valve. Specific procedures may vary slightly depending on your appliance model. Refer to your appliance's service manual for detailed instructions if available.
- Preparation:
- Disconnect the appliance from the power supply.
- Turn off the hot and cold water supply valves.
- Move the appliance away from the wall to access the rear.
- Access the Valve:
- Locate and remove the rear access panel of the appliance. This usually involves unscrewing several screws.
- Identify the water inlet valve, which will have the hot and cold water hoses connected to it.
- Disconnect Hoses and Wiring:
- Place a towel or small bucket underneath the valve to catch any residual water.
- Carefully disconnect the hot and cold water supply hoses from the valve.
- Disconnect the internal hoses that lead from the valve to the tub.
- Note the position of the electrical connectors and then disconnect them from the solenoids on the valve. Taking a photo can be helpful.
- Remove Old Valve:
- Unscrew any mounting screws or clips holding the old water valve in place.
- Carefully remove the old valve from the appliance.
- Install New Valve:
- Position the new Mintu water valve in the same location as the old one.
- Secure it with the mounting screws or clips.
- Reconnect the electrical connectors to the corresponding solenoids. Ensure they are firmly attached.
- Reconnect the internal hoses from the valve to the tub.
- Reconnect the hot and cold water supply hoses to the valve. Ensure connections are tight to prevent leaks.
- Test and Reassemble:
- Turn on the hot and cold water supply valves slowly and check for any leaks around the connections. Tighten if necessary.
- Plug the appliance back into the electrical outlet.
- Run a short cycle (e.g., rinse/spin) to verify proper water fill and operation.
- Once confirmed, replace the rear access panel and move the appliance back into position.

Figure 1: Front view of the Mintu Water Valve Replacement, showing the three solenoid coils and water inlets.

Figure 2: Side view of the Mintu Water Valve Replacement, highlighting the electrical connections and outlet ports.

Figure 3: Top-down view of the Mintu Water Valve Replacement, showing the overall compact design.
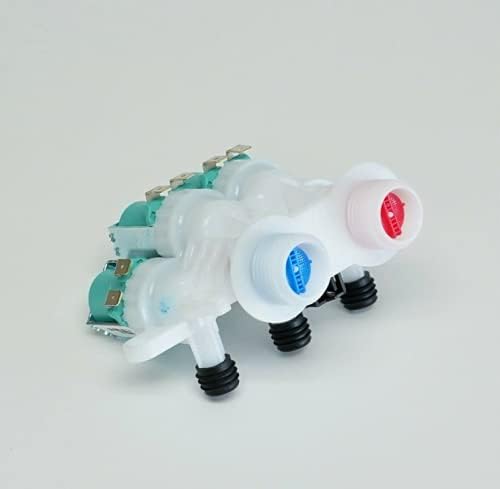
Figure 4: Rear view of the Mintu Water Valve Replacement, featuring color-coded hot (red) and cold (blue) water inlets for easy identification.
5. Operating Principles
The water valve operates by receiving electrical signals from the appliance's control board. These signals activate internal solenoids, which open or close specific ports to allow hot, cold, or mixed water to flow into the wash tub or drum. The valve ensures the correct water temperature and fill level for each cycle selected.
Once installed, the replacement valve functions identically to the original part, restoring the appliance's ability to manage water intake effectively.
6. Maintenance
While the water valve itself requires minimal maintenance, regular checks of related components can prolong its lifespan and ensure optimal appliance performance.
- Check Water Hoses: Periodically inspect the hot and cold water inlet hoses for cracks, bulges, or leaks. Replace them if any damage is observed.
- Clean Inlet Screens: The water valve typically has small screens at its inlet ports to filter out sediment. If water flow is restricted, turn off the water supply, disconnect the hoses, and clean these screens.
- Prevent Freezing: In cold environments, ensure the appliance and its water lines are protected from freezing temperatures, which can damage the valve.
7. Troubleshooting
If you experience issues after replacing the water valve, consider the following common troubleshooting steps:
| Problem | Possible Cause | Solution |
|---|---|---|
| No water entering appliance | Water supply valves closed; clogged inlet screens; faulty electrical connection to valve. | Ensure water supply is fully open. Clean inlet screens. Check electrical connections to the valve solenoids. |
| Slow water fill | Partially clogged inlet screens; low water pressure. | Clean inlet screens. Verify household water pressure. |
| Water leaks from valve connections | Loose hose connections; damaged hose washers. | Tighten all hose connections. Replace rubber washers in the water supply hoses if they are worn or damaged. |
| Incorrect water temperature (e.g., only cold water) | Hot water supply valve closed; hot water solenoid on valve not activating. | Ensure hot water supply is open. Check electrical connection to the hot water solenoid. |
If problems persist after troubleshooting, it is recommended to consult a certified appliance technician.
8. Specifications
| Attribute | Detail |
|---|---|
| Brand | Mintu |
| Part Type | Water Valve Replacement |
| Compatibility | Maytag and Whirlpool Washing Machines/Dryers (refer to Section 2 for models) |
| UPC | 718997295742 |
| ASIN | B098XJ3T99 |
| Manufacturer | Mintu |
9. Warranty and Support
For information regarding warranty coverage or technical support for your Mintu Water Valve Replacement, please refer to the product packaging or contact the manufacturer directly. Keep your proof of purchase for warranty claims.
For general appliance repair advice, consider consulting online resources or a qualified appliance repair professional.