Redragon GC-702
Redragon Mid Tower Tempered Glass Case with RGB Fans (5 x 120mm)
Model: GC-702
Brand: Redragon
Introduction
Thank you for choosing the Redragon GC-702 Mid Tower Tempered Glass Case. This manual provides essential information for the proper setup, operation, and maintenance of your new PC case. Please read this manual thoroughly before installation to ensure optimal performance and safety.
Safety Information
- Always disconnect power before installing or removing components.
- Handle tempered glass panels with care to prevent breakage.
- Ensure proper grounding to prevent electrical hazards.
- Keep the case away from liquids and excessive humidity.
- Do not block ventilation openings to ensure adequate airflow.
- This product is designed for indoor use only.
Package Contents
Please verify that all items are present in the package:
- Redragon GC-702 Mid Tower Case
- Accessory Box (screws, cable ties, standoffs)
- User Manual (this document)
- Pre-installed RGB Fans (quantity as specified)
Product Overview
The Redragon GC-702 is a mid-tower PC case featuring tempered glass panels and pre-installed RGB fans for enhanced aesthetics and cooling. It supports Mini ATX, Micro ATX, and ATX motherboards.

Figure 1: Front and side view of the Redragon GC-702 case, showcasing the tempered glass panel and illuminated RGB fans.

Figure 2: Rear and opposite side view of the Redragon GC-702 case, showing the I/O shield cutout, expansion slots, and rear fan mount.

Figure 3: Top view of the Redragon GC-702 case, highlighting the top ventilation and the front I/O panel with USB ports and audio jacks.
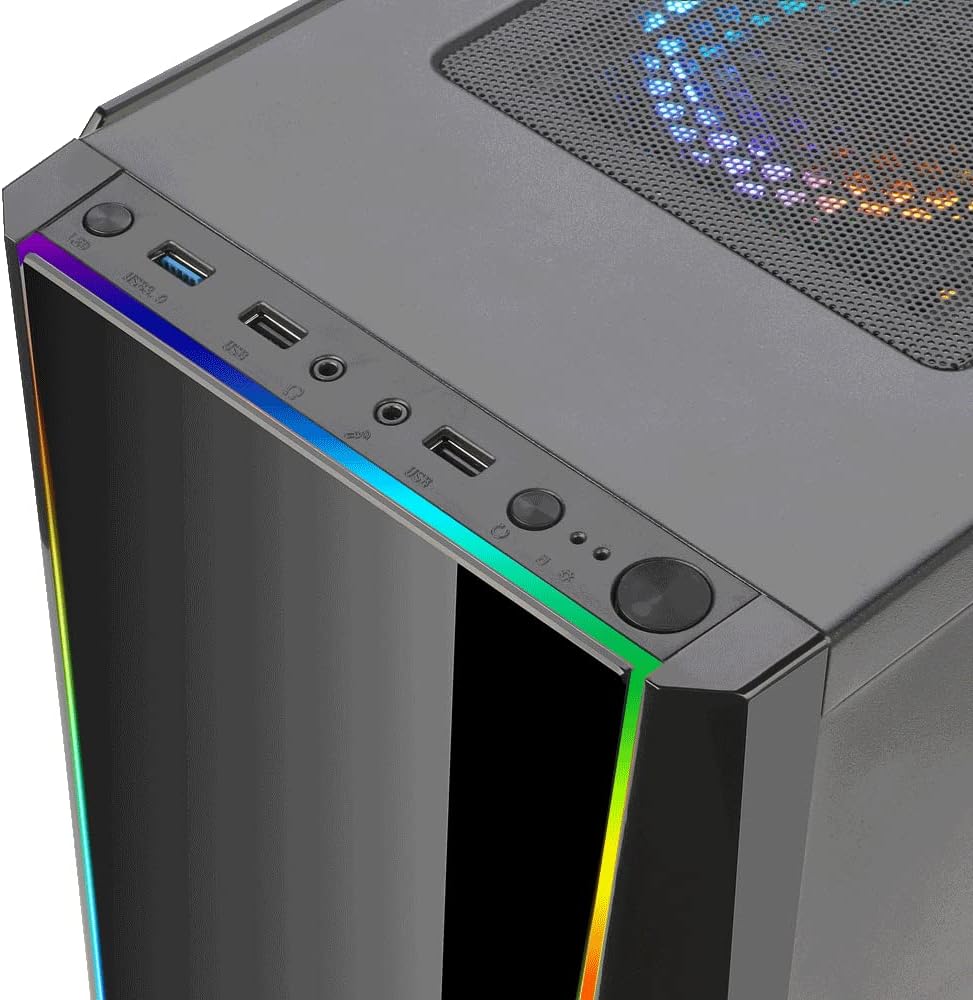
Figure 4: Close-up view of the front I/O panel on the Redragon GC-702 case, detailing the power button, reset button, USB 2.0 ports, and audio input/output jacks.
Setup Instructions
1. Preparing the Case
- Carefully remove the case from its packaging.
- Place the case on a stable, flat surface.
- Unscrew and remove the tempered glass side panel(s) to access the interior. Store them safely to prevent damage.
2. Motherboard Installation
- Install the I/O shield into the cutout at the rear of the case.
- Align your motherboard with the standoffs inside the case. Ensure the standoffs match your motherboard's form factor (Mini ATX, Micro ATX, or ATX).
- Secure the motherboard using the provided screws.
3. Component Installation
- Power Supply Unit (PSU): Install the PSU into its designated bay, typically at the bottom rear of the case. Secure with screws.
- Storage Drives: Install 2.5" SSDs and 3.5" HDDs into their respective drive bays.
- Graphics Card (GPU) & Expansion Cards: Remove the necessary PCIe slot covers and install your graphics card and other expansion cards. Secure them with screws.
4. Cable Management
- Connect all necessary power cables from the PSU to your components (motherboard, GPU, drives).
- Connect the front panel cables (Power SW, Reset SW, HDD LED, Power LED, USB, Audio) to the corresponding headers on your motherboard. Refer to your motherboard manual for correct pin assignments.
- Utilize the cable routing cutouts and tie-down points behind the motherboard tray to manage cables neatly. This improves airflow and aesthetics.
5. Final Assembly
- Once all components are installed and cables are managed, reattach the side panels.
- Ensure all screws are tightened securely.
Operating Instructions
Powering On
After connecting all external peripherals (monitor, keyboard, mouse, power cable), press the power button located on the front I/O panel of the case. The pre-installed RGB fans will illuminate, and your system should begin to boot.
RGB Lighting Control
The RGB lighting is synchronized with your motherboard. To control the lighting effects, you will need to use your motherboard's dedicated RGB software (e.g., ASUS Aura Sync, MSI Mystic Light Sync, Gigabyte RGB Fusion, ASRock Polychrome Sync). Install the appropriate software from your motherboard manufacturer's website and follow their instructions to customize the lighting.
Maintenance
- Dust Cleaning: Regularly clean dust filters (if present) and the interior of the case using compressed air or a soft brush. This helps maintain optimal airflow and cooling performance.
- Tempered Glass Care: Clean tempered glass panels with a soft, lint-free cloth and a glass cleaner. Avoid abrasive materials that could scratch the surface.
- Cable Management: Periodically check cable connections to ensure they are secure and not obstructing airflow.
Troubleshooting
| Problem | Possible Cause | Solution |
|---|---|---|
| System does not power on. | Loose power connections, faulty PSU, incorrect front panel wiring. | Check all power cables (24-pin, CPU, GPU). Verify PSU is switched on. Ensure front panel power switch cable is correctly connected to motherboard. |
| RGB fans are not lighting up. | RGB cables not connected, incorrect motherboard header, software issue. | Ensure RGB cables are securely connected to the motherboard's RGB header. Install and configure your motherboard's RGB control software. |
| Poor airflow/overheating. | Blocked vents, excessive dust, incorrect fan orientation. | Clean dust filters and interior. Ensure fans are oriented correctly (intake/exhaust). Improve cable management. |
If you encounter issues not listed here, please refer to your motherboard and component manuals or contact Redragon support.
Specifications
- Brand: Redragon
- Model Number: GC-702
- Case Type: Mid Tower
- Motherboard Support: Mini ATX, Micro ATX, ATX
- Materials: Tempered Glass, Steel
- Color: Black
- Cooling Method: Air
- Light Color: RGB
- Fan Size: 120mm (Pre-installed fans as specified)
- USB Ports: 2 x USB 2.0
- Item Weight: 7 Kilograms
- Package Dimensions: 61 x 55.29 x 30.1 cm
Warranty and Support
For warranty information and technical support, please refer to the official Redragon website or contact your local retailer. Keep your proof of purchase for warranty claims.
Redragon Official Website: www.redragonzone.com
Ask a question about this manual
Ask about setup, troubleshooting, compatibility, parts, safety, or missing instructions. Manuals+ will review the question and use this page’s manual context to help answer it.