Prostormer Cordless Paint Sprayer
Prostormer 20V Cordless Paint Sprayer Instruction Manual
Model: Cordless Paint Sprayer | Brand: Prostormer
1. Introduction
Thank you for choosing the Prostormer 20V Cordless Paint Sprayer. This high-power HVLP paint spray gun is designed for efficient and even application of various finishes on surfaces such as furniture, fences, walls, and doors. Its cordless design and brushless motor provide freedom of movement and extended product life. Please read this manual carefully before operation to ensure safe and optimal performance.

Figure 1: Prostormer 20V Cordless Paint Sprayer
2. Important Safety Instructions
Always follow basic safety precautions when using electrical appliances to reduce the risk of fire, electric shock, and personal injury.
- Press Trigger Firmly: Due to the protection mechanism, you must press the trigger firmly for the spray gun to spray paint. Otherwise, it will only spray air.
- Avoid Prolonged Operation: Do not operate the motor for extended periods without breaks, as this may lead to motor burnout.
- Small Flow for Small Items: When spraying small items like chairs or small cabinets, it is recommended to use a small flow mode to prevent paint splashes and drips.
- Ventilation: Use the paint sprayer in a well-ventilated area.
- Personal Protective Equipment (PPE): Always wear appropriate PPE, including safety glasses, gloves, and a respirator, to protect against paint fumes and overspray.
- Flammable Materials: Do not spray flammable materials near open flames, pilot lights, or other ignition sources.
- Cleaning: Always disconnect the power source before cleaning or performing maintenance.
3. Package Contents
Verify that all items are present and in good condition upon opening the package:
- 1 x Prostormer Electric Paint Sprayer
- 1 x 1200ml Detachable Container
- 4 x Nozzles (Φ1.5mm, Φ1.8mm, Φ2.2mm, Φ2.6mm)
- 1 x Funnel
- 1 x Cleaning Needle
- 1 x Cleaning Brush
- 1 x Sealing Ring
- 1 x Charger
- 1 x User Manual (this document)
4. Product Components
Familiarize yourself with the main parts of your Prostormer paint sprayer:

Figure 2: Exploded View of Paint Sprayer Components. Key parts include the Union Nut, AirCap, Trigger, Locking Button, 4 Nozzles, Spray Jet Width Adjusting Lever, 1200ml Container, Flow Control Knob, and Lithium Battery.
- Motor Unit: Contains the brushless motor and main power components.
- Spray Gun Head: Attaches to the motor unit and holds the nozzle and air cap.
- 1200ml Container: Detachable reservoir for paint or other liquids.
- Nozzles: Interchangeable nozzles (1.5mm, 1.8mm, 2.2mm, 2.6mm) for different paint viscosities and spray patterns.
- Flow Control Knob: Adjusts the paint output volume.
- Air Cap: Adjustable to change spray pattern (horizontal, vertical, circular).
- Trigger: Activates the spraying function.
- Lithium Battery: Provides cordless power to the unit.
5. Setup and Assembly
- Charge Battery: Before first use, fully charge the lithium battery using the provided charger. The battery has indicator lights to show charge status.
- Attach Battery: Slide the charged battery into the base of the motor unit until it clicks securely into place.
- Assemble Container: Ensure the 1200ml container is securely attached to the spray gun head.
- Attach Spray Gun Head: Align the spray gun head with the motor unit and twist to lock it into position. The gun body is designed for quick disassembly and assembly for ease of use and cleaning.
- Select Nozzle: Choose the appropriate nozzle size based on the paint type and desired finish.
- Φ1.5mm: For thinner materials like stains and sealers.
- Φ1.8mm: General purpose, suitable for most paints.
- Φ2.2mm: For thicker paints and primers.
- Φ2.6mm: For very thick materials or high coverage.

Figure 3: Four interchangeable nozzle sizes.
- Prepare Paint: Fill the 1200ml container with your desired paint. Use the funnel to prevent spills. If necessary, thin the paint according to the paint manufacturer's instructions and test for proper viscosity using the included funnel.
Setup Demonstration Video
Video 1: This video demonstrates the assembly and initial setup of the Prostormer 20V Cordless Paint Sprayer, including attaching the container and battery.
6. Operating Instructions
- Adjust Flow Rate: The flow control knob allows you to adjust the paint output. Turn the knob to increase or decrease the flow rate to achieve the desired coverage and finish.

Figure 4: Adjusting the flow control knob for precise paint output.
- Select Spray Pattern: The air cap can be turned to adjust the spray pattern. You can choose from three patterns:
- Horizontal Ellipse: For horizontal surfaces.
- Vertical Ellipse: For vertical surfaces.
- Circular: For small areas or corners.
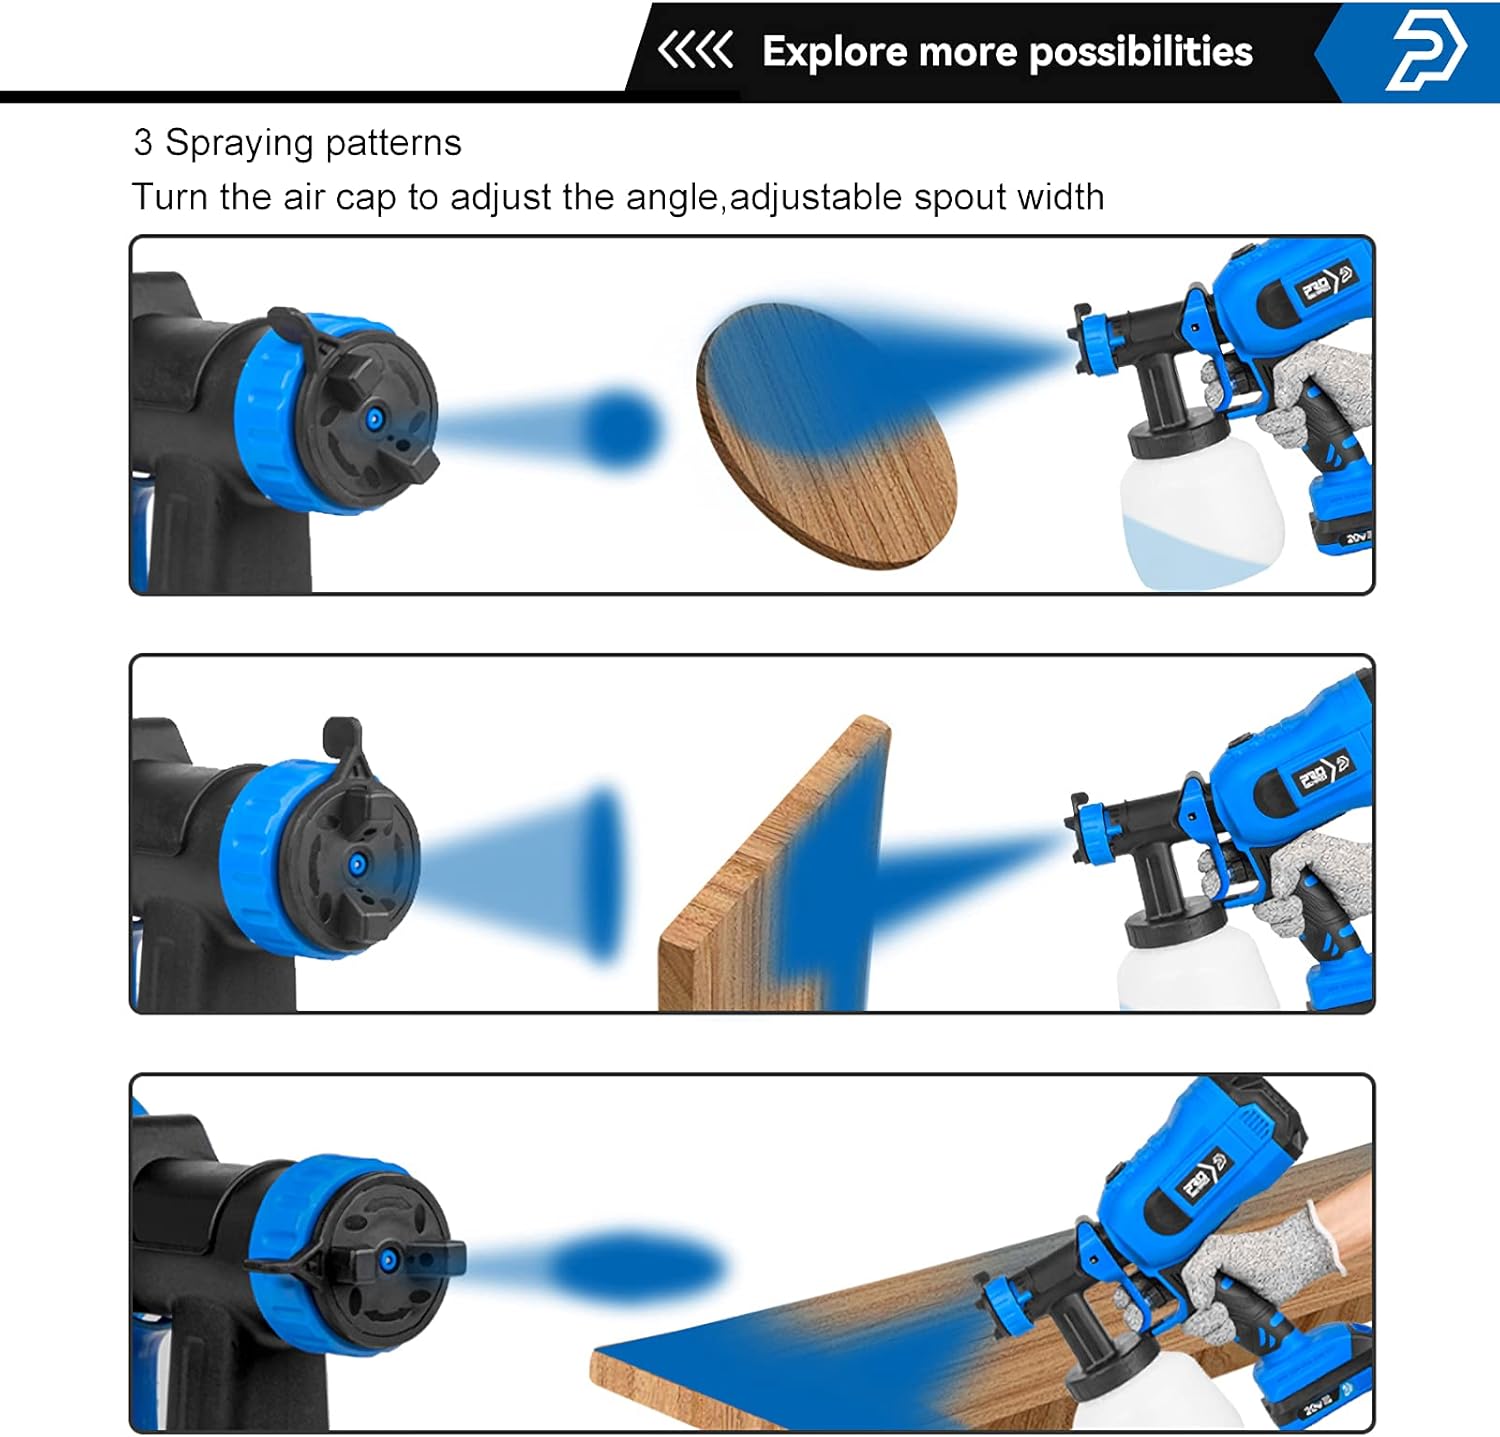
Figure 5: Adjusting the air cap to select one of three spray patterns.
- Spraying Technique:
- Hold the sprayer approximately 6-12 inches (15-30 cm) from the surface.
- Move the sprayer in smooth, even strokes, overlapping each pass by about 50%.
- Maintain a consistent speed and distance for an even finish.
- Always press the trigger firmly to ensure proper paint flow.
- Test Spray: Before applying paint to your main project, always test the spray pattern and flow on a scrap piece of material to ensure desired results.
7. Maintenance and Cleaning
Proper cleaning and maintenance are crucial for the longevity and performance of your paint sprayer.
- Empty Container: After use, empty any remaining paint from the 1200ml container.
- Disassemble: Detach the container and spray gun head from the motor unit. Disassemble the nozzle and air cap components.
- Clean Components:
- Thoroughly clean all paint-contacting parts (container, suction tube, spray gun head, nozzles, air cap) with warm soapy water for water-based paints, or appropriate solvent for oil-based paints.
- Use the provided cleaning needle and brush to clear any clogs in the nozzle or air cap.
- Ensure all parts are completely free of paint residue.
- Rinse and Dry: Rinse all cleaned parts with clean water and allow them to dry completely before reassembly.
- Reassemble and Store: Reassemble the sprayer once all parts are dry. Store the unit in a clean, dry place away from direct sunlight and extreme temperatures.
8. Troubleshooting
| Problem | Possible Cause | Solution |
|---|---|---|
| No paint spray / Only air | Trigger not fully pressed; Nozzle clogged; Paint too thick; Suction tube blocked. | Press trigger firmly; Clean nozzle and air cap; Thin paint as per manufacturer; Clear suction tube. |
| Uneven spray pattern | Incorrect nozzle size; Air cap misaligned; Inconsistent spraying technique. | Select appropriate nozzle; Adjust air cap; Practice consistent strokes. |
| Motor stops / Overheats | Prolonged continuous operation; Blocked air vents. | Allow motor to cool down; Clear air vents. |
| Paint drips / Runs | Paint too thin; Too much paint applied; Sprayer too close to surface. | Adjust paint viscosity; Reduce flow rate; Increase distance from surface. |
9. Specifications
- Brand: Prostormer
- Model Name: Paint Sprayer (Cordless Paint Sprayer)
- Power Source: Battery Powered (20V Lithium Ion battery included)
- Tank Volume: 1200ml
- Nozzle Sizes: Φ1.5mm, Φ1.8mm, Φ2.2mm, Φ2.6mm
- Product Dimensions: 8"W x 7"H
- Item Weight: 4.54 pounds
- Material: Spray Gun (housing)
- Recommended Uses: Painting (Furniture, Fence, Walls, Door)
10. Warranty and Support
Prostormer products are manufactured to high-quality standards. For warranty information, technical support, or service inquiries, please refer to the contact information provided on the product packaging or visit the official Prostormer website. Keep your purchase receipt as proof of purchase for any warranty claims.
Ask a question about this manual
Ask about setup, troubleshooting, compatibility, parts, safety, or missing instructions. Manuals+ will review the question and use this page’s manual context to help answer it.