1. Safety Instructions
Always observe basic safety precautions when using electric tools to reduce the risk of fire, electric shock, and personal injury. Read all instructions before operating this product.
- Work Area Safety: Keep the work area clean and well-lit. Cluttered or dark areas invite accidents. Do not operate power tools in explosive atmospheres, such as in the presence of flammable liquids, gases, or dust.
- Electrical Safety: Power tool plugs must match the outlet. Never modify the plug in any way. Do not abuse the cord. Never use the cord for carrying, pulling, or unplugging the power tool. Keep cord away from heat, oil, sharp edges, or moving parts.
- Personal Safety: Always wear eye protection. Use hearing protection when operating for extended periods. Dress properly; avoid loose clothing or jewelry. Secure long hair.
- Tool Use and Care: Do not force the power tool. Use the correct power tool for your application. Disconnect the plug from the power source before making any adjustments, changing accessories, or storing power tools.
- Maintenance: Have your power tool serviced by a qualified repair person using only identical replacement parts. This will ensure that the safety of the power tool is maintained.
2. Product Overview
The Ferm Impact Drill PDM 1016 is a powerful corded electric tool designed for drilling into various materials, including wood, metal, and masonry. It features an impact function for harder materials and a reverse rotation for versatility.
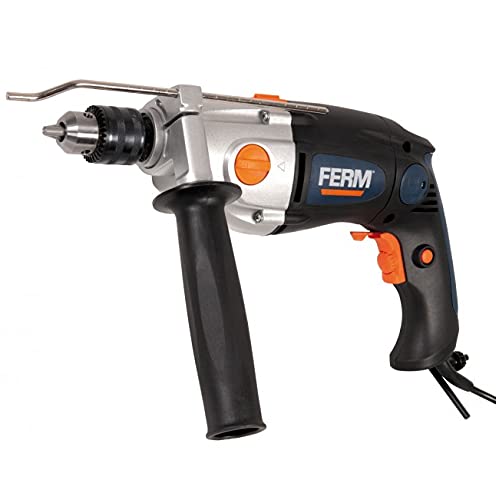
Figure 1: Overall view of the Ferm Impact Drill PDM 1016. This image illustrates the main body, chuck, and handle of the drill.
Key Components:
- Chuck: Holds the drill bit securely. This model features a 13mm keyed chuck.
- Chuck Key: Used to tighten and loosen the chuck for changing drill bits.
- Trigger Switch: Activates the drill.
- Lock-on Button: For continuous operation without holding the trigger.
- Forward/Reverse Switch: Changes the direction of rotation.
- Drill/Impact Mode Selector: Switches between standard drilling and impact drilling.
- Auxiliary Handle: Provides additional grip and control during operation.
- Depth Stop: Used to set a precise drilling depth.
Note: Additional images detailing specific components would be included here if available.
3. Setup
3.1 Attaching the Auxiliary Handle
- Unscrew the auxiliary handle counter-clockwise until it is loose enough to slide over the drill's chuck.
- Position the handle to your desired angle for comfortable and secure grip.
- Tighten the handle by screwing it clockwise until it is firmly secured.
3.2 Installing the Depth Stop
- Insert the depth stop rod through the hole in the auxiliary handle.
- Adjust the rod to the desired drilling depth. The tip of the drill bit should extend beyond the end of the depth stop by the desired depth.
- Secure the depth stop by tightening the screw or clamp on the auxiliary handle.
3.3 Inserting and Removing Drill Bits
- Ensure the drill is unplugged from the power source.
- Insert the chuck key into one of the holes on the chuck.
- Rotate the chuck key counter-clockwise to open the chuck jaws.
- Insert the drill bit fully into the chuck, ensuring it is centered.
- Rotate the chuck key clockwise to tighten the chuck jaws firmly around the drill bit. Remove the chuck key immediately after tightening.
- To remove a drill bit, reverse the tightening process.
4. Operating Instructions
4.1 Powering On/Off
- Plug the drill into a suitable power outlet.
- To start the drill, press the trigger switch.
- To stop the drill, release the trigger switch.
- For continuous operation, press the trigger switch and then press the lock-on button. To release, press the trigger switch again.
4.2 Selecting Drill Mode (Drill/Impact)
- For drilling into wood, metal, or plastic, set the mode selector to the drill symbol.
- For drilling into masonry, concrete, or brick, set the mode selector to the impact symbol.
4.3 Changing Rotation Direction (Forward/Reverse)
- The forward/reverse switch is typically located above the trigger.
- Push the switch to the left for forward rotation (clockwise, for drilling).
- Push the switch to the right for reverse rotation (counter-clockwise, for removing screws or freeing jammed bits).
- Always ensure the drill has come to a complete stop before changing the direction of rotation.
4.4 Drilling Techniques
- Mark the drilling spot clearly.
- Hold the drill firmly with both hands, using the auxiliary handle for stability.
- Start drilling at a low speed, gradually increasing pressure and speed as the bit engages the material.
- Maintain a steady, even pressure. Do not force the drill.
- For deep holes, periodically withdraw the bit to clear debris.
5. Maintenance
Regular maintenance ensures the longevity and safe operation of your drill.
5.1 Cleaning
- Always unplug the drill before cleaning.
- Clean the ventilation openings regularly to prevent overheating. Use a soft brush or compressed air.
- Wipe the tool housing with a soft, damp cloth. Do not use harsh chemicals or abrasive cleaners.
- Keep the chuck jaws clean and free of debris to ensure proper bit gripping.
5.2 Storage
- Store the drill in a dry, secure place, out of reach of children.
- Protect the power cord from damage during storage.
5.3 Carbon Brush Replacement
The carbon brushes may need replacement after extended use. This procedure should ideally be performed by a qualified service technician to ensure proper installation and tool safety.
6. Troubleshooting
Refer to the table below for common issues and their solutions.
| Problem | Possible Cause | Solution |
|---|---|---|
| Drill does not start | No power supply; Faulty power cord/plug; Trigger switch malfunction | Check power outlet and connections; Inspect cord for damage; Contact service center |
| Loss of power during operation | Overload; Loose connection; Worn carbon brushes | Reduce pressure; Check connections; Have carbon brushes inspected/replaced |
| Excessive vibration or noise | Bent drill bit; Loose chuck; Internal damage | Replace bent bit; Re-tighten chuck; Contact service center |
| Drill bit gets stuck | Incorrect drilling technique; Overheating; Material too hard | Use reverse function to free; Allow drill to cool; Use appropriate bit/mode |
7. Specifications
Detailed technical specifications for the Ferm Impact Drill PDM 1016.
| Feature | Specification |
|---|---|
| Brand | Ferm |
| Model Number | PDM 1016 |
| Maximum Power | 1050 Watt |
| Power Source | Corded Electric |
| Operating Voltage | Refer to product label for specific voltage requirements (typically 220-240V AC) |
| Maximum Rotational Speed | 3000 RPM (revolutions per minute) |
| Chuck Type | Keyed Chuck |
| Chuck Size | 13 mm |
| Special Features | Reverse Rotation |
| Color | Blue |
8. Warranty and Support
For warranty information, please refer to the warranty card included with your product or visit the official Ferm website. If you require technical support, spare parts, or service, please contact your local authorized Ferm service center or the retailer where the product was purchased. Keep your proof of purchase for warranty claims.


