A&I Brooders and Incubators MX-BL500N
R-com Rcom Large Avian Brooder Nursery ICU MX-BL500N User Manual
Model: MX-BL500N
1. Introduction
This manual provides detailed instructions for the setup, operation, and maintenance of the R-com Rcom Large Avian Brooder Nursery ICU MX-BL500N. This unit is designed to provide a controlled and safe environment for companion birds and newborn animals, functioning as both a brooder and an Intensive Care Recovery Room.
The MX-BL500N incorporates advanced features such as automatic temperature and humidity control, an anion activation function, and a centralized heating system for enhanced stability and durability.

Figure 1: R-com Rcom Large Avian Brooder Nursery ICU MX-BL500N Overview.
2. Key Features
- Centralized Heating System: Utilizes a PTC memory element from a carbon-filmed heating system for improved stability and durability.
- Automatic Temperature & Humidity Control: Independent systems for precise environmental management.
- Built-in Air Filter / Deodorizing Filter: For maintaining air quality within the unit.
- Anion Activation Function: Enhances the internal environment.
- Water Pump for Humidification: Ensures consistent humidity levels.
- Energy Efficiency: Reduces electric power consumption by up to 40% compared to older models.
- Recessed Brooding Tray: Designed for easy cleaning and hygiene management.
- 10-Stage Dimmer for Illumination: Allows control over indoor lighting brightness.
- Rotary Door: Facilitates easy access and observation of occupants.
- BLDC Fan: Optimizes internal air circulation and minimizes noise (69db).
- Large FND Display: Easy-to-read display for temperature and humidity settings.
- Alarm Function: Notifies users in case of abnormal temperature conditions.

Figure 2: Internal airflow and key features of the R-com Brooder.

Figure 3: Close-up of the Large FND display showing temperature and humidity readings.
3. Setup
3.1 Unpacking and Placement
- Carefully remove the brooder from its packaging.
- Place the unit on a stable, level surface away from direct sunlight, drafts, and extreme temperature fluctuations. Ensure adequate space around the unit for ventilation.
- Verify all components are present: main unit, power cord, water pump, and any included trays.
3.2 Tray Installation
The brooder features a recessed brooding tray for easy cleaning. A secondary tray option is available to create compartments or accommodate newborn birds.

Figure 4: The rotatable sliding door and drawer-separated tray for easy access and hygiene.
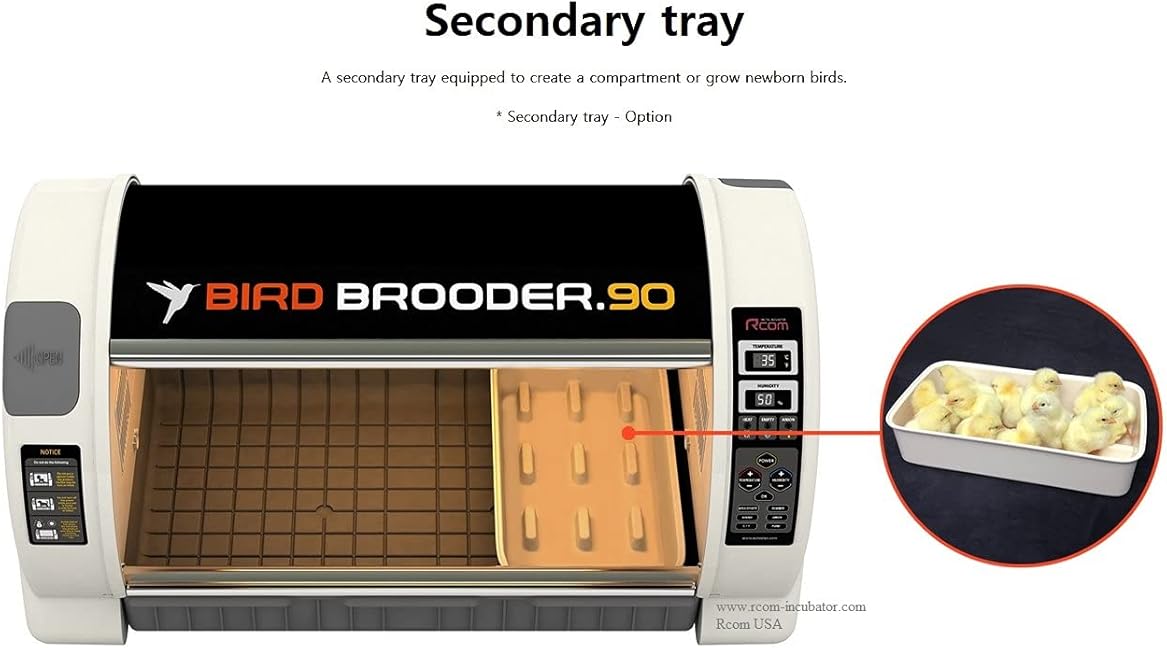
Figure 5: Installation of the optional secondary tray for partitioning the brooding area.
3.3 Power Connection
Connect the power cord to the unit and then to a suitable electrical outlet (AC 100-120V, 50/60Hz or AC 220-240V, 50/60Hz depending on model and region). Ensure the power switch is in the OFF position before connecting.
4. Operating Instructions
4.1 Power On and Initial Settings
- Press the POWER button to turn on the unit. The FND display will illuminate.
- The unit will display current temperature and humidity readings.
4.2 Temperature Control
The R-com Brooder features automatic temperature control. To adjust the target temperature:
- Press the TEMPERATURE button. The temperature value on the display will blink.
- Use the UP and DOWN arrow buttons to set the desired temperature.
- Press OK to confirm the setting. The unit will begin adjusting to the new temperature.

Figure 6: Automatic temperature and humidity control system.
4.3 Humidity Control
The unit includes an independent humidity system with a water pump. To adjust the target humidity:
- Ensure the water reservoir is filled and the water pump is correctly installed.
- Press the HUMIDITY button. The humidity value on the display will blink.
- Use the UP and DOWN arrow buttons to set the desired humidity.
- Press OK to confirm the setting. The unit will activate the water pump to reach the target humidity.
- An alarm function will notify you if there is insufficient water for humidification.
4.4 Illumination Control (LED Lighting)
The internal LED lighting brightness can be adjusted in 10 stages.
- Press the LIGHT button (or equivalent, refer to control panel diagram if available).
- Use the UP and DOWN arrow buttons to cycle through the brightness levels.
- The display may show the current light level (e.g., L1-L10).

Figure 7: Control panel showing LED lighting adjustment options.
5. Maintenance
5.1 Cleaning the Brooding Tray
The recessed brooding tray is designed for easy removal and cleaning to maintain hygiene.
- Gently slide out the brooding tray.
- Clean the tray with a mild disinfectant solution and rinse thoroughly.
- Ensure the tray is completely dry before reinserting it into the unit.
5.2 Air Filter / Deodorizing Filter Maintenance
Regularly check and clean or replace the built-in air filter and deodorizing filter to ensure optimal air quality and unit performance.
- Locate the air filter compartment (refer to unit diagram if available).
- Remove the filter and clean it according to manufacturer recommendations (e.g., vacuuming, rinsing, or replacement).
- Reinstall the clean or new filter.
5.3 Water Reservoir and Pump
Periodically clean the water reservoir and water pump to prevent mineral buildup and ensure efficient humidification.
- Drain any remaining water from the reservoir.
- Clean the reservoir and pump components with a mild descaling solution if necessary, then rinse thoroughly.
- Refill with clean, distilled water for best results.
6. Troubleshooting
| Problem | Possible Cause | Solution |
|---|---|---|
| Unit does not power on. | Power cord not connected; Power outlet issue; Unit fuse blown. | Check power cord connection; Test power outlet; Check and replace fuse (250V 10.0A). |
| Temperature not stable or incorrect. | Unit placed in drafty area; Sensor malfunction; Heating element issue. | Relocate unit to a stable environment; Contact customer support if sensor or heating element is suspected. |
| Humidity not reaching set level or alarm for low water. | Water reservoir empty; Water pump clogged or malfunctioning; Humidity sensor issue. | Refill water reservoir; Clean water pump; Contact customer support if sensor is suspected. |
| Excessive fan noise. | Obstruction in fan; Fan malfunction. | Ensure no obstructions; If noise persists, contact customer support. |
7. Specifications
| Parameter | Value |
|---|---|
| Model No. | MX-BL500, MX-BL500(N) |
| Temperature Control | Ambient temperature ~ 38°C / ~ 100°F |
| External Environment Temp. | Optimum range 20 ~ 25°C / 68 ~ 77°F |
| Humidity Control | 40 ~ 60% (Adjustable based on conditions) |
| External Environment Humi. | 40 ~ 60% |
| Display | FND |
| Power | AC 100-120V, 50/60Hz / AC 220-240V, 50/60Hz |
| Power Consumption | Average 90W |
| Size (W x L x H) | 855mm x 470mm x 440mm / Capacity 90L |
| Weight (N.W. / G.W.) | 10kg / 14.5kg |
| Fuse | 250V 10.0A (Ø5*20mm) |

Figure 8: Size comparison of R-com Brooder models (60L and 90L).

Figure 9: Detailed technical specifications for the R-com Brooder 90.
8. Warranty and Support
For warranty information, technical support, or service inquiries, please contact your authorized dealer or the manufacturer, Autoelex Rcom. Please have your model number (MX-BL500N) and date of purchase available when contacting support.
Manufacturer: Autoelex Rcom
Brand: A&I Brooders and Incubators
Ask a question about this manual
Ask about setup, troubleshooting, compatibility, parts, safety, or missing instructions. Manuals+ will review the question and use this page’s manual context to help answer it.