1. Introduction
This manual provides detailed instructions for the assembly, operation, and maintenance of your yuandd DIY Large Wall Clock. Designed not only for timekeeping but also as a modern decorative element, this clock allows for personalized installation to suit your space.
The clock components are crafted from EVA foam and acrylic with a mirror effect, offering a lightweight yet durable design. The silent quartz movement ensures accurate timekeeping without disruptive ticking sounds.

A close-up view of the yuandd DIY Large Wall Clock, featuring large, colorful numbers (1-12) arranged around a central black clock mechanism with black hour and minute hands.
2. Setup and Installation
Careful installation is key to the aesthetic and functional performance of your DIY wall clock. Please follow these steps precisely.
2.1 Unpacking and Preparation
- Carefully unpack all components and verify against the parts list (not provided in source data, assume all parts are present).
- Identify the clock mechanism, hour hand, minute hand, numbers, and the included paper ruler/template.
- Important: Before installation, peel off the protective paper from all acrylic components (numbers and hands).
2.2 Installation Steps
The following steps guide you through the assembly and mounting process. A paper ruler is included to assist with accurate placement.
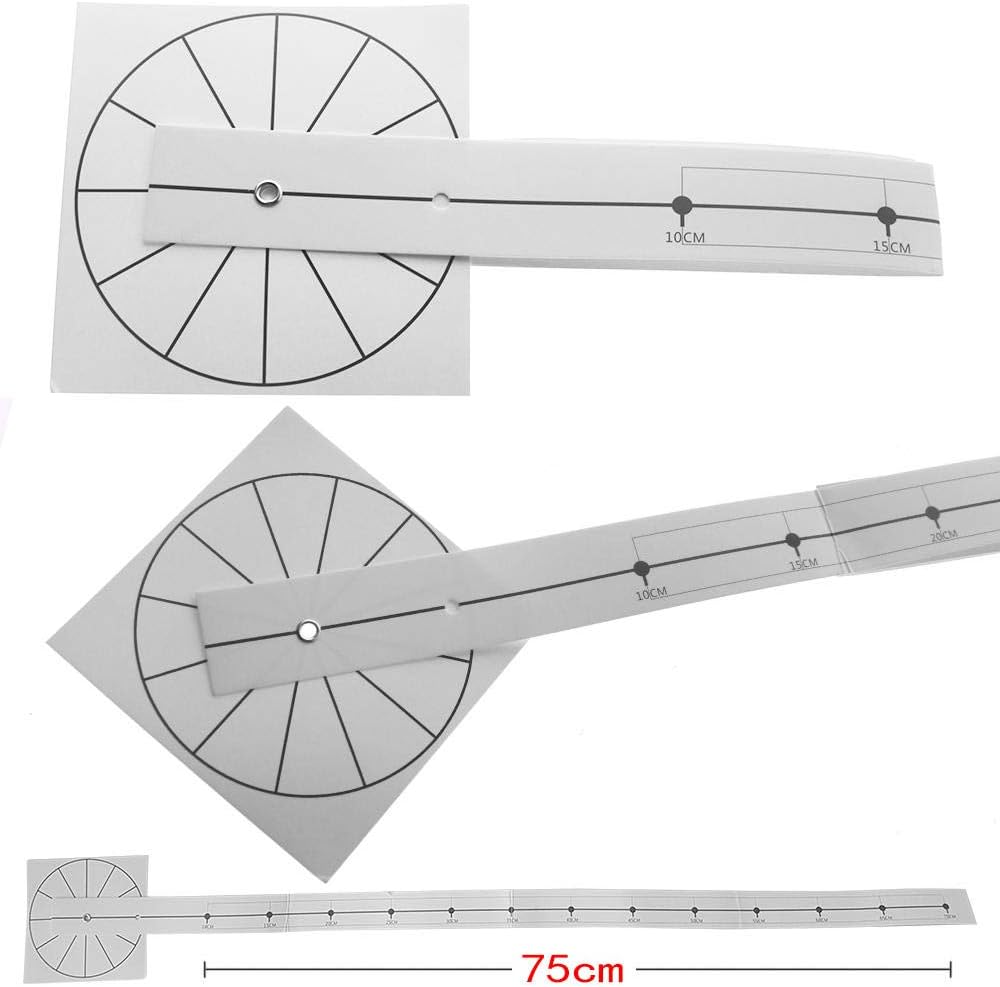
Images of the included paper ruler and circular template, essential tools for accurately positioning the clock numbers and the central mechanism during installation. The ruler shows measurements up to 75cm.
- Step 1: Fasten the Clock on the Wall. Secure a hook (not included) at your desired central position on the wall.
- Step 2: Hang the Clock Plate. Hang the central clock plate onto the hook.
- Step 3: Cover with Auxiliary Paper Scale. Place the auxiliary paper scale over the clock plate. Use this scale to mark the positions for each number.
- Step 4: Peel Protective Paper. Peel off the protective paper from the back of each acrylic number.
- Step 5: Position Numbers. Carefully stick each number onto the wall according to the markings from the paper scale.
- Step 6: Press Hour Hand. Press the hour hand onto the clock axis. Align it to the 12 o'clock position.
- Step 7: Fix Minute Hand. Fix the minute hand onto the clock axis in the same way as the hour hand. Tighten the nuts gently to secure both hands.
- Step 8: Install Battery and Adjust Time. Install one AA battery into the clock mechanism. Adjust the time using the dial on the back of the mechanism.

A visual guide detailing the 8 steps for installing the DIY wall clock. Steps include fastening the clock on the wall, hanging the clock plate, covering with the auxiliary paper scale, peeling protective paper, pressing hands onto axes, fixing the minute hand, installing an AA battery, and adjusting the time.
3. Operating Instructions
3.1 Battery Installation
The clock requires one AA battery (not included). Locate the battery compartment on the back of the clock mechanism. Insert the battery, ensuring correct polarity (+/-). The quartz movement will begin to operate silently.

A detailed view of the black quartz clock mechanism, labeled 'Sangtai 6168S QUARTZ'. This mechanism is responsible for the silent and accurate timekeeping of the clock.
3.2 Setting the Time
To set the time, use the small adjustment wheel located on the back of the clock mechanism. Rotate the wheel until the hour and minute hands display the correct time. Avoid moving the hands directly by hand, as this can damage the mechanism.
4. Maintenance
To ensure the longevity and appearance of your yuandd DIY Large Wall Clock, follow these simple maintenance guidelines:
- Cleaning: Gently wipe the acrylic numbers and hands with a soft, dry, or slightly damp cloth. Avoid abrasive cleaners or harsh chemicals, as these can scratch or damage the acrylic surface.
- Battery Replacement: Replace the AA battery annually, or when the clock begins to lose time or stop. Always use a fresh, high-quality battery.
- Dusting: Regularly dust the clock components to prevent buildup, which can affect the aesthetic and potentially the movement.
5. Troubleshooting
If you encounter any issues with your clock, refer to the following common problems and solutions:
- Clock Not Moving:
- Check if the battery is inserted correctly with the correct polarity.
- Replace the battery with a new one.
- Ensure the hour and minute hands are not bent or touching each other, or the numbers. Gently adjust if necessary.
- Incorrect Time:
- Adjust the time using the wheel on the back of the clock mechanism.
- If the clock consistently loses or gains time, replace the battery.
- Hands Interfering:
- Ensure the hands are securely attached but not too tight, allowing free movement.
- Gently bend the hands slightly if they are touching each other or the clock face/numbers.
6. Specifications
| Feature | Detail |
|---|---|
| Brand | yuandd |
| Model | yuandd-0703276 |
| Color | Multicolor, Black |
| Material | Acrylic, EVA Foam |
| Special Features | Silent Movement |
| Display Type | Analog |
| Power Source | Battery Powered (1x AA, not included) |
| Applicable Placement | Living Room |
| Finished Clock Diameter (47 Inch Model) | Up to 120 cm (47 inches) |
| Hour Hand Length (47 Inch Model) | 31.3 cm |
| Minute Hand Length (47 Inch Model) | 39 cm |
| Clock Mechanism Diameter | 12 cm |

A diagram illustrating the lengths of the hour hand, minute hand, and the diameter of the clock mechanism for both the 37-inch and 47-inch versions of the DIY wall clock. For the 47-inch model, the hour hand is 31.3 cm, the minute hand is 39 cm, and the clock mechanism is 12 cm.
7. Warranty and Support
Specific warranty information for the yuandd DIY Large Wall Clock is not available in the provided product data. For details regarding warranty coverage, returns, or technical support, please contact the seller or manufacturer directly through your purchase platform.


