1. Introduction
This manual provides instructions for the NEJE 15W Laser Engraving Module (E40), designed for use with NEJE Master, Plus, and Max series machines, as well as other compatible CNC routers, Arduino, and 3D printers. This module features a 15W optical output power from a 40W input, offering precision for engraving and cutting various materials.
2. Safety Information
Always prioritize safety when operating laser equipment. Failure to follow safety guidelines can result in serious injury.
- Eye Protection: The module includes integrated protective glass. However, it is highly recommended to wear additional certified laser safety glasses to protect your eyes from direct or reflected laser light.
- Ventilation: Ensure adequate ventilation in your workspace to dissipate fumes and smoke produced during engraving or cutting.
- Flammable Materials: Do not operate the laser near flammable liquids, gases, or materials. Always have a fire extinguisher readily available.
- Supervision: Never leave the laser module operating unattended.
- Children and Pets: Keep children and pets away from the operating area.
3. Package Contents
Verify that all items listed below are included in your package:
- NEJE A40640 Laser Module (Built-in high pressure air nozzle)
- 4mm PVC Trachea (2m)
- Connector (M8 to M4)
- 2.5mm L-shaped Wrench
- 5mm L-shaped Wrench
- Z Axis Adjuster
- NEJE PWM/Temperature Tester Board
- NEJE Interface Switch / Transfer Board
- CNC Metal Air Nozzle
- 4-pin Cable (30cm) + 2-pin Yellow and Black Signal Line + 3-pin Input Line
- NEJE Module Manual

This image details the complete package contents, including the NEJE A40640 laser module, 4mm PVC trachea, M8 to M4 connector, L-shaped wrenches (2.5mm and 5mm), Z axis adjuster, NEJE PWM/Temperature tester board, NEJE interface switch/transfer board, CNC metal air nozzle, various connection cables, and the NEJE module manual.
4. Setup
4.1 Compatibility and Power Requirements
The NEJE E40 module is compatible with DC3.3V-12V PWM/TTL input signals. It is designed for easy integration with NEJE Master 2S/Plus/Max machines and can also be adapted for use with other CNC routers, Arduino, and 3D printer systems. A stable 12V 3A-4A power supply is required for optimal performance.
4.2 Module Installation
- Mounting: Securely attach the NEJE E40 laser module to your engraving machine's mounting bracket. Ensure it is firmly in place to prevent movement during operation.
- Z-Axis Adjustment: Use the provided Z axis adjuster to set the initial height of the laser module above your working surface.
- Cable Connection: Connect the 4-pin cable to the laser module and your machine's control board. Ensure the PWM/TTL signal line (yellow and black 2-pin) and the 3-pin input line are correctly connected according to your machine's wiring diagram.
- Power Supply: Connect the recommended 12V 3A-4A power supply to your machine.
4.3 Air Assist Setup
For cleaner cuts and reduced charring, an air assist system is recommended. The NEJE E40 module includes a built-in high-pressure air nozzle.
- Connect Air Nozzle: Attach the CNC metal air nozzle to the module if not already pre-installed.
- Connect Trachea: Connect the 4mm PVC trachea to the air nozzle.
- Air Pump: Connect the other end of the trachea to an external air pump (not included) capable of providing 0.6-1.5 Mpa pressure.

This diagram illustrates the NEJE A40640 engraving module, showing its internal components, eye protection feature, and the recommended setup for air assist (0.6-1.5 Mpa) with a focus point of 22mm for cutting plywood up to 18mm thick.
5. Operating Instructions
5.1 Software and Control
The NEJE E40 module is compatible with various control software, including LightBurn, LaserGRBL, NEJE Controller (PC), and NEJE Android/iOS Apps. Ensure your chosen software is correctly configured for your machine and the E40 module.
5.2 Focus Adjustment
Achieving the correct focus is critical for optimal engraving and cutting results. The NEJE lens provides a clear focus without scattered light, and the focal distance is adjustable.
- Initial Focus: Place a test material under the laser.
- Adjust Height: Slowly adjust the Z-axis (module height) until the laser spot on the material is at its smallest and most intense point. This is your focal point.
- Fine-tuning: Perform small test engravings or cuts and fine-tune the focus for the best results on your specific material.

This image demonstrates the precision of the NEJE module, showing a significantly smaller laser focus spot (0.04mm*0.06mm) compared to other modules (0.08mm*0.1mm), resulting in clearer and more detailed engravings.

This image illustrates the NEJE module's ability to achieve a longer depth of field and cleaner, thicker cuts. It shows a vertical cut through material, indicating high verticality and clean edges, unlike other modules that may produce carbonized substances and edge errors.
5.3 Material Compatibility and Performance
The NEJE E40 module is capable of engraving and cutting a wide range of materials:
- Engraving: MDF, balsa, paper, wood, fabric, plastic, leather, plywood, foam paper, anodized aluminum, stainless steel (requires good focus), painted metal, painted tile, bone, film-coated transparent acrylic, film-coated stainless steel, film-coated glass, felt.
- Cutting: 4mm plywood (1 pass at speed 200), 3mm black acrylic (1 pass).

This image displays a variety of materials suitable for processing with the NEJE laser module, including plywood, kraft paper, leather, plastic, black anodized aluminum, corrugated board, solid wood, veneer, bamboo, MDF board, black acrylic, stamp rubber, canvas art, non-woven fabric, painted metal, painted tile, bone, film-coated transparent acrylic, film-coated stainless steel, film-coated glass, and felt.
6. Maintenance
Regular maintenance ensures the longevity and optimal performance of your laser module.
- Lens Cleaning: Periodically inspect the laser lens for dust, debris, or residue. Clean gently with a specialized lens cleaning solution and a lint-free cloth to maintain laser beam quality.
- Fan Maintenance: The module features an intelligent temperature sensor control and a 10000 rpm 40mm fan. Ensure the fan intake and exhaust vents are clear of obstructions to allow for proper cooling. Clean any accumulated dust from the fan blades.
- General Cleaning: Keep the exterior of the module clean and free from material dust or debris.
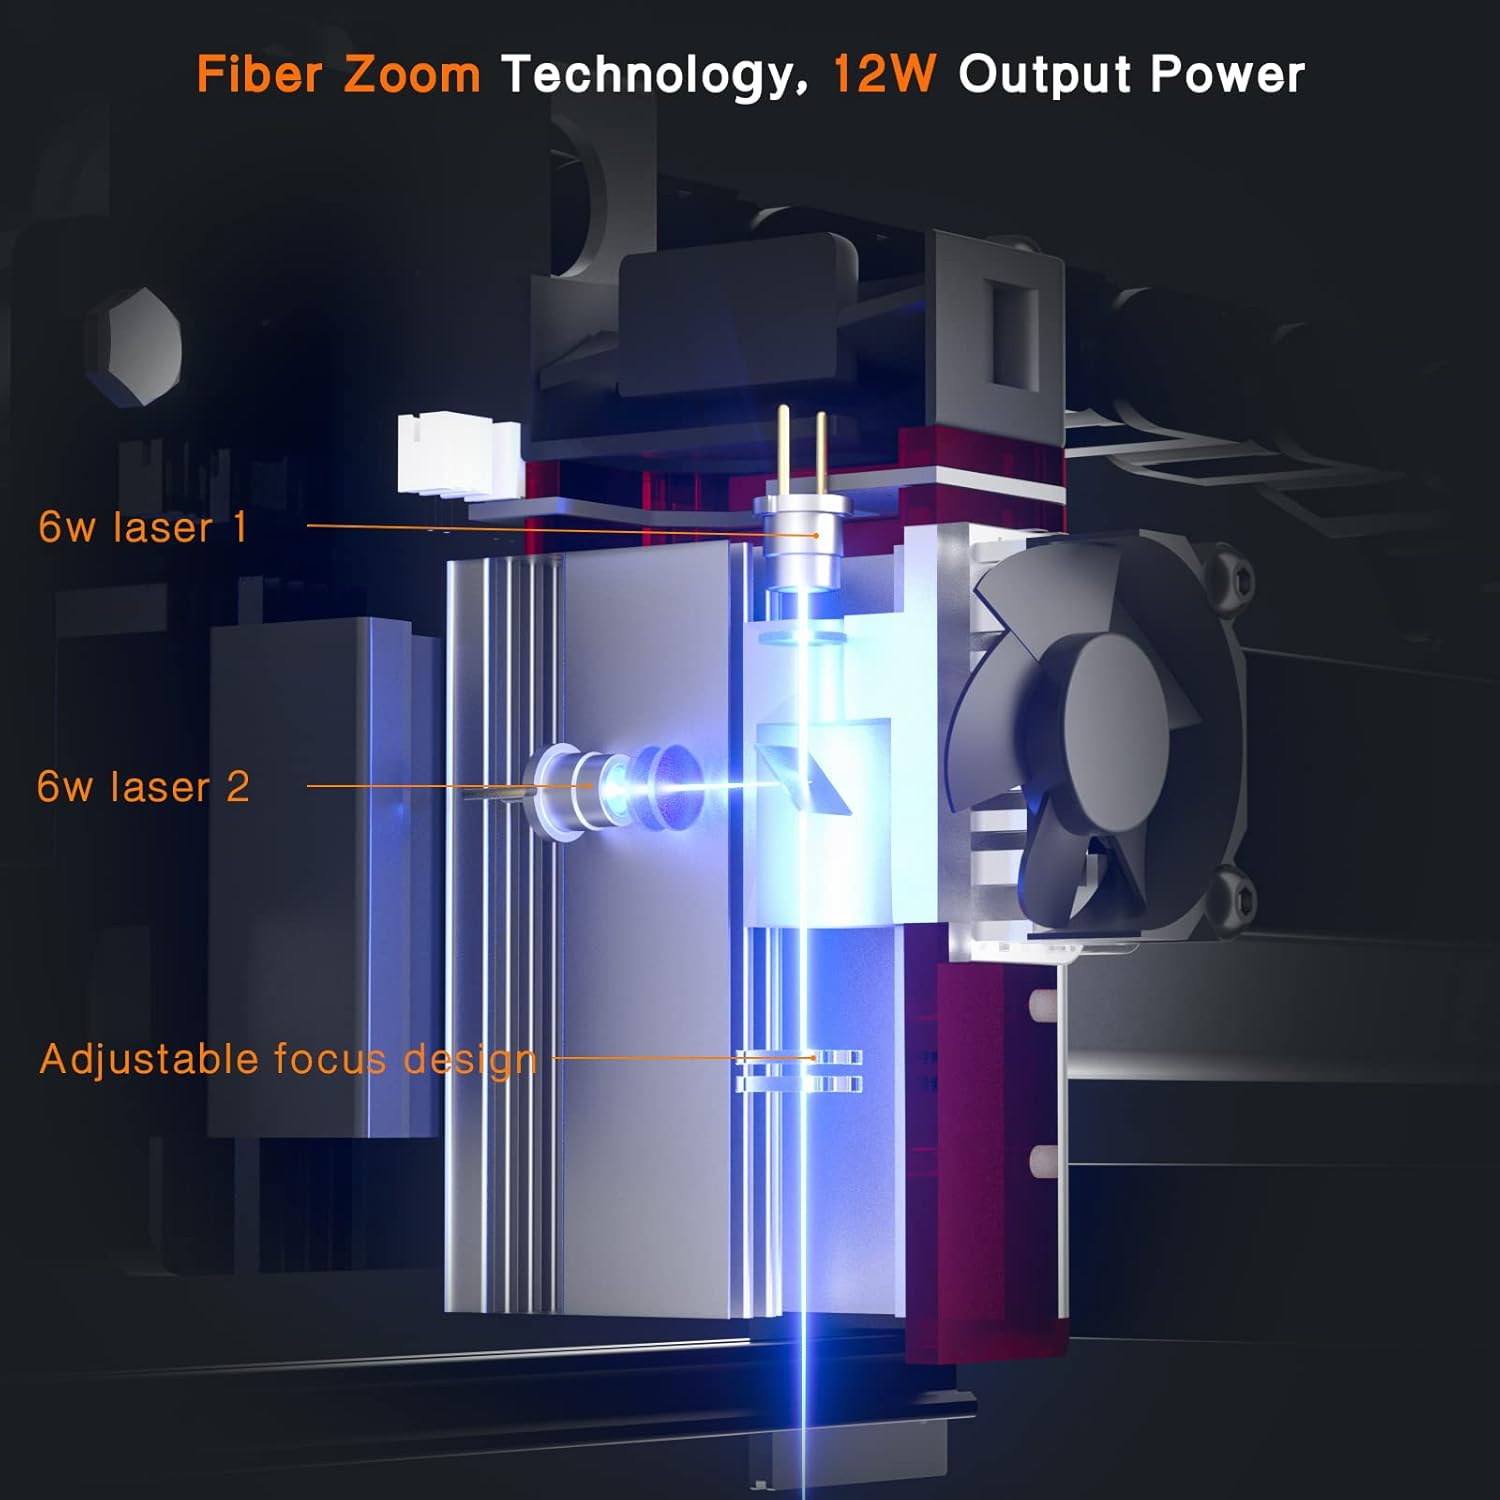
This image illustrates the internal structure of the NEJE laser module, highlighting the dual fan intelligent control system designed for stable power output and efficient cooling.
7. Troubleshooting
If you encounter issues, refer to the following common troubleshooting steps:
- Laser Not Firing: Check all cable connections, especially the power and signal lines. Ensure the power supply meets the 12V 3A-4A requirement. Verify that the software is sending the correct PWM/TTL signal.
- Weak Laser Output/Poor Engraving: Re-check the focus adjustment. Ensure the lens is clean. Verify that the laser power settings in your software are appropriate for the material.
- Inconsistent Cutting: Ensure the material is flat and securely held. Check for proper focus across the entire work area. Verify air assist is functioning correctly if cutting.
- Overheating: Ensure the fan is operating and not obstructed. Check ambient temperature of the workspace.
For complex issues or problems not resolved by these steps, please contact NEJE customer support.
8. Specifications
| Model Number | E40 |
| Optical Output Power | 15W |
| Input Power | 40W |
| Wavelength | 445-450 nm |
| Input (PWM/TTL) | DC3.3V-12V |
| Recommended Power Supply | 12V 3A-4A |
| Cooling Fan | 10000 rpm 40mm |
| Diode Type | Original Osram 5.6mm |
| Dimensions (Package) | 17.1 x 10.9 x 6.6 cm |
| Weight (Product) | 490 g |
9. Warranty and Support
9.1 Warranty Information
NEJE Master 2S/Plus/Max engraving machines and module series, including the E40 module, are covered by a 2-year free warranty from the date of purchase. This warranty covers manufacturing defects and malfunctions under normal use.
9.2 Customer Support
If you have any questions, require technical assistance, or need to claim warranty service, please contact NEJE customer support directly. Our professional customer service team is available to help resolve your concerns at any time.
Please refer to the contact information provided in your product packaging or on the official NEJE website for the most up-to-date support channels.