
Introduction
This instruction manual provides comprehensive guidance for the installation, operation, and maintenance of your JDO 6-Setting High Pressure Handheld Shower Head. Please read this manual thoroughly before installation and use to ensure proper function and longevity of your product. Keep this manual for future reference.
Safety Information
- Ensure water supply is turned off before beginning installation to prevent leaks or water damage.
- Do not overtighten connections, as this may damage components. Hand-tightening is sufficient for most connections.
- Use only the provided components or compatible replacements.
- Keep small parts away from children to prevent choking hazards.
- If you encounter any difficulties or leaks, refer to the troubleshooting section or contact customer support.
Package Contents
Verify that all components listed below are present in your package:
- Hand Held Shower Head x 1
- Shower Arm Mount x 1
- Stainless Steel Shower Hose (59 Inches) x 1
- Anti-leakage Teflon Tape x 1
- Extra Rubber Washer x 1
- Installation Guide x 1
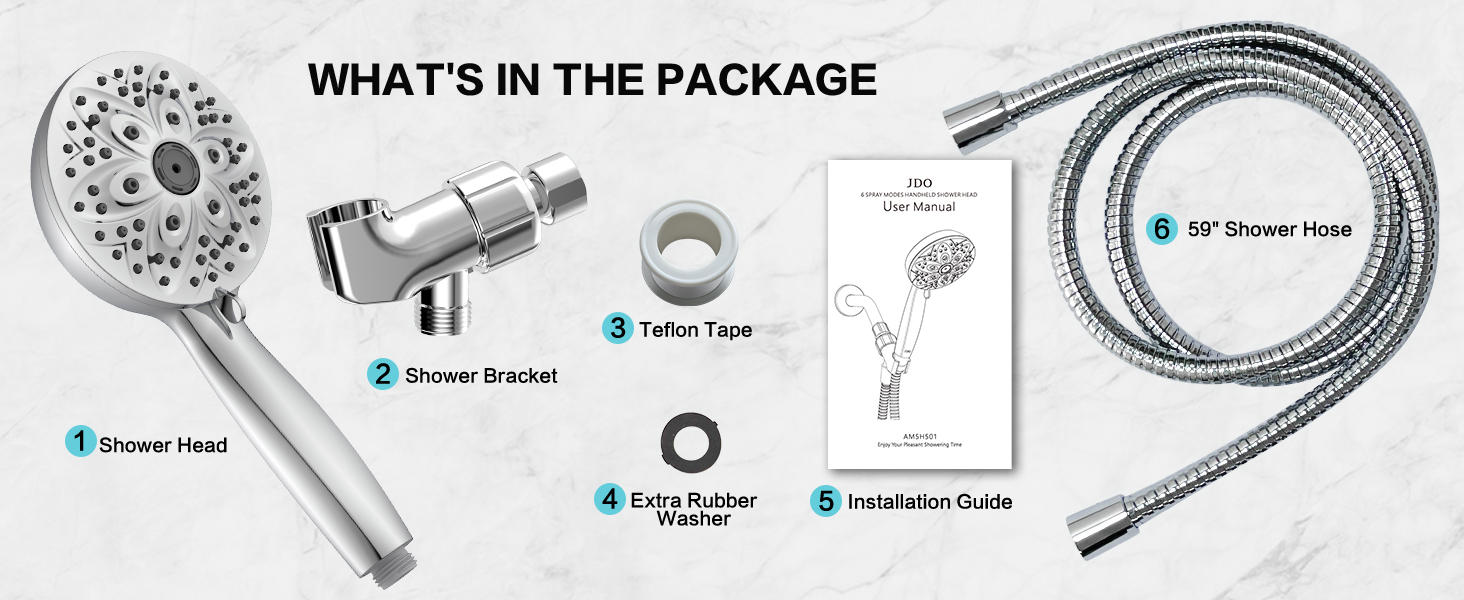
Figure 1: Contents of the JDO Shower Head Package
Setup and Installation
The JDO shower head is designed for quick and easy installation, typically taking less than 1 minute without the need for special tools. Follow these steps for a secure and leak-free setup:
- Prepare the Shower Arm: Ensure your existing shower arm is clean and free of debris. Remove any old shower head.
- Apply Teflon Tape: Wrap the anti-leakage Teflon tape clockwise around the threads of your shower arm. Apply 3-5 wraps for a good seal.
- Install Shower Arm Mount: Hand-tighten the shower arm mount onto the shower arm. Ensure the rubber washer is properly seated inside the mount's connection. Do not overtighten.
- Connect Shower Hose to Mount: Connect one end of the 59-inch stainless steel shower hose to the shower arm mount. Ensure the rubber washer is inside the hose nut. Hand-tighten securely. Note: Remove any plastic covers at both ends of the hose before installation.
- Connect Shower Head to Hose: Connect the handheld shower head to the other end of the shower hose. Ensure the rubber washer is inside the hose nut. Hand-tighten securely.
- Test for Leaks: Turn on the water supply and check all connections for leaks. If leaks occur, gently tighten the connections further or reapply Teflon tape.

Figure 2: Adjustable Shower Bracket with Brass Swivel Ball Joint

Figure 3: Durable 59-inch Stainless Steel Shower Hose Features
Operating Instructions
Your JDO shower head features 6 distinct spray patterns to customize your showering experience. To change the spray mode, simply slide and turn the showerhead dial located on the face of the shower head.
Spray Modes:
- Rain: A gentle, full-coverage spray for a relaxing shower.
- Massage: A focused, pulsating stream for muscle relief.
- Mist: A fine, soft mist for a refreshing sensation.
- Spray: A powerful, concentrated spray for rinsing.
- Mixed Modes: Combinations of the above for varied experiences (e.g., Rain & Massage, Rain & Mist).
- Water-Saving Mode: Pauses water flow, ideal for conserving water while shampooing or soaping up.

Figure 4: 6 Spray Settings and High Pressure Performance
Maintenance
Regular cleaning will help maintain the performance and appearance of your JDO shower head. The shower head is equipped with 54 anti-clog silicone nozzles designed for easy cleaning.
- Cleaning Nozzles: To remove mineral buildup or limescale from the silicone nozzles, simply rub them with your finger or a soft cloth. This dislodges any deposits and restores full water flow.
- General Cleaning: Wipe the shower head and hose with a soft, damp cloth and mild soap. Avoid abrasive cleaners, harsh chemicals, or scouring pads, as these can damage the chrome finish.
- Hose Care: Periodically check the shower hose for any kinks or damage. Ensure it is not excessively twisted during use.

Figure 5: Easy-to-Clean Silicone Nozzles
Troubleshooting
If you encounter any issues with your JDO shower head, refer to the table below for common problems and solutions:
| Problem | Possible Cause | Solution |
|---|---|---|
| Water leaks from connections | Loose connections, missing/damaged rubber washers, insufficient Teflon tape. | Ensure all connections are hand-tightened. Check that rubber washers are properly seated. Reapply Teflon tape if necessary. |
| Low water pressure | Clogged nozzles, low household water pressure. | Clean the silicone nozzles by rubbing them. Check your home's main water supply. |
| Difficulty changing spray modes | Mineral buildup in the spray dial mechanism. | Run hot water through the shower head for a few minutes. Gently try to turn the dial. If persistent, a mild descaling solution might be needed (follow product instructions carefully). |
| Hose appears damaged or leaking | Wear and tear, improper handling. | Inspect the hose for visible damage. If damaged, replacement may be necessary. Ensure the hose is not kinked during use or storage. |
Specifications
| Feature | Detail |
|---|---|
| Brand | JDO |
| Model Number | AM5H501CP |
| Style | 6 Modes |
| Color | Chrome |
| Shape | Round |
| Material | Acrylonitrile Butadiene Styrene (ABS) |
| Finish Type | Polished |
| Installation Type | Wall Mounted |
| Product Dimensions | 10"L x 4.7"W |
| Number of Settings | 6 |
| Hose Length | 59 Inches |
| Item Weight | 1.37 pounds |
| Special Features | Adjustable Shower Head, Detachable Shower Head, High Pressure Shower Head, Shower Head Set with Shower Head Holder, Shower Head with Hose |
| UPC | 764784696551 |
Warranty and Support
Your JDO 6-Setting High Pressure Handheld Shower Head comes with a 12-month warranty from the date of purchase, covering manufacturing defects and material flaws under normal use.
For warranty claims, technical support, or any questions regarding your product, please contact JDO customer service through the official JDO Store on Amazon or refer to the contact information provided in your original purchase documentation.
You can visit the official JDO Store for more products and support: JDO Store