1. Product Overview
The TNP Bluetooth Remote Control is a versatile device designed to enhance interaction with your digital devices. It features a trackpad for cursor control, dedicated media buttons, a camera shutter function, and presentation control capabilities. This remote is compatible with a wide range of operating systems, including iOS, iPadOS, macOS, Android, and Windows.

Figure 1: Front view of the TNP Bluetooth Remote Control.
2. Package Contents
- TNP Bluetooth Remote Control
- USB-C Charging Cable
- User Manual (this document)
3. Setup and Pairing
3.1 Charging the Remote
Before initial use, fully charge the remote control. Connect the supplied USB-C charging cable to the remote's USB-C port and the other end to a standard USB power source (e.g., computer USB port, wall adapter). The charging indicator light will show the charging status.

Figure 2: Charging the remote control via USB-C.
3.2 Bluetooth Pairing
- Ensure the remote control is sufficiently charged.
- Turn on the remote control using the power switch (if available, otherwise it's usually always on or wakes up with a button press).
- Press and hold the Pairing/Battery button until the indicator light begins to flash, indicating it is in pairing mode.
- On your device (iPad, iPhone, Mac, Android tablet, PC), navigate to the Bluetooth settings.
- Search for available devices. The remote should appear as "TNP Remote" or similar.
- Select the remote control from the list to complete the pairing process. The indicator light on the remote will stop flashing and remain solid or turn off, confirming a successful connection.
Note for iOS Users: For full functionality, ensure your iOS device meets the minimum system requirements specified by TNP Products. This typically involves enabling AssistiveTouch for cursor control.
4. Operating Instructions
The TNP Bluetooth Remote Control offers multiple modes and functions for various applications.

Figure 3: Remote control button layout and functions.
4.1 Mode Switching
The remote supports different operational modes. Use the Mode button to cycle through them:
- Multimedia Mode: For controlling audio/video playback.
- Trackpad / Mouse Mode: For cursor navigation and scrolling.
- Camera Shutter Mode: For remote photo taking.

Figure 4: Universal support and mode selection.
4.2 Trackpad and Cursor Control
In Trackpad/Mouse Mode, the top surface acts as a trackpad.
- Move Cursor: Swipe your finger across the trackpad surface to move the cursor on your device's screen.
- Scrolling: Use specific gestures on the trackpad for vertical or horizontal scrolling, similar to a laptop trackpad.
- Click: Press down on the trackpad surface to perform a left-click action.

Figure 5: Scroll and swipe functionality with precision.

Figure 6: Trackpad gestures for various workflows.
4.3 Media Controls
In Multimedia Mode, use the dedicated media buttons:
- Play/Pause: Central button with play/pause icon.
- Volume Up/Down: '+' and '-' buttons.
- Previous/Next Track: Left and right arrow buttons with skip icons.
4.4 Camera Shutter
In Camera Shutter Mode, the remote acts as a wireless trigger for your device's camera.
- Open your device's camera application.
- Press the designated camera shutter button (often the Play/Pause button or a specific arrow key, depending on the device and mode) to take a photo or start/stop video recording.

Figure 7: Remote control used as a camera shutter.
4.5 Presentation Clicker
The remote can function as a presentation clicker for applications like PowerPoint or Keynote.
- Connect the remote to your presentation device (MacBook, PC, tablet).
- Use the directional arrow keys to navigate slides forward or backward.
- The trackpad can be used for cursor control during presentations.
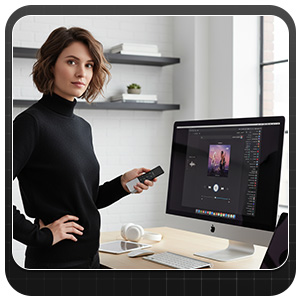
Figure 8: Remote control used for presentations.
4.6 iOS Home Button and Siri Activation
- The remote includes an iOS Home button function to switch between applications.
- Hold down the Home button for approximately 2 seconds to activate Siri on compatible iOS devices.
5. Maintenance
5.1 Cleaning
To clean the remote, use a soft, dry cloth. Avoid using harsh chemicals, solvents, or abrasive materials, as these may damage the device's surface or internal components.
5.2 Storage
Store the remote control in a cool, dry place away from direct sunlight and extreme temperatures. If storing for an extended period, ensure the battery is partially charged (around 50%) to prolong its lifespan.
6. Troubleshooting
- Remote not pairing:
- Ensure the remote is charged.
- Confirm Bluetooth is enabled on your device.
- Make sure the remote is in pairing mode (indicator light flashing).
- Try restarting both the remote and your device.
- Forget the device in your Bluetooth settings and attempt to re-pair.
- Trackpad or buttons unresponsive:
- Check battery level.
- Ensure the remote is within Bluetooth range of your device.
- Verify the remote is in the correct operating mode for the desired function.
- For iOS devices, confirm AssistiveTouch is enabled for cursor control.
- Intermittent connection:
- Reduce distance between the remote and your device.
- Avoid obstacles that may interfere with the Bluetooth signal.
- Minimize other active Bluetooth devices in the vicinity.
7. Specifications
| Product Dimensions | 5.62 x 2.4 x 0.9 inches |
| Item Weight | 2.41 ounces |
| Bluetooth Version | 5.0 |
| Max Supported Devices | 3 |
| Compatible Devices | iOS, iPadOS, macOS, Android, Windows (Smartphones, Tablets, PCs) |
| Color | Black, White |
| Manufacturer | TNP Products |
8. Warranty and Support
8.1 Warranty Information
TNP Products offers a limited warranty for this device. Please refer to the warranty card included with your purchase or visit the official TNP Products website for detailed warranty terms and conditions.
8.2 Customer Support
For technical assistance, troubleshooting, or product inquiries, please contact TNP Products customer support through their official website or the contact information provided with your purchase.