1. Introduction
The AmicoPower MMA-180A is an advanced DC inverter welder designed for both Stick (Manual Metal Arc) and Lift-TIG welding processes. This machine utilizes IGBT inverter technology to provide a stable and concentrated arc, making it suitable for various welding tasks. This manual provides essential information for the safe operation, proper setup, routine maintenance, and effective troubleshooting of your welding machine.
2. Safety Instructions
Always prioritize safety when operating welding equipment. Failure to follow safety guidelines can result in serious injury or property damage.
- Eye and Face Protection: Always wear a welding helmet with appropriate shade lenses to protect your eyes and face from arc flash and sparks.
- Protective Clothing: Wear flame-resistant clothing, welding gloves, and sturdy footwear to protect against burns and electrical shock.
- Ventilation: Ensure adequate ventilation in the work area to disperse welding fumes, which can be hazardous if inhaled.
- Electrical Safety: Never operate the welder in wet conditions. Ensure all electrical connections are secure and properly grounded. Do not touch live electrical parts.
- Fire Prevention: Keep a fire extinguisher nearby. Remove all flammable materials from the welding area. Sparks and hot metal can cause fires.
- Work Area: Maintain a clean and organized work area. Avoid welding near pressurized containers or combustible materials.
- Read Manual: Read and understand this entire manual before operating the welding machine.
3. Package Contents
Verify that all items listed below are included in your package. If any items are missing or damaged, contact your supplier immediately.
- AmicoPower MMA-180A Stick Arc Welding Machine
- 8 feet Power Cord with N6-50P plug (attached to machine)
- 230V to 115V Power Adapter
- 300 Amp Electrode Holder with 10 feet Cable (35-50 mm Connect)
- 300 Amp Work Clamp with 10 feet Cable (35-50 mm Connect)
- 2 Pieces of 3/32 inch Electrodes
- 2 Pieces of 1/8 inch Electrodes
- Owner’s Manual (this document)
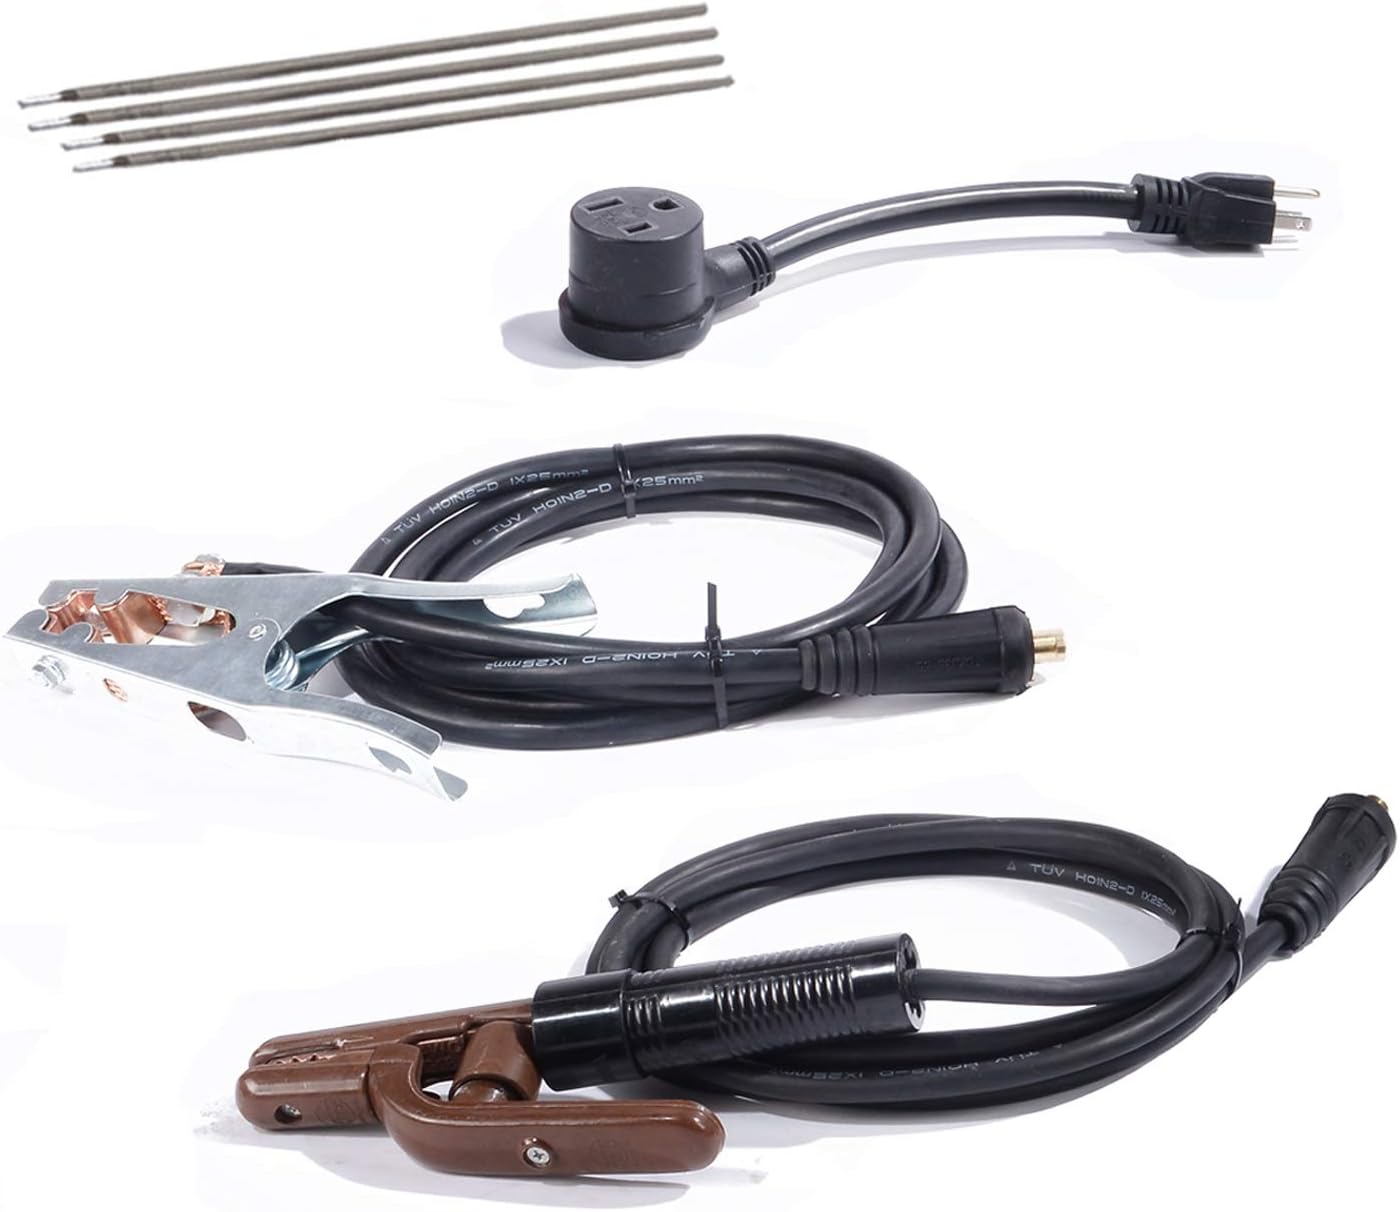
Figure 3.1: Included accessories for the AmicoPower MMA-180A welder. This image displays the power adapter, electrode holder, work clamp, and sample electrodes.
4. Product Overview
Familiarize yourself with the main components and controls of your MMA-180A welding machine.

Figure 4.1: Front panel of the AmicoPower MMA-180A welder. Key controls include the digital display, current adjustment knob, arc force adjustment knob, power indicator, and output terminals.
Front Panel Controls:
- Digital Display: Shows the set welding current (Amps).
- Current Adjustment Knob: Used to set the desired welding current (15-180 Amps).
- Arc Force Adjustment Knob: Controls the arc force, which helps prevent the electrode from sticking and improves arc stability.
- Power Indicator (Green LED): Illuminates when the machine is powered on.
- O.C. (Over Current/Overload) Indicator (Red LED): Illuminates if the machine overheats or experiences an overload, indicating the thermal protection is active.
- Output Terminals (+ and -): Connect the electrode holder and work clamp cables here.

Figure 4.2: Rear panel of the AmicoPower MMA-180A welder. This view shows the main power switch, cooling fan, and power cord connection.
Rear Panel Components:
- Power Switch: Turns the welding machine ON or OFF.
- Cooling Fan: Provides necessary airflow to cool the internal components during operation.
- Power Cord: Connects the machine to the main power supply.
5. Setup
Follow these steps for the initial setup of your welding machine.
5.1 Power Connection
- Ensure the power switch on the rear panel is in the OFF position.
- The MMA-180A supports wide voltage input (AC 100~250V, 50-60Hz).
- For 230V operation, connect the attached N6-50P plug directly to a compatible 230V outlet.
- For 115V operation, use the provided 230V to 115V power adapter. Connect the N6-50P plug to the adapter, then plug the adapter into a compatible 115V outlet.
- Ensure the power source is capable of providing the necessary amperage (e.g., 32A for 230V, 45A for 115V).
5.2 Connecting Welding Cables
- Connect the electrode holder cable to the positive (+) output terminal on the front panel. Twist to secure.
- Connect the work clamp cable to the negative (-) output terminal on the front panel. Twist to secure.
- Attach the work clamp securely to the workpiece or welding table, ensuring good electrical contact.
5.3 Electrode Installation
- Select an appropriate electrode for your welding task (e.g., 3/32 in. or 1/8 in. as provided, or other compatible electrodes).
- Insert the bare end of the electrode into the jaws of the electrode holder. Ensure it is held firmly.
6. Operating Instructions
This section details the operation of the MMA-180A for Stick (MMA) and Lift-TIG welding.
6.1 Powering On
- After completing the setup, turn the power switch on the rear panel to the ON position.
- The green Power LED on the front panel will illuminate, and the digital display will show the current setting.
6.2 Stick (MMA) Welding
- Current Adjustment: Rotate the Current Adjustment Knob to set the desired welding amperage. Refer to electrode manufacturer guidelines for recommended current settings.
- Arc Force Adjustment: Adjust the Arc Force Knob. Higher settings provide a more aggressive arc, which can help prevent sticking, especially with certain electrodes or in specific positions. Lower settings result in a softer arc.
- Striking an Arc: Gently scratch the electrode against the workpiece to initiate the arc. Maintain a consistent arc length and travel speed for optimal results.
- Duty Cycle: The MMA-180A has a rated duty cycle of 60% at 180 Amps (230V) or 140 Amps (115V). This means it can weld continuously for 6 minutes out of every 10-minute period at the maximum rated current before requiring a 4-minute cool-down. Exceeding the duty cycle will activate the thermal overload protection (O.C. indicator).
6.3 Lift-TIG Welding (Optional)
The MMA-180A supports Lift-TIG welding. To perform Lift-TIG welding, a separate TIG torch with a gas valve and a suitable shielding gas cylinder (e.g., Argon) are required (not included in this package).
- Connect the TIG torch to the negative (-) terminal and the work clamp to the positive (+) terminal.
- Ensure shielding gas is flowing from the TIG torch.
- Gently touch the tungsten electrode to the workpiece to initiate the arc (Lift-Arc). Lift the torch slightly to establish the arc and begin welding.
7. Maintenance
Regular maintenance ensures the longevity and optimal performance of your welding machine.
- Cleaning: Periodically clean the machine's exterior with a dry, soft cloth. Use compressed air to blow out dust and debris from the cooling vents. Ensure the machine is unplugged before cleaning.
- Cable Inspection: Regularly inspect welding cables, electrode holder, and work clamp for damage, frayed wires, or loose connections. Replace damaged components immediately.
- Storage: Store the welding machine in a clean, dry environment, away from excessive dust, moisture, and corrosive materials.
- Fan Operation: Ensure the cooling fan operates freely and is not obstructed.
8. Troubleshooting
This section addresses common issues you might encounter during operation.
| Problem | Possible Cause | Solution |
|---|---|---|
| Machine does not power on | No power from outlet; Power cord damaged; Power switch off | Check power outlet and circuit breaker; Inspect power cord; Ensure power switch is ON |
| No welding arc | Loose cable connections; Poor work clamp contact; Incorrect current setting; Wet electrode | Tighten all cable connections; Ensure good contact for work clamp; Adjust current; Use dry electrodes |
| O.C. (Overload) indicator is on | Exceeded duty cycle; Insufficient ventilation; Overcurrent | Allow machine to cool down; Ensure clear airflow to vents; Reduce welding current |
| Electrode sticks frequently | Low current setting; Insufficient arc force; Incorrect electrode angle | Increase current; Increase arc force; Adjust electrode angle and technique |
9. Specifications
Technical specifications for the AmicoPower MMA-180A welding machine.
| Feature | Specification |
|---|---|
| Model | MMA-180A |
| Rated Input Voltage | AC 100~250V |
| Frequency | 50~60Hz |
| Rated Input Power (230V) | 7.4KVA / 32A |
| Rated Input Power (115V) | 5.2KVA / 45A |
| Current Range (230V) | 15-180 Amp |
| Current Range (115V) | 15-140 Amp |
| Rated Duty Cycle (230V) | 60% @ 180 Amp |
| Rated Duty Cycle (115V) | 60% @ 140 Amp |
| Nominal DC Open Circuit Voltage | 76V |
| Usable Electrode (230V) | 1/16~3/16 in. |
| Usable Electrode (115V) | 1/16~5/32 in. |
| Power Factor | 0.93 |
| Dimensions (L x W x H) | 16.5 x 8.5 x 13.5 in. (Product) / 16 x 7.5 x 13 inches (Product) |
| Net Weight | 18.0 lbs. |
| Material | Metal |
| Certification | ETL Listed |