1. Introduction and Overview
The Vividia FM-120 is a versatile USB digital forensic magnifier camera designed for detailed examination of documents and other materials. It connects directly to various computing devices, providing magnified views and the ability to capture images and videos. This device is equipped with multiple specialized light sources to reveal features not visible under normal light, making it an essential tool for forensic analysis, counterfeit detection, and quality control.
Key Features:
- USB connectivity for Windows, Mac, Chromebook, and Android devices.
- Magnification range of 30x to 50x, depending on monitor size.
- Seven distinct light sources: UVA (365nm), UVC (254nm), Infrared (IR), Blue (470nm), Laser (980nm), White Top, White Side, and White Crossed.
- Ability to capture still images and record videos using compatible software.
- Large view area of approximately 12mm x 9mm for comprehensive inspection.
Important Safety Note: The UVC light (254nm) emitted by this device is extremely harmful to eyes. Never look directly into the light source from the bottom of the magnifier when UVC is active.
2. Setup Instructions
Follow these steps to set up your Vividia FM-120 USB Digital Forensic Magnifier Camera:
- Connect the Magnifier: Plug the USB-A connector of the FM-120 into an available USB port on your computer (Windows, Mac, Chromebook, or Linux) or compatible Android device.
- Install Software (if necessary):
- Windows 11/10: Use the built-in "Camera" application. For older Windows versions (10/8/7/XP), you may need to install third-party software like "Amcap," "Oasis.exe," or "Digital Viewer." These can typically be downloaded from the manufacturer's website.
- MacOS: Use the built-in "PhotoBooth" application or other free USB camera applications available for MacOS.
- Android Devices: Download and install a generic USB camera application such as "USB Camera" or "Endoscope Camera" from the Google Play Store.
- iOS Devices (iPhone/iPad): The FM-120 requires a separately sold WiFi box to connect wirelessly to iOS devices.
- Verify Connection: Once connected and software is launched, you should see the live feed from the magnifier on your device's screen.

Figure 2.1: Vividia FM-120 connected to a laptop, showing a magnified view of a banknote.
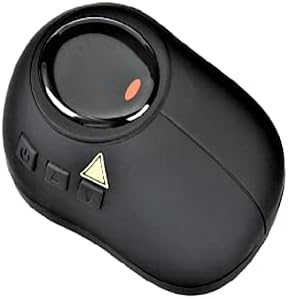
Figure 2.2: Top view of the Vividia FM-120 magnifier.
3. Operating Instructions
The Vividia FM-120 is designed for ease of use. Here’s how to operate it effectively:
3.1 Adjusting Magnification
The magnification range is approximately 30x to 50x, which varies based on the size of your display monitor. To adjust the focus and achieve optimal magnification, gently rotate the focus wheel located on the top of the magnifier until the image on your screen is clear and sharp.
3.2 Selecting Light Sources
The FM-120 features multiple light sources to highlight different forensic features. Use the dedicated buttons on the device to cycle through or activate the desired lighting mode:
- White Light: Standard illumination for general viewing. Options include White Top, White Side, and White Crossed for varying angles of illumination.
- UVA (365nm): Ultraviolet light for detecting fluorescent security features in documents and currency.
- UVC (254nm): Short-wavelength ultraviolet light for advanced forensic analysis. Caution: Extremely harmful to eyes. Do not look directly at the light.
- Infrared (IR): Used to reveal hidden security features, watermarks, or alterations that are visible only under infrared light.
- Blue Light (470nm): Specialized illumination for certain forensic applications, often used in conjunction with filters.
- Laser (980nm): For specific forensic examinations requiring laser illumination.

Figure 3.1: Bottom view of the Vividia FM-120, showing the lens and light sources.
3.3 Capturing Images and Videos
Most compatible USB camera software applications will have options to capture still images and record video footage. Refer to your specific software's user interface for instructions on how to use these functions. Captured files can be saved to your connected device for further analysis or documentation.
3.4 Typical Applications
The Vividia FM-120 is suitable for a range of professional applications:
- Fingerprint analysis
- Banknote and currency detection
- Forensic lab analysis
- Handwriting analysis
- Printed document analysis
- Counterfeit detection and analysis
Video 3.1: Demonstration of the Vividia FM-120 USB Digital Forensic Magnifier in use, showcasing its various light sources and applications for document and banknote examination.

Figure 3.2: Banknote security features visible under UV light.
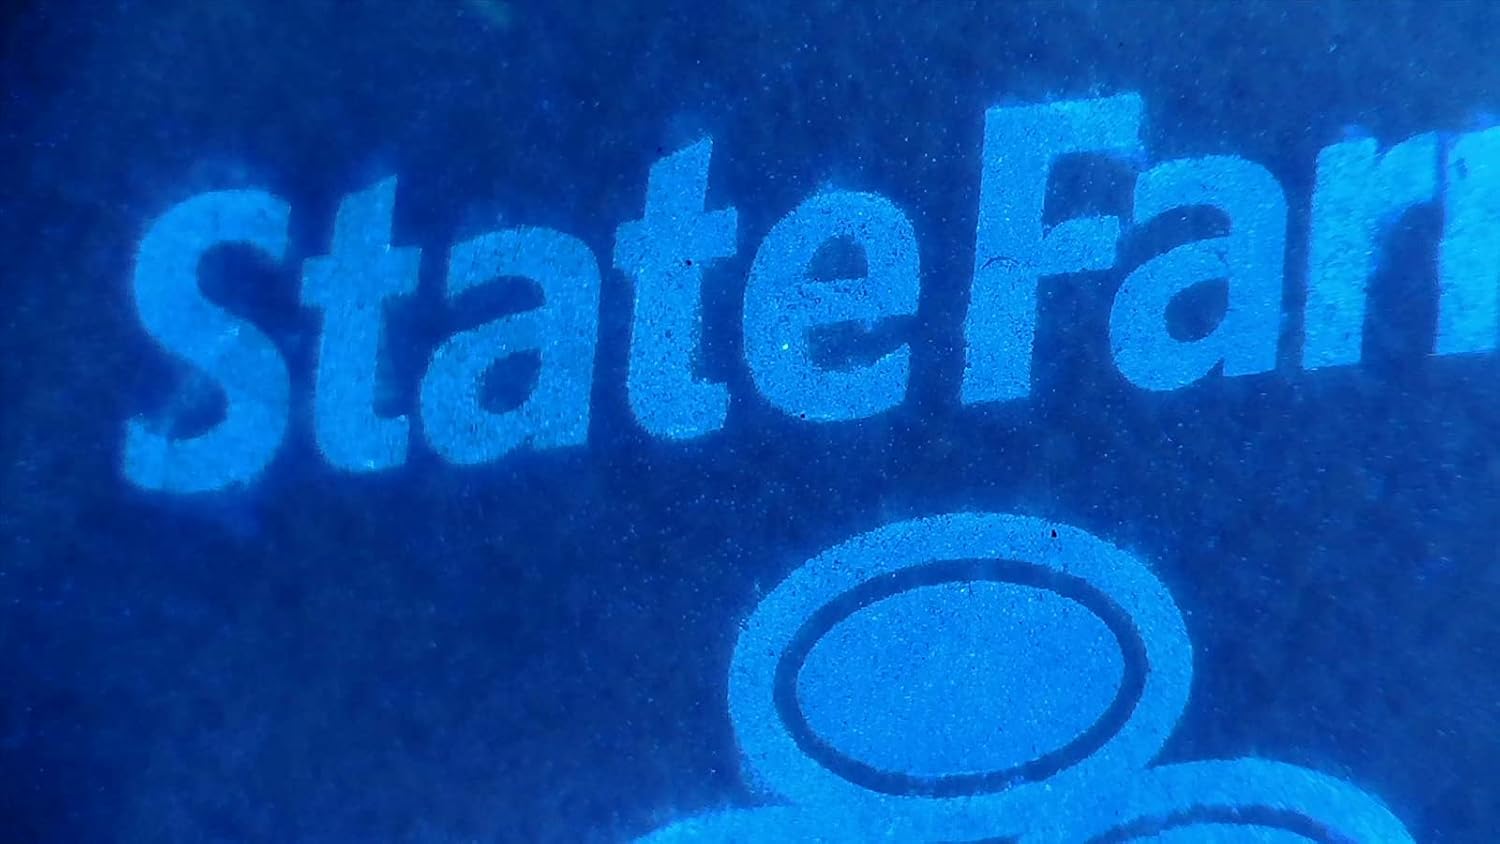
Figure 3.3: Fluorescent features on a document under UV light.
4. Maintenance
Proper maintenance ensures the longevity and optimal performance of your Vividia FM-120:
- Cleaning the Lens: Use a soft, lint-free cloth specifically designed for optical lenses to gently wipe the magnifier's lens. Avoid abrasive materials or harsh chemicals that could scratch or damage the lens coating.
- Cleaning the Body: Wipe the body of the magnifier with a soft, dry cloth. If necessary, a slightly damp cloth can be used, but ensure no moisture enters the device.
- Storage: Store the magnifier in a clean, dry place away from direct sunlight, extreme temperatures, and high humidity. Keep it protected from dust and physical impact.
- Cable Care: Avoid bending or twisting the USB cable excessively to prevent internal damage.
5. Troubleshooting
If you encounter issues with your Vividia FM-120, refer to the following common troubleshooting steps:
- No Image on Screen:
- Ensure the USB cable is securely connected to both the magnifier and your device.
- Verify that the correct camera software or application is open and selected the FM-120 as the input source.
- Try connecting the magnifier to a different USB port or a different computer/device to rule out port or device-specific issues.
- Poor Image Quality/Blurry Image:
- Adjust the focus wheel on the top of the magnifier until the image is clear.
- Ensure the lens is clean and free from dust or smudges.
- Check the lighting conditions. Experiment with different built-in light sources to find the optimal illumination for your subject.
- Lights Not Functioning:
- Confirm the magnifier is properly powered via the USB connection.
- Press the light selection buttons to cycle through the different light sources.
- If only specific lights are not working, contact customer support.
- Software Not Recognizing Device:
- Restart your computer or device.
- Ensure your operating system and camera software are up to date.
- For Windows, check Device Manager to see if the USB camera is listed and drivers are installed correctly.
6. Specifications
| Feature | Specification |
|---|---|
| Model | FM-120 |
| Output Interface | USB 2.0 (USB-A type) |
| Light Sources | White (Top, Side, Crossed), UVA (365nm), UVC (254nm), Infrared (IR), Blue (470nm), Laser (980nm) |
| Magnification | 30x to 50x (dependent on monitor size) |
| View Area | Approximately 12mm x 9mm |
| Power | 5V DC, 300mA |
| Net Weight | 70g |
| Compatible OS | Windows 11/10/8/7/XP/Vista, Mac OS, Linux, Chromebook OS, Android 4.0 and above. (iOS requires separate WiFi box) |
7. Warranty and Support
For warranty information, technical support, or service inquiries regarding your Vividia FM-120 USB Digital Forensic Magnifier Camera, please contact the manufacturer, Vividia Technologies, or the authorized seller, Oasis Scientific Inc. Refer to your purchase documentation for specific warranty terms and contact details.
Manufacturer: Vividia Technologies
Seller: Oasis Scientific Inc.