1. Important Safety Instructions
Please read and understand all instructions before assembling and using this product. Failure to follow these instructions may result in electric shock, fire, or serious injury.
- Ensure the power is off before installation or maintenance.
- Do not connect electricity until your lamp is fully assembled.
- This lamp is intended for indoor use only.
- Use only the specified bulb type and wattage (E26, 8W LED included).
- Keep the lamp away from water and moisture.
- Do not attempt to modify the lamp in any way.
2. Package Contents
Carefully unpack all components and check against the list below. Ensure all parts are present and undamaged before proceeding with assembly.
- Lamp Base
- Lower Pole Section
- Middle Pole Section with Height Adjustment Knob
- Upper Pole Section with Lamp Head
- Metal Lampshade
- Dimmable LED Bulb (E26, 8W)
- Remote Control (AAA batteries not included)
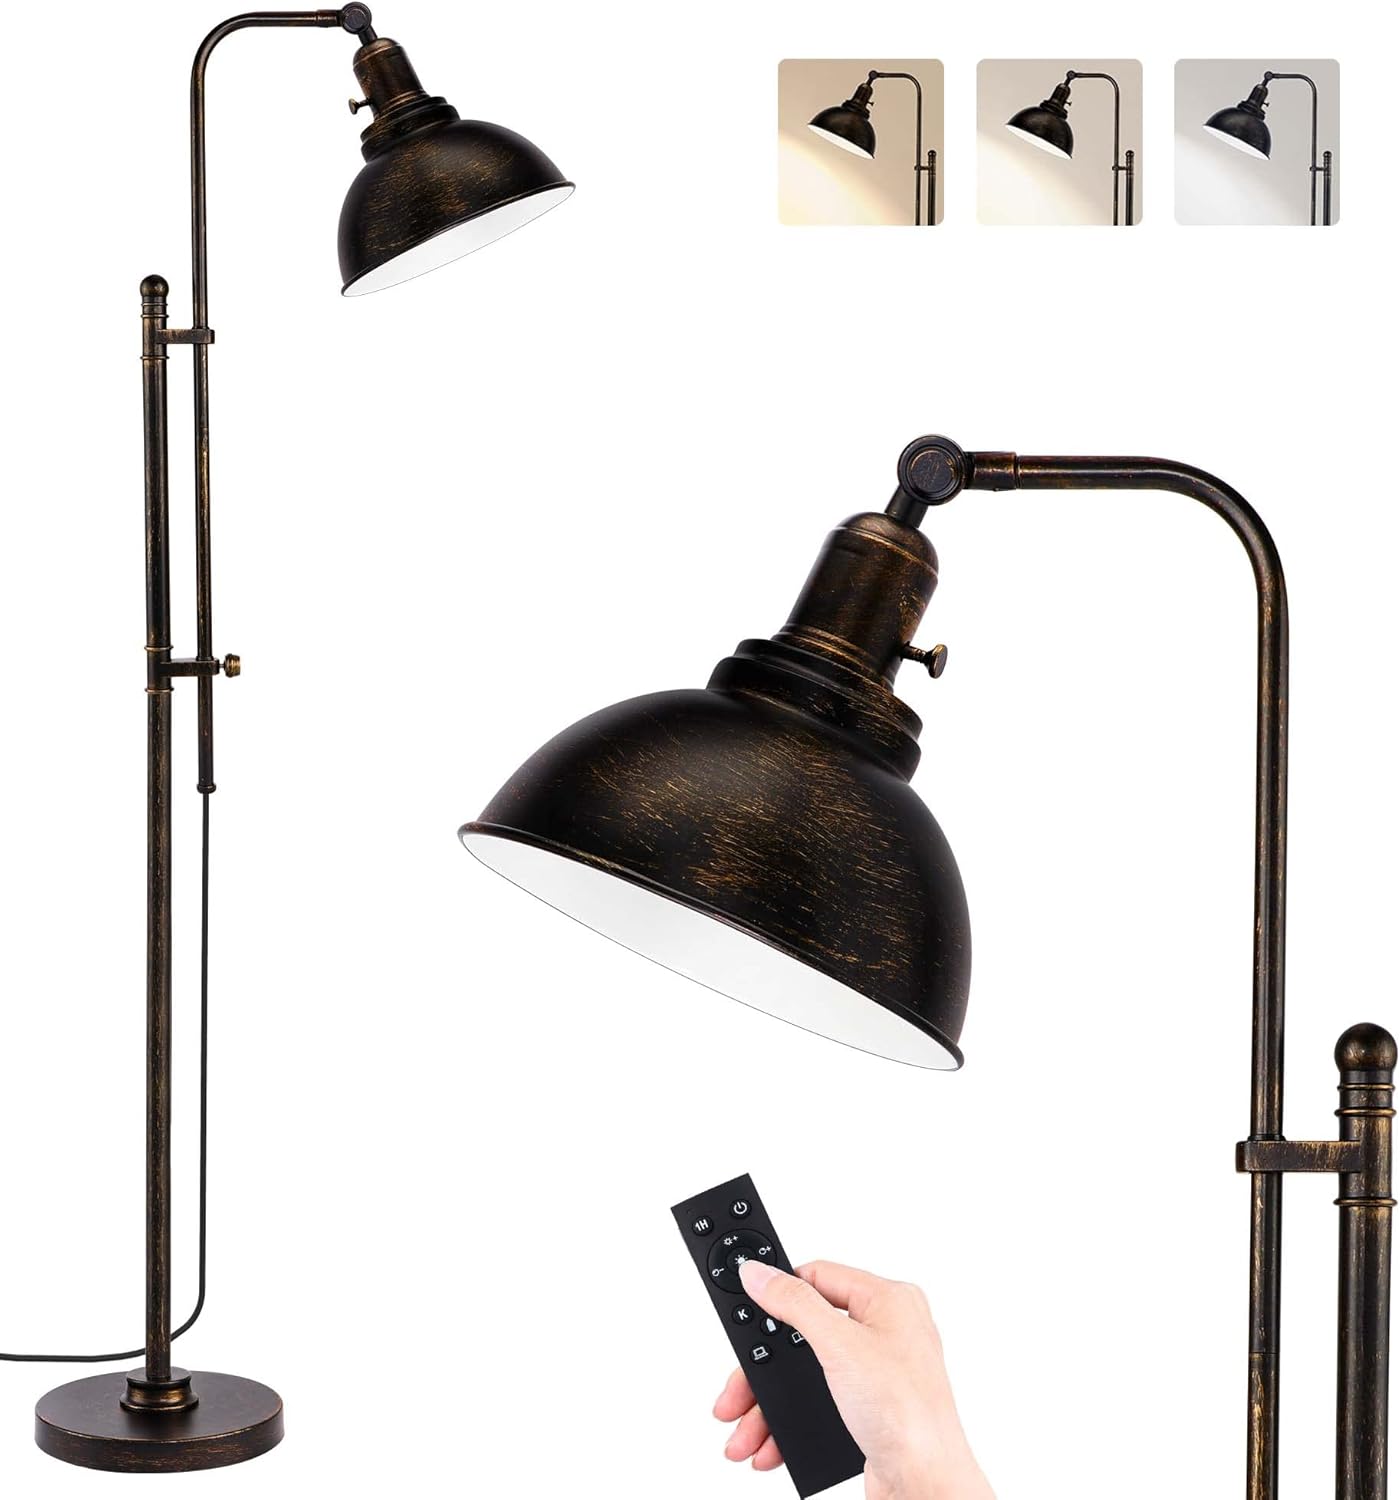
Image: All lamp components for assembly.
3. Assembly Instructions
Follow these steps to assemble your PARTPHONER Industrial Floor Lamp:
- Attach the Lower Pole to the Base: Carefully screw the lower pole section into the lamp base until secure.
- Connect Middle and Upper Pole Sections: Thread the middle pole section onto the lower pole, then attach the upper pole section (with the lamp head) to the middle pole. Ensure all connections are tight.
- Install the Lampshade: Screw the metal lampshade onto the lamp head socket.
- Insert the LED Bulb: Carefully screw the provided E26 LED bulb into the lamp socket. Do not overtighten.
- Connect to Power: Plug the power cord into a standard electrical outlet.
Video: Visual guide for lamp assembly and initial setup.
4. Operating Instructions
Your PARTPHONER Industrial Floor Lamp can be operated using the integrated rotary switch or the included remote control.
4.1. Using the Rotary Switch
The rotary switch is located on the lamp head. Turn the knob clockwise to turn the lamp ON and counter-clockwise to turn it OFF. This switch provides basic on/off functionality.

Image: Detail of the rotary switch on the lamp head.
4.2. Using the Remote Control
The remote control offers advanced features including dimming, color temperature adjustment, and scene modes. Insert 2 AAA batteries (not included) into the remote before use.
- Power Button: Turns the lamp ON/OFF.
- Brightness Adjustment (+/-): Increases or decreases the light intensity.
- Color Temperature Adjustment (K+/-): Changes the light color from warm (3000K) to cool (6500K).
- Color Temperature Switch: Cycles through preset color temperatures (3000K, 4000K, 5000K, 6500K).
- Scene Modes: Includes preset modes for reading, night light, and other ambient settings.
- Timer (1H): Sets a 1-hour timer for automatic shut-off.

Image: Remote control functions.

Image: Different color temperature settings.
5. Adjustments
The lamp offers flexibility in height and lampshade angle to suit your lighting needs.
5.1. Height Adjustment
To adjust the lamp's height, loosen the rotary switch on the middle pole section. Extend or retract the upper pole to the desired height (between 51.3 inches and 66.1 inches), then tighten the rotary switch to secure it.
5.2. Lampshade Angle Adjustment
The lampshade can be swiveled up to 220 degrees. Gently adjust the lampshade to direct light as needed for reading, ambient lighting, or highlighting specific areas.

Image: Lamp height and angle adjustability.
6. Maintenance
6.1. Cleaning
To clean the lamp, ensure it is unplugged and completely cool. Wipe with a soft, dry cloth. Do not use abrasive cleaners or solvents, as these may damage the finish.
6.2. Bulb Replacement
The lamp uses an E26 base bulb. If the included LED bulb needs replacement, ensure the lamp is unplugged and the bulb is cool before unscrewing the old bulb and installing a new one. Use an E26 LED bulb with a maximum wattage of 60W (or equivalent LED wattage).
7. Troubleshooting
- Lamp does not turn on:
- Check if the power cord is securely plugged into the outlet.
- Ensure the bulb is screwed in correctly and is not faulty.
- Verify the wall switch (if applicable) is in the ON position.
- Remote control not working:
- Check if the remote control batteries are installed correctly and are not depleted. Replace if necessary.
- Ensure there are no obstructions between the remote and the lamp.
8. Specifications
| Product Dimensions | 9.2"D x 10.2"W x 66.1"H (Adjustable height: 51.3" to 66.1") |
| Item Weight | 13.47 Pounds |
| Base Material | Metal |
| Finish Type | Painted (Aged Black) |
| Bulb Base | E26 |
| Included Bulb | 8W LED Dimmable (1000 lumens, 3000K-6500K) |
9. Warranty and Support Information
PARTPHONER provides a 24-month quality service for this product. If you encounter any quality issues or require assistance, please contact us directly via the Amazon message box or the email address provided in your purchase documentation. We are committed to resolving any concerns within 24 hours.