1. Introduction
This manual provides comprehensive instructions for using TransOurDream Glitter 2.0 Heat Transfer Paper. Follow these guidelines to achieve optimal results when creating custom designs on various fabrics.
2. Product Overview
TransOurDream Glitter 2.0 Heat Transfer Paper is designed for inkjet printers, allowing you to transfer vibrant, glitter-enhanced designs onto both light and dark fabrics. The paper is compatible with standard inkjet printers and offers durable, machine-washable results when properly applied.

Image: TransOurDream Glitter 2.0 Heat Transfer Paper packaging, showcasing the product and a sample glitter design on a T-shirt.
3. Safety Information
Always exercise caution when working with heat sources such as irons or heat presses. Ensure adequate ventilation and keep heat application devices away from flammable materials. Keep the product out of reach of children.
4. Package Contents
- 20 sheets of 8.5x11" TransOurDream Glitter 2.0 Heat Transfer Paper
- 2 sheets of 11x17" reusable Teflon Paper
5. Requirements
To use this product, you will need the following:
- Inkjet Printer: Compatible with standard inkjet printers (e.g., HP, Brother, Canon).
- Ink Type: Pigment ink or dye ink. Do not use sublimation ink.
- Cutting Tool: Scissors or a cutting machine.
- Heat Application Device: Household iron or a heat press machine.
- Teflon Paper: Included in the package.
- Fabric: 100% cotton fabrics are recommended. For poly-blend cotton or other fabrics, perform a test first.
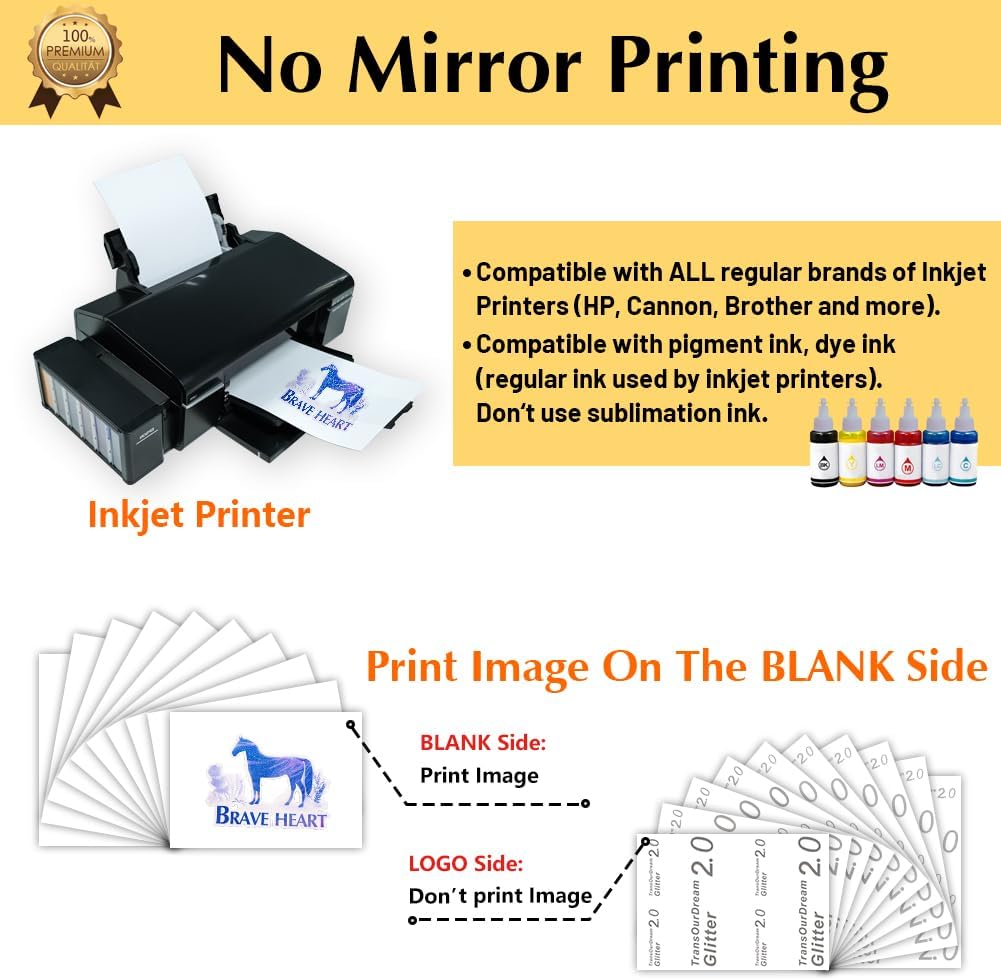
Image: An inkjet printer with ink cartridges, illustrating the compatible printing method. Note: No mirror printing is required.
6. Operating Instructions
Follow these steps carefully for successful heat transfer:
- Print Your Design:
Print your desired image onto the blank side of the transfer paper. Do not mirror the image. Ensure your printer settings are appropriate for photo paper or heavy paper for best ink saturation.

Image: A design being printed on the transfer paper.
- Cut Out and Peel:
Once printed, carefully cut out your design using scissors or a cutting machine. After cutting, gently peel the printed design layer from its backing paper.
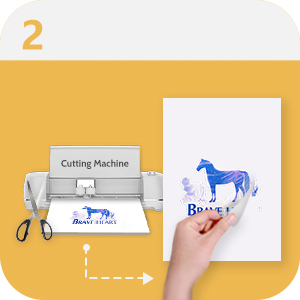
Image: A cut design being peeled from its backing.
- Place Design on Fabric:
Position the peeled design onto your chosen fabric with the printed image facing upwards.
- Cover with Teflon Paper:
Place one of the included Teflon sheets directly over your design on the fabric. This protects the design and your heat application device.

Image: Covering the design with Teflon paper.
- Transfer Image with Heat:
Apply heavy, even pressure with your iron or heat press. Refer to the specific temperature and time recommendations provided with your heat press, or use a high temperature setting for an iron. Ensure the entire design area receives consistent heat and pressure.

Image: Applying heat with an iron over the Teflon-covered design.

Image: Recommended iron settings for heavy pressure and high temperature.

Image: Recommended Easy Press settings for heavy pressure at 170°C (338°F).
- Remove Teflon Paper:
Once the transfer is complete, carefully remove the Teflon paper. The design should now be permanently adhered to the fabric.

Image: Removing the Teflon paper after transfer.

Image: Visual summary of the easy-to-use transfer process.
7. Applications
TransOurDream Glitter 2.0 Heat Transfer Paper is suitable for personalizing a wide range of items made from cotton fabrics. This includes:
- T-shirts
- Sweatshirts
- Hoodies
- Tote bags
- Canvas bags
- Aprons
- Masks
- Pillow cases
- Cushion covers
- Tablecloths
- Flags
For best results, 100% cotton fabrics are recommended. Always perform a test on a small, inconspicuous area for poly-blend cotton or other fabric types.

Image: Examples of various items customized with glitter heat transfers, including a T-shirt, tote bag, pillow, and cap.
8. Care and Maintenance
Proper care ensures the longevity and glitter effect of your transferred designs:
- Initial Wash: Wait at least 48 hours after transfer before washing the fabric. This allows the transfer to fully cure and achieve the best glitter effect.
- Washing: Machine wash garments inside out with cold water on a gentle cycle. Use a mild detergent.
- Drying: Air dry garments by hanging them. Avoid using a tumble dryer, as high heat can cause the transfer to crack or peel over time.
- Ironing: If ironing is necessary, turn the garment inside out and iron on a low setting, avoiding direct contact with the transferred design.

Image: A transferred T-shirt drying, illustrating the recommended air-drying method for maintaining glitter effect.

Image: A washing machine, representing the machine wash durability of the transfer when cared for properly.
9. Troubleshooting
If you encounter issues, consider the following:
- Fading or Cracking: This can occur if insufficient heat or pressure was applied during transfer, or if the garment was tumble-dried at high heat. Ensure proper application technique and air dry garments.
- Design Not Adhering: Verify that you used an inkjet printer with pigment or dye ink, not sublimation ink. Ensure the fabric is suitable (100% cotton recommended) and that adequate heat and pressure were applied for the recommended duration.
- Difficulty Peeling Backing: Ensure the paper is completely cool before attempting to peel the backing. If the design is still warm, it may be more difficult to separate.
10. Specifications
| Feature | Detail |
|---|---|
| Brand | TransOurDream |
| Model | TOD-GL2-20 |
| Sheet Size | 8.5 x 11 inches (Letter) |
| Sheet Count | 20 sheets |
| Paper Finish | Coated, Glitter |
| Compatible Printer | Inkjet Printers |
| Compatible Ink | Pigment Ink, Dye Ink (Not Sublimation Ink) |
| Package Dimensions | 11.18 x 8.62 x 0.75 inches |
| Item Weight | 12.3 ounces |
| First Available | July 1, 2021 |
11. Warranty and Support
TransOurDream is committed to providing high-quality products. For any questions, concerns, or support regarding your Glitter 2.0 Heat Transfer Paper, please do not hesitate to contact us. Contact information can typically be found on the product packaging or the official TransOurDream website.
No official product videos were provided in the available data for embedding in this manual.