1. Introduction
This manual provides detailed instructions for the assembly, operation, and maintenance of your Rolanstar Twin Bed Frame. This bed frame features integrated storage drawers, a headboard with a charging station, and RGB LED lighting. Please read this manual thoroughly before beginning assembly or operation to ensure safe and correct use of the product.

Image 1.1: The Rolanstar Twin Bed Frame, showcasing its integrated LED headboard and under-bed storage drawers.
2. Safety Information
- Ensure all components are present and undamaged before assembly. Do not use if any parts are missing or broken.
- Assemble the bed frame on a soft, clean surface to prevent scratches or damage.
- Do not overtighten screws during assembly, as this may damage the threads or components.
- The bed frame has a maximum weight capacity of 800 lbs. Do not exceed this limit.
- Keep electrical components (charging station, LED lights) away from water or excessive moisture.
- Ensure all electrical connections are secure before plugging into a power outlet.
- Children should not play on or around the bed frame without adult supervision.
3. Package Contents
Verify that all the following components are included in your package:
- Headboard with integrated LED light and USB charging station
- Metal bed frame components
- 4 Storage Drawers
- Assembly Bag (containing screws, bolts, and tools)
- Instruction Manual

Image 3.1: An exploded diagram illustrating the main components of the bed frame, including the headboard, frame sections, and drawers, labeled A through E for assembly reference.
4. Assembly Instructions
The Rolanstar Twin Bed Frame features a pre-assembled design for simplified setup. No complex tools are required beyond what is provided.
- Unpack Components: Carefully remove all parts from the packaging and lay them out on a soft, flat surface. Identify each component using the provided parts list.
- Connect Frame Sections: The main frame sections are designed for easy interlocking. Align the male connectors (A) with the female slots (B) and push them together until they click securely. Insert the plastic clips (C) into the designated holes to further secure the connection.
- Install Bed Slats: Position the metal bed slats (D) across the frame. Ensure they are evenly spaced and securely seated in their designated slots. The slats are designed to be noise-free with soft sponge padding on the middle beam.
- Attach Headboard: Secure the headboard to the main frame using the provided bolts and the included hex key. Ensure all connections are tight.
- Assemble and Insert Drawers: Assemble the four storage drawers (E) according to their individual instructions. Once assembled, slide them into position under the bed frame. Each drawer includes screw clips to prevent accidental movement.
- Place Mattress: Once the frame is fully assembled, place your twin-sized mattress on the slats. The frame is designed to accommodate mattresses between 6-10 inches thick to prevent sliding.

Image 4.1: Detail of the frame's interlocking mechanism, showing how components A and B connect and are secured by clip C.

Image 4.2: Detail of the drawer fixture system, showing a screw clip that secures the drawer in place under the bed frame.
Video 4.1: An instructional video demonstrating the assembly process and key features of the Rolanstar Bed Frame, including drawer operation and headboard functionality.
5. Operating Instructions
5.1. Charging Station
The 2-tier storage headboard includes an integrated charging station for your convenience.
- Ports: The charging station features 2 USB ports (5V/2.4A) and 1 Type-C port (5V/3A).
- Power Connection: Connect the bed frame's power cord to a standard wall outlet.
- Usage: Plug your devices (phones, tablets, etc.) into the appropriate USB or Type-C ports for charging.

Image 5.1: The 2-tier storage headboard with devices charging via the integrated USB and Type-C ports, illuminated by the LED lights.
5.2. RGB LED Lights
The headboard is equipped with RGB LED lights that can be customized to your preference.
- Control: The LED lights can be controlled via a dedicated remote control or a smartphone application. Refer to the separate LED light instruction sheet for app download and pairing details.
- Features: Adjust colors (over 60,000 options), brightness, various lighting modes, and set timers. The lights can also sync with music.
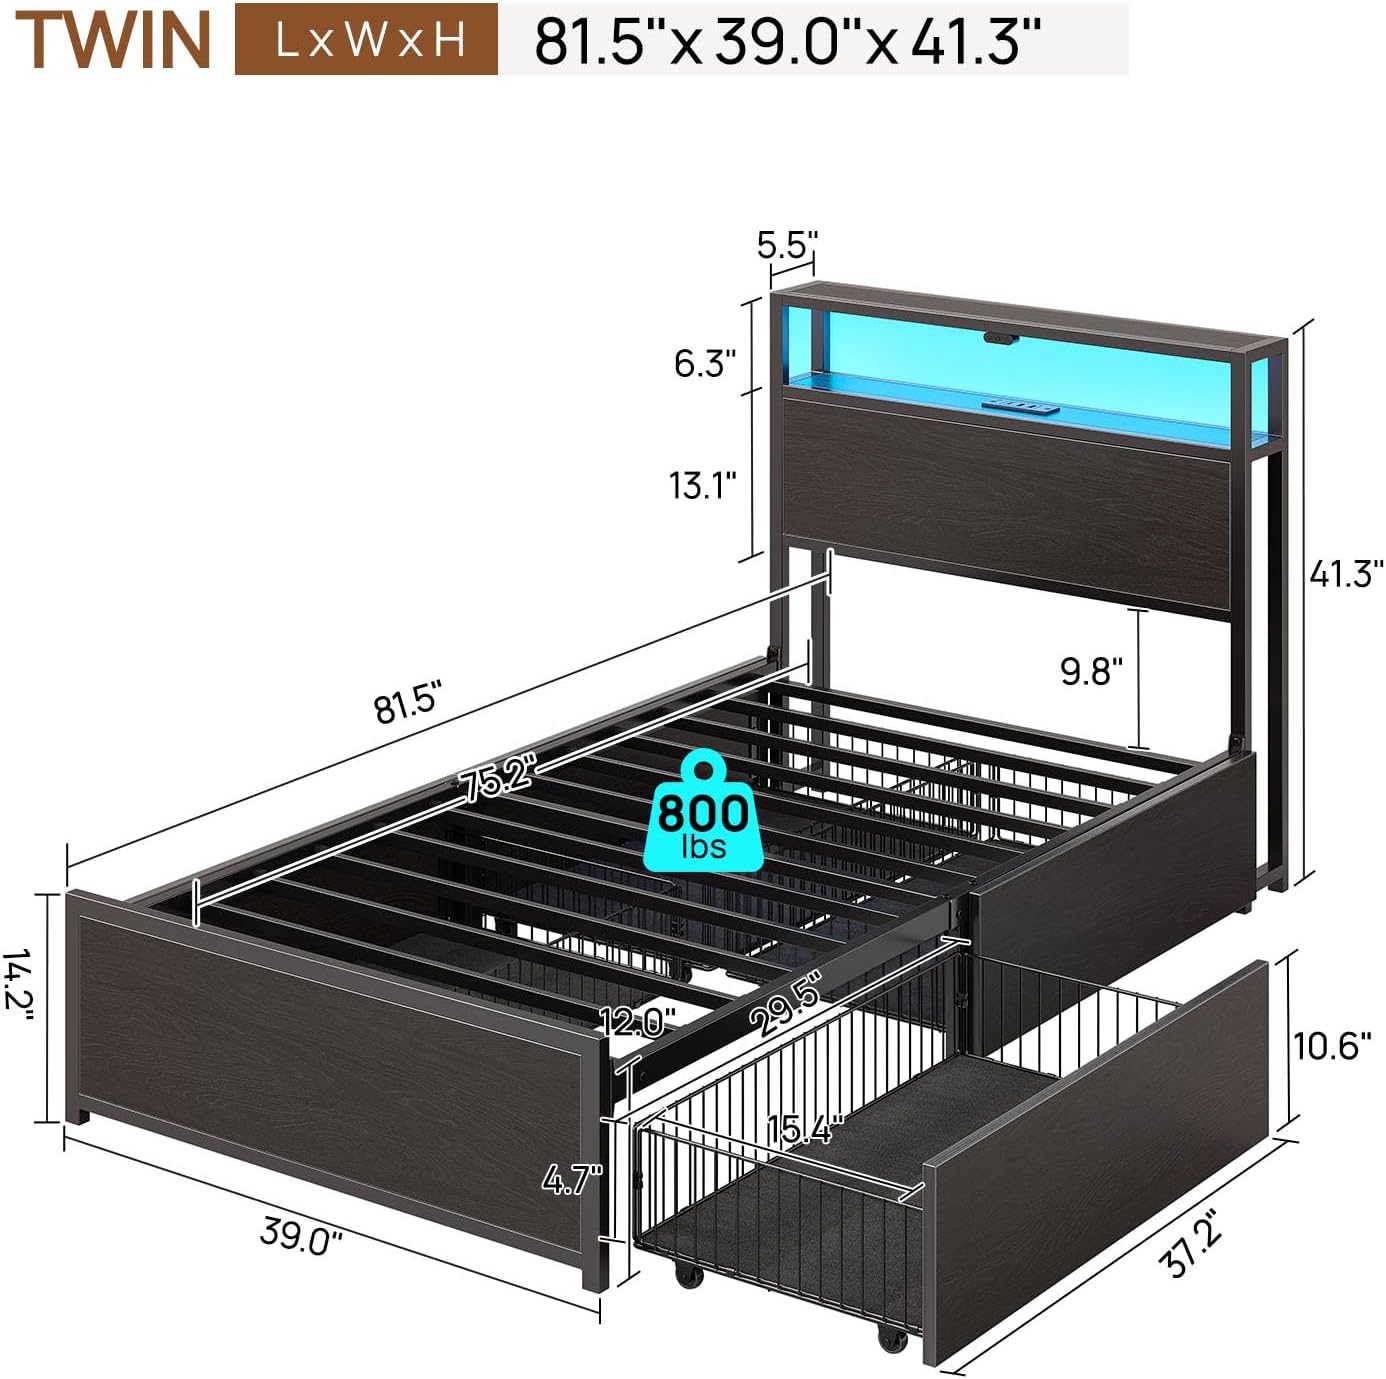
Image 5.2: The bed frame headboard displaying various RGB LED light colors, with icons indicating features like 60,000+ colors, brightness adjustment, mic mode, custom timer, music mode, and app control.
5.3. Storage Drawers
The bed frame includes four spacious sliding drawers for convenient under-bed storage.
- Operation: Gently pull the drawers out from under the bed. They are equipped with wheels for smooth gliding.
- Security: Each drawer features screw clips that can be engaged to prevent the drawers from sliding out unintentionally. Ensure these clips are disengaged before pulling the drawers out.
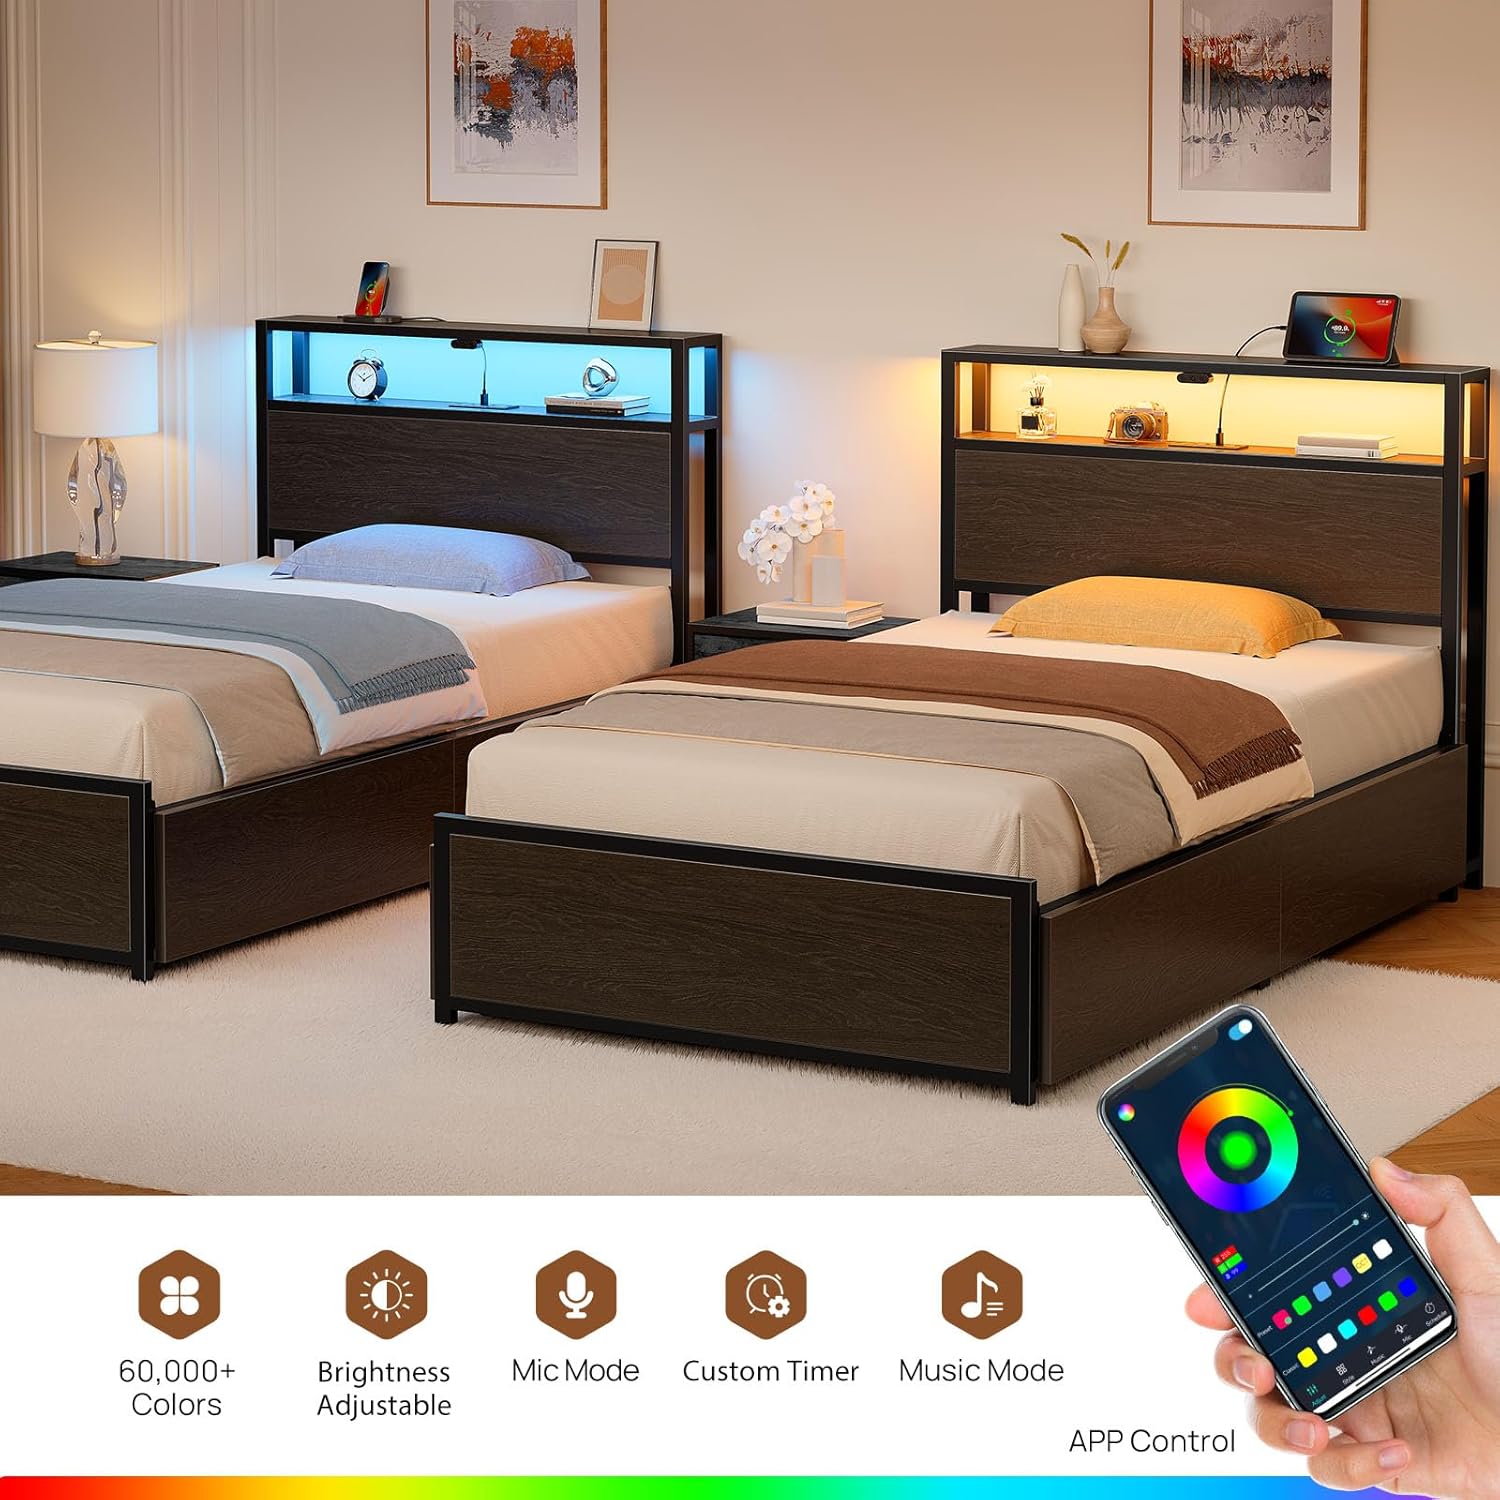
Image 5.3: An open storage drawer under the bed frame, demonstrating its capacity for folded clothing and the smooth-gliding wheels.
6. Maintenance and Care
- Cleaning: The bed frame surfaces are water-resistant. Wipe down with a damp cloth and mild detergent. Avoid abrasive cleaners or harsh chemicals.
- Hardware Check: Periodically check all bolts and screws to ensure they remain tight. Retighten if necessary to maintain stability and prevent noise.
- Drawer Maintenance: Keep the drawer wheels free of debris to ensure smooth operation.
- Electrical Components: Do not attempt to repair the charging station or LED lights yourself. Contact customer support if issues arise.

Image 6.1: A hand wiping water droplets from a dark, water-resistant surface, illustrating the ease of cleaning the bed frame's materials.
7. Troubleshooting
| Problem | Possible Cause | Solution |
|---|---|---|
| Bed frame is squeaking or unstable. | Loose bolts or screws; uneven assembly. | Check and tighten all assembly hardware. Ensure the frame is on a level surface. |
| LED lights are not turning on. | Power cord not connected; remote/app not paired; LED strip damaged. | Ensure power cord is securely plugged in. Check remote/app pairing. Contact support if still not working. |
| Charging ports are not working. | Power cord not connected; device cable faulty. | Verify the bed frame's power cord is plugged in. Try a different charging cable or device. |
| Storage drawers are difficult to slide or get stuck. | Debris in wheels; drawer clips engaged; uneven floor. | Clean wheels. Ensure drawer clips are disengaged. Check if the bed frame is on a level surface. |
8. Specifications
- Model: hq-chj038-01
- Brand: Rolanstar
- Size: Twin
- Product Dimensions (L x W x H): 81.5" x 39" x 41.3"
- Item Weight: 64.8 pounds
- Weight Capacity: 800 lbs
- Color: Black
- Finish Type: Powder Coated
- Headboard Material: Wood
- Special Features: Easy Assembly, No Box Spring Needed, Noise-Free, Sturdy Structure, Water-Resistant
- Compatible Mattress Size: Twin (Recommended 6-10 inches thick)
- Charging Station: 2 USB Ports (5V/2.4A), 1 Type-C Port (5V/3A)

Image 8.1: A detailed diagram showing the dimensions of the Rolanstar Twin Bed Frame.

Image 8.2: Illustration highlighting the 800 lbs weight capacity and the robust steel structure of the bed frame.
9. Warranty and Support
For warranty information or technical support, please contact Rolanstar customer service. Keep your purchase receipt for warranty claims.
Customer Service: Refer to the contact information provided with your product packaging or visit the official Rolanstar website.