
1. Introduction
This manual provides essential information for the installation and proper use of your Mintu Dryer Timer Replacement part. This component is designed to restore the timing functions of compatible GE dryer models. Please read these instructions carefully before attempting any installation or repair.
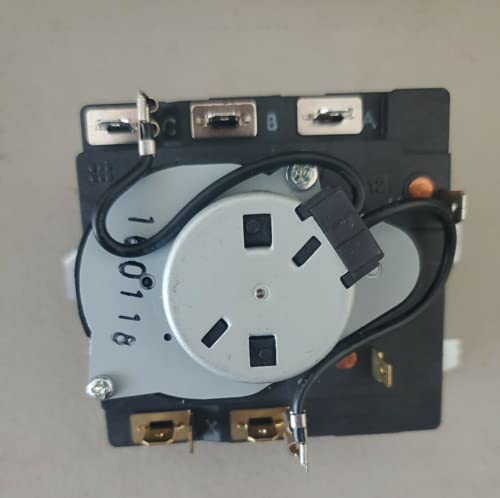
Image of the Mintu Dryer Timer Replacement part, showing its connectors and housing.
2. Safety Information
WARNING: Before attempting any repair or installation on an appliance, always disconnect the power supply to the dryer by unplugging it or turning off the circuit breaker. Failure to do so can result in serious injury or death from electrical shock.
- Wear appropriate personal protective equipment, such as gloves and safety glasses.
- If you are not comfortable performing appliance repairs, it is recommended to consult a qualified technician.
- Keep children and pets away from the work area.
- Ensure all connections are secure before restoring power.
3. Package Contents
Your package should contain the following item:
- One (1) Mintu Dryer Timer Replacement Part (Part Number: GTD42EASJ1WW, GTD42EASJ2WW)
Inspect the part for any visible damage upon receipt. If any damage is found, do not proceed with installation and contact customer support.
4. Compatible Dryer Models
This Mintu Dryer Timer Replacement part is compatible with various GE dryer models. Please verify your dryer's model number before installation. Compatible models include, but are not limited to:
- GE GTD42EASJ0WW
- GE GTD42EASJ1WW
- GE GTD42EASJ2WW
- GE GTD42GASJ0WW
- GE GTD42GASJ1WW
- GE GTD42GASJ2WW
- GE GTX42EASJ0WW
- GE GTX42EASJ1WW
- GE GTX42EASJ2WW
- GE GTX42GASJ0WW
- GE GTX42GASJ1WW
For additional compatibility, refer to your dryer's service manual or contact Mintu customer support.
5. Installation (Setup)
The following steps provide a general guide for replacing a dryer timer. Specific procedures may vary by dryer model. Always refer to your dryer's service manual for detailed instructions.
- Disconnect Power: Unplug the dryer from the electrical outlet or turn off the circuit breaker supplying power to the dryer.
- Access the Control Panel: Depending on your dryer model, you may need to remove screws from the back or top of the control panel to access the timer.
- Locate the Old Timer: Identify the existing dryer timer. Note the position and color of all wires connected to it. Taking a photograph before disconnecting wires can be helpful.
- Disconnect Wires: Carefully disconnect each wire from the old timer. Use needle-nose pliers if necessary, but avoid pulling directly on the wires.
- Remove Old Timer: Unscrew or unclip the old timer from its mounting bracket.
- Install New Timer: Position the new Mintu timer in the same location as the old one and secure it with screws or clips.
- Connect Wires: Reconnect the wires to the new timer, ensuring each wire is attached to its corresponding terminal. Refer to your photograph or the dryer's wiring diagram.
- Reassemble Control Panel: Secure the control panel back in place.
- Restore Power: Plug the dryer back into the electrical outlet or turn on the circuit breaker.
- Test Functionality: Run a short cycle to ensure the timer operates correctly.
6. Functionality (Operating)
Once installed, the Mintu Dryer Timer Replacement part restores the original timing functions of your GE dryer. The timer controls the duration of drying cycles and advances through different stages (e.g., heat, cool-down). Operate your dryer as per its original manufacturer's instructions. The timer should accurately progress through the selected cycle.
7. Maintenance
The Mintu Dryer Timer Replacement part is a sealed unit and does not require routine maintenance. To ensure the longevity of your dryer and its components:
- Regularly clean the dryer's lint filter before or after each load.
- Periodically inspect and clean the dryer vent to prevent lint buildup, which can cause overheating and strain on components.
- Avoid overloading the dryer, as this can lead to inefficient drying and increased wear on parts.
8. Troubleshooting
If your dryer is not functioning correctly after replacing the timer, consider the following common issues:
- Dryer Not Starting: Ensure the dryer is plugged in, the circuit breaker is on, and the door is fully closed. Check all wire connections to the new timer.
- Timer Not Advancing: Verify that the timer knob is correctly aligned and securely attached. Recheck wire connections. A faulty heating element or thermal fuse can sometimes prevent the timer from advancing in certain cycles.
- Incorrect Cycle Duration: Confirm that the correct cycle was selected. If the issue persists, re-examine the wiring for any loose or incorrect connections.
- No Heat: This is typically not a timer issue, but rather related to the heating element, thermal fuse, or thermostat. However, ensure the timer is correctly set to a heat cycle.
If troubleshooting steps do not resolve the issue, it is recommended to consult a professional appliance technician or contact Mintu customer support.
9. Specifications
| Attribute | Detail |
|---|---|
| Manufacturer | Mintu |
| Part Number | GTD42EASJ1WW, GTD42EASJ2WW |
| ASIN | B0989XJP5 |
| Date First Available | June 30, 2021 |
10. Warranty and Support
For warranty information or technical assistance, please contact Mintu customer support through the retailer where the product was purchased or visit the official Mintu website. Please have your purchase details and the part number ready when contacting support.