
1. Introduction and Overview
This manual provides essential information for the safe and efficient operation of your PRIMECOM 32Amp Smart Electric Vehicle (EV) Wall Charging Station. This Level 2 EVSE is designed to provide fast and reliable charging for compatible electric vehicles, operating at 220/240 Volts and delivering up to 32 Amps. Please read this manual thoroughly before installation and use to ensure proper functionality and safety.
2. Safety Information
Important Safety Instructions:
- Always have the charging station installed by a qualified electrician in accordance with all local and national electrical codes.
- Do not attempt to open, disassemble, repair, or modify the charging station. This may cause damage, electric shock, or fire, and will void the warranty.
- Do not use the charging station if the enclosure, cable, or EV connector is damaged, cracked, or shows any signs of wear. Contact customer support immediately.
- Keep the charging station and its components away from water, moisture, and flammable materials.
- Ensure the NEMA 10-50P outlet is properly grounded and rated for the charging station's electrical requirements.
- Supervise children when the charging station is in use.
- Do not insert foreign objects into any part of the charging station or EV connector.
3. Package Contents
Carefully unpack the box and verify that all items listed below are present and undamaged. If any items are missing or damaged, please contact PRIMECOMTECH customer support.
- PRIMECOM 32Amp EV Wall Charging Station Unit
- Integrated Charging Cable with J1772 Connector (approx. 40 feet)
- NEMA 10-50P Power Plug
- Wall Mounting Bracket
- EV Connector Holster
- Mounting Hardware (screws, anchors)
- User Manual (this document)
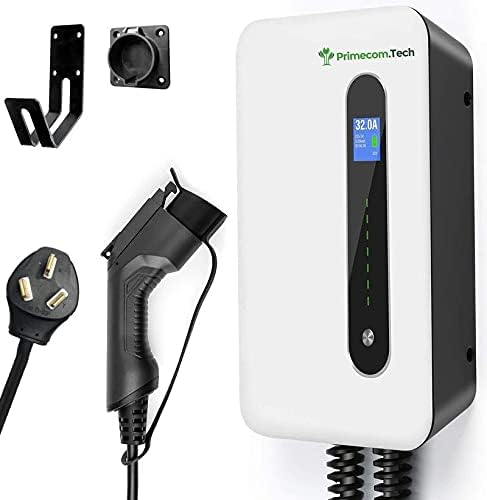
Image 1: Components of the PRIMECOM 32Amp EV Wall Charging Station. This image displays the main charging unit, the attached charging cable with its J1772 vehicle connector, the NEMA 10-50P power plug, and the separate wall-mounted bracket and holster for the charging cable.
4. Setup and Installation
Professional installation by a qualified electrician is highly recommended to ensure safety and compliance with all electrical codes.
- Site Selection: Choose a suitable location near your NEMA 10-50P outlet, preferably in a garage or covered area, ensuring sufficient space for the charging cable and vehicle parking. The location should be dry and protected from direct weather exposure.
- Mounting the Charging Unit:
- Use the provided wall mounting bracket as a template to mark drilling points on the wall.
- Drill pilot holes and insert wall anchors if necessary.
- Securely attach the mounting bracket to the wall using the provided screws.
- Carefully hang the PRIMECOM charging unit onto the mounted bracket, ensuring it is securely seated.
- Power Connection: Plug the NEMA 10-50P power plug of the charging station into a dedicated 220/240 Volt NEMA 10-50R outlet. Ensure the outlet is on a circuit rated for at least 32 Amps.
- Mounting the EV Connector Holster: Install the separate EV connector holster near the charging unit at a convenient height to store the J1772 connector when not in use. This protects the connector from damage and keeps the area tidy.
- Initial Power-Up: Once installed, the unit will power on. The display will illuminate, indicating readiness.
5. Operating Instructions
The PRIMECOM EV Wall Charging Station is designed for straightforward operation.
- Before Charging: Ensure your vehicle is parked safely and the charging port is accessible. Make sure the charging station is securely plugged into the NEMA 10-50R outlet.
- Connecting to Vehicle: Remove the J1772 connector from its holster. Align the connector with your vehicle's charging port and firmly insert it until it clicks into place.
- Initiating Charge: Once connected, the charging station will automatically detect the vehicle and begin the charging process. The display on the unit will show charging status, current (Amps), voltage, and energy delivered.
- Monitoring Charge: The unit's display provides real-time charging information. The LED indicator lights on the unit may also show charging progress (e.g., solid green for charging, blinking for standby).
- Stopping Charge: To stop charging, first unlock your vehicle's charging port (if applicable, as per your vehicle's manual). Then, press the release button on the J1772 connector and pull it out from the vehicle's charging port.
- After Charging: Return the J1772 connector to its holster to protect it from damage and keep the area tidy.
6. Maintenance
Regular maintenance ensures the longevity and safe operation of your charging station.
- Cleaning: Wipe the charging station and cable with a soft, damp cloth. Do not use abrasive cleaners, solvents, or harsh chemicals. Ensure the unit is unplugged before cleaning.
- Cable Care: Avoid kinking, twisting, or driving over the charging cable. Store the cable neatly, preferably coiled, and keep the J1772 connector in its holster when not in use.
- Inspection: Periodically inspect the charging station, cable, and plug for any signs of damage, wear, or corrosion. If any damage is observed, discontinue use and contact customer support.
- Environmental Conditions: While designed for durability, avoid exposing the unit to extreme temperatures, direct sunlight for prolonged periods, or heavy precipitation.
7. Troubleshooting
If you encounter issues with your PRIMECOM charging station, refer to the table below for common problems and solutions.
| Problem | Possible Cause | Solution |
|---|---|---|
| Unit not powering on. | No power from outlet; circuit breaker tripped. | Check the NEMA 10-50R outlet and ensure the circuit breaker is not tripped. Test the outlet with another device if possible. |
| Charging not starting. | J1772 connector not fully inserted; vehicle not ready to charge; vehicle charging port locked. | Ensure the J1772 connector is fully seated and clicked into place. Check your vehicle's dashboard for charging readiness. Unlock the vehicle's charging port if it has a locking mechanism. |
| Slow charging. | Vehicle charging settings; external factors (e.g., grid voltage fluctuations). | Check your vehicle's charging settings. Ensure no other high-power appliances are on the same circuit. |
| Error message on display. | Internal fault; communication error with vehicle. | Note the error code. Unplug the unit from the wall for 5 minutes, then plug it back in. If the error persists, contact customer support. |
For issues not covered here, or if troubleshooting steps do not resolve the problem, please contact PRIMECOMTECH customer support.
8. Specifications
| Feature | Specification |
|---|---|
| Model Number | P32-40-FEET-10-50P |
| Brand | PRIMECOMTECH |
| Manufacturer | PRIMECOM |
| Charging Level | Level 2 EVSE |
| Input Voltage | 220/240 Volts AC |
| Maximum Current | 32 Amps |
| Maximum Power Output | 7.2 kW |
| Connector Type | J1772 (Type 1) |
| Power Plug Type | NEMA 10-50P |
| Cable Length | Approximately 40 feet |
| UPC | 680283740314 |
9. Warranty and Support
PRIMECOMTECH stands behind the quality of its products. This charging station comes with a standard manufacturer's warranty against defects in materials and workmanship. Please refer to the warranty card included with your product or visit the official PRIMECOMTECH website for detailed warranty terms and conditions.
For technical support, troubleshooting assistance, or warranty claims, please contact PRIMECOMTECH customer service. Have your model number (P32-40-FEET-10-50P) and purchase date ready when contacting support.
Contact Information: Please visit the PRIMECOMTECH official website or your point of purchase for the most current contact details.