LuckyHigh Mini Benchtop Cut-Off Miter Saw User Manual
Model: B0983BZWKT
Introduction
This user manual provides essential information for the safe and efficient operation, maintenance, and troubleshooting of your LuckyHigh Mini Benchtop Cut-Off Miter Saw. Designed for precision cutting of small materials such as metal, wood, and plastic, this compact tool is ideal for hobbyists and light-duty tasks. Please read this manual thoroughly before initial use to ensure proper handling and to maximize the lifespan of your saw.
Important Safety Instructions
WARNING: Always wear appropriate personal protective equipment, including eye protection, hearing protection, and gloves, when operating this saw.
Ensure the work area is clean, well-lit, and free from clutter.
Keep children and bystanders away while operating the saw.
Do not operate power tools in explosive atmospheres, such as in the presence of flammable liquids, gases, or dust.
Always secure the workpiece firmly with the included C-clamp or other suitable clamping device before cutting.
Avoid accidental starting. Ensure the switch is in the off-position before plugging in the tool.
Do not overreach. Keep proper footing and balance at all times.
Maintain tools with care. Keep cutting tools sharp and clean for better and safer performance.
Disconnect the plug from the power source before making any adjustments, changing accessories, or storing power tools.
Use the correct power tool for your application. Do not force the tool.
Never bypass safety features or modify the tool.
Package Contents
Upon opening your package, please verify that all items listed below are present and undamaged:
1 x Mini Bench Cut-off Saw Unit
2 x Carbon Brushes
2 x L Wrench
1 x 2" Blade
1 x C-Clamp
Image: The Mini Benchtop Cut-Off Miter Saw with all its components laid out, including the main saw unit, power cord, a manual, two carbon brushes, two L-wrenches, a 2-inch blade, and a C-clamp.
Technical Specifications
Power Input:
110V AC, 60 Hz
Wattage:
80 Watts (90 Watts listed in specifications)
Amperage:
9 Amp
No-Load Speed:
7800 r/min (RPM)
Arbor Size:
3/8"
Blade Diameter:
2"
Blade Width:
0.020"
Cutting Depth:
1/2"
Miter Angle:
0-45 Degrees (Adjustable)
Power Cord Length:
71"
Item Weight:
3.91 pounds (1.78 Kilograms)
Dimensions:
9.76 x 6.14 x 4.49 inches (Package)
Blade Material:
Steel
Recommended Surfaces:
Brass, Metal, Plastic, Wood
Setup Guide
1. Unpacking and Inspection
Carefully remove all components from the packaging. Inspect the saw and accessories for any signs of damage during transit. If any parts are missing or damaged, do not operate the saw and contact customer support immediately.
2. Securing the Saw
For stable and safe operation, it is highly recommended to secure the mini benchtop saw to a sturdy workbench or surface. The base of the saw has pre-drilled holes for mounting. Use appropriate fasteners (not included) to firmly attach the saw to prevent movement during operation.
Image: A side view of the saw, highlighting the base with mounting holes and the overall compact design.
3. Blade Installation (if not pre-installed)
Ensure the saw is unplugged before attempting to install or change the blade. Use the provided L-wrench to loosen the blade retaining screw. Carefully place the 2-inch blade onto the arbor, ensuring the teeth are oriented correctly for cutting (refer to the arrow on the blade for rotation direction). Securely tighten the retaining screw. Always check for proper blade seating before operation.
Image: A detailed view of the saw's blade and its protective guard, indicating the blade's rotation direction.
Operating Instructions
1. Preparing the Workpiece
Place the material to be cut onto the saw's base. Use the integrated C-clamp to firmly secure the workpiece. Adjust the clamp by turning the red knob to match the width of your material. Ensure the material is stable and will not shift during the cut.
Image: A close-up of the saw's base, showing the adjustable miter scale (0-45 degrees) and the red knob for tightening the material clamp.
2. Adjusting Miter Angle (Optional)
If a miter cut is required, loosen the appropriate adjustment knob on the base and pivot the fence to the desired angle between 0 and 45 degrees. Tighten the knob securely once the angle is set.
3. Making a Cut
Plug the saw into a standard 110V AC outlet.
Hold the saw handle firmly.
Press the red safety switch located near the handle, then press the main power switch (red toggle switch on top) to start the motor.
Allow the blade to reach full speed before beginning the cut.
Slowly and steadily lower the saw blade through the workpiece. Do not force the cut; let the saw do the work.
Once the cut is complete, release the power switch and allow the blade to come to a complete stop before raising the saw.
Unclamp the workpiece and remove it from the cutting area.
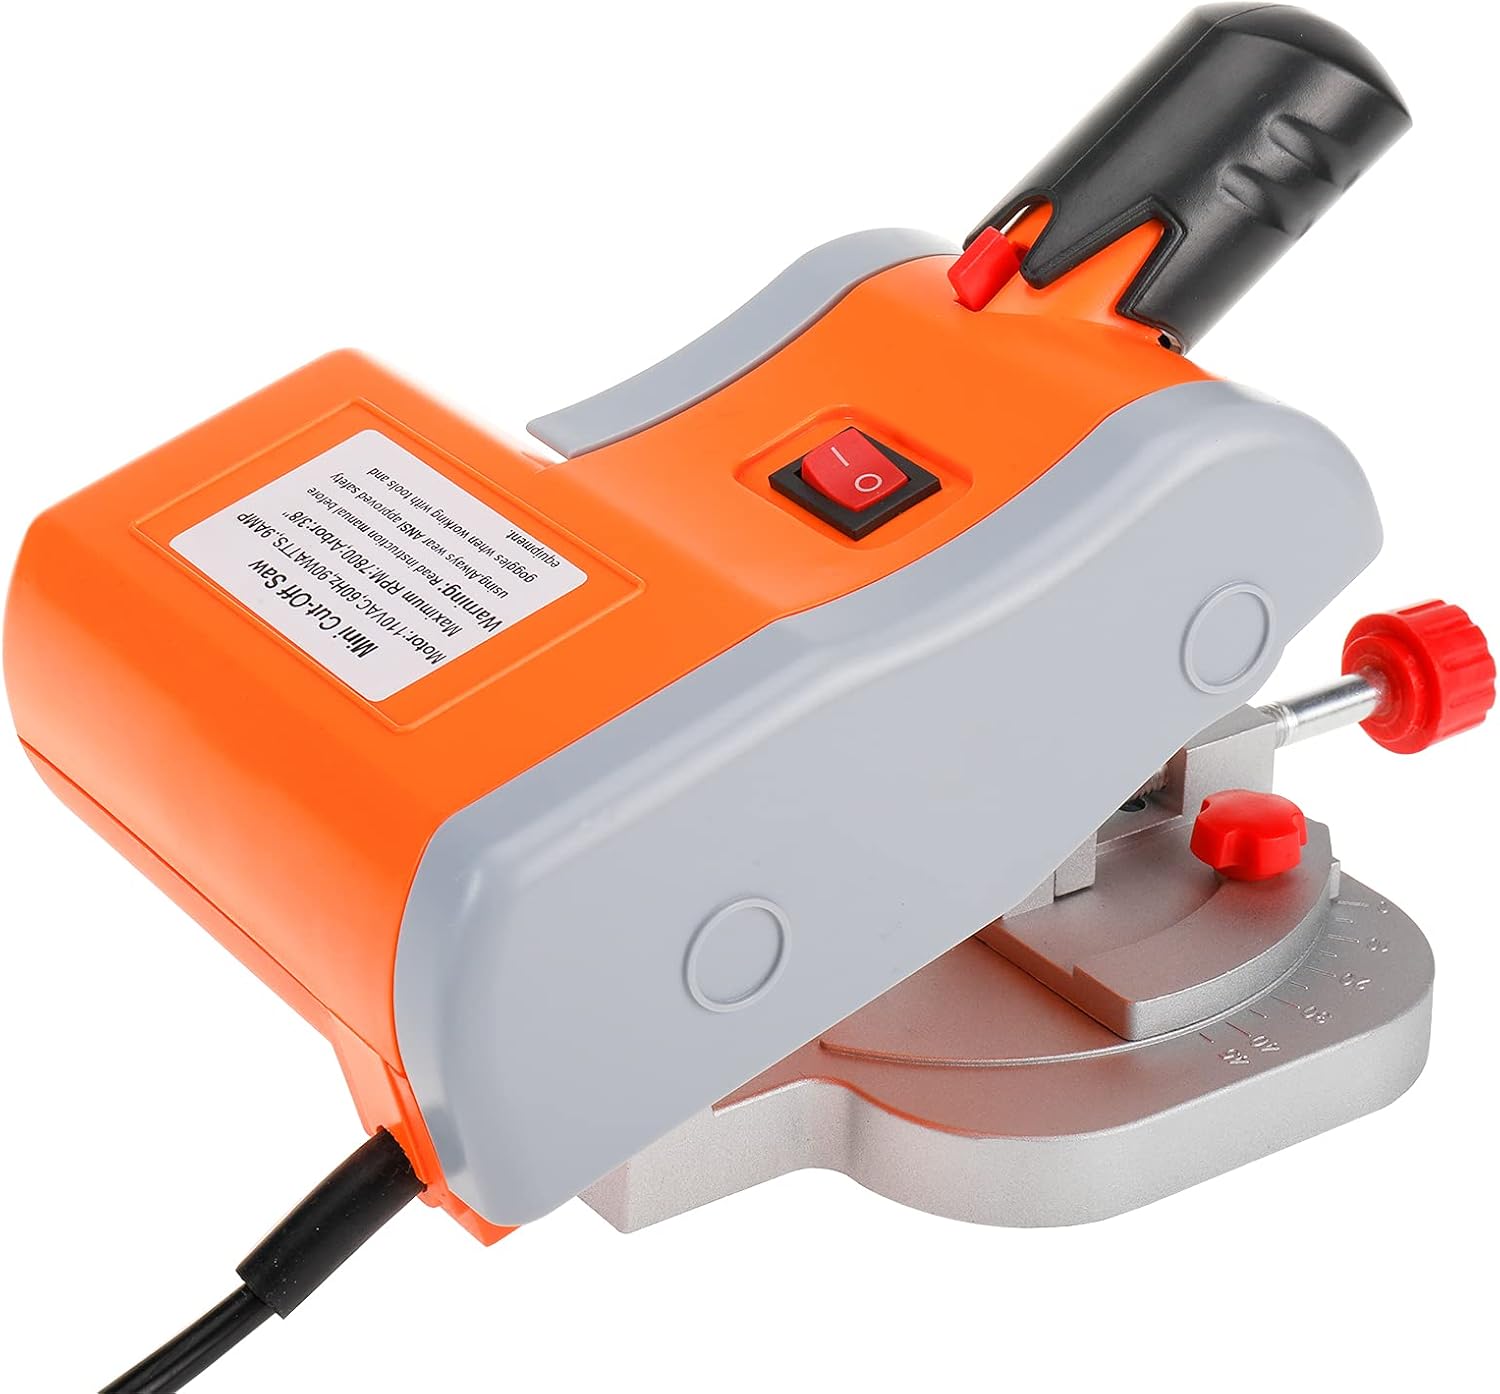
Image: The top of the saw, displaying the main power switch and a warning label with model information.
Maintenance
Regular maintenance ensures optimal performance and extends the life of your saw. Always unplug the saw before performing any maintenance.
1. Cleaning
After each use, clear sawdust and debris from the cutting area, blade guard, and motor vents using a brush or compressed air.
Wipe down external surfaces with a clean, damp cloth. Do not use harsh chemicals or abrasive cleaners.
2. Blade Care
Inspect the blade regularly for sharpness and damage. A dull or damaged blade can cause kickback and poor cuts.
Replace the blade when it becomes dull or damaged. Use only 2-inch blades with a 3/8-inch arbor.
3. Carbon Brush Replacement
The motor uses carbon brushes which wear down over time. If the saw experiences reduced power or intermittent operation, the carbon brushes may need replacement. Refer to the saw's motor housing for access to the brush caps. Replace both brushes at the same time. Use only genuine replacement carbon brushes.
Troubleshooting
Problem
Possible Cause
Solution
Saw does not start.
No power supply; Power switch off; Safety switch not engaged; Worn carbon brushes.
Check power outlet and cord; Ensure both power and safety switches are engaged; Replace carbon brushes.
Poor cut quality / Saw struggling.
Dull or incorrect blade; Material not properly secured; Forcing the cut; Overheating.
Replace blade; Secure workpiece firmly; Allow saw to cut at its own pace; Allow saw to cool down.
Excessive vibration or noise.
Loose blade; Damaged blade; Loose mounting.
Tighten blade screw; Replace blade; Secure saw to workbench.
Warranty and Support
For information regarding warranty coverage, technical support, or replacement parts, please refer to the manufacturer's official website or contact their customer service department directly. Keep your purchase receipt as proof of purchase for any warranty claims.