Important Safety Information
WARNING: Before beginning any repair or installation, ensure the gas supply to the appliance is turned off and the appliance is disconnected from its electrical power source. Failure to do so can result in serious injury, electric shock, gas leak, fire, or death.
Always wear appropriate personal protective equipment, such as gloves and eye protection, when performing repairs.
If you are unsure about any step of the installation process, consult a qualified appliance technician.
This igniter is a replacement part. Handle with care as ceramic parts can be fragile.
Product Compatibility
This Owigift Oven Range Burner Igniter is designed as a replacement part for various GE Gas Range models, including but not limited to:
- PGS975SEP1SS
- PGS975SEP2SS
- PGS975SEP3SS
- PGS975WEM1WW
- PGS975WEM2WW
- PGS975WEM3WW
- PGS975WEM4WW
- JGS968SH5SS
- JGS968SH6SS
Always verify the compatibility with your specific appliance model before installation.
Tools Required
- Screwdriver (Phillips and/or Flathead, depending on appliance)
- Nut Driver or Wrench (for gas line, if applicable)
- Pliers
- Work Gloves
- Safety Glasses
- Flashlight (optional, for better visibility)
Installation (Setup)
Follow these general steps for replacing an oven range burner igniter. Specific steps may vary slightly depending on your GE gas range model. Refer to your appliance's service manual for detailed instructions if available.
- Disconnect Power and Gas: Turn off the gas supply valve to the range and unplug the appliance from the electrical outlet.
- Access the Oven Cavity: Open the oven door. Remove the oven racks. Depending on your model, you may need to remove the oven bottom panel. This usually involves lifting the front edge and sliding it out, or removing a few screws.
- Locate the Igniter: The igniter is typically located near the burner tube at the bottom of the oven cavity. It is a small, ceramic-like component with two wires.
- Disconnect Wires: Carefully disconnect the two wires leading to the igniter. These are usually connected with ceramic wire nuts or quick-disconnect terminals. Note their orientation if necessary.
- Remove Old Igniter: Unscrew the mounting screws that secure the igniter to the burner assembly or oven floor. Carefully remove the old igniter.
- Install New Igniter: Position the new Owigift igniter in the same location as the old one. Secure it with the mounting screws. Do not overtighten.
- Connect Wires: Connect the new igniter's wires to the appliance's wiring. Ensure connections are secure.
- Reassemble Oven: Replace the oven bottom panel and oven racks.
- Restore Power and Gas: Plug the appliance back into the electrical outlet and turn on the gas supply valve.

Image 1: Top-down view of the Owigift Oven Range Burner Igniter, highlighting the ceramic heating element and the metal mounting bracket with screw holes.
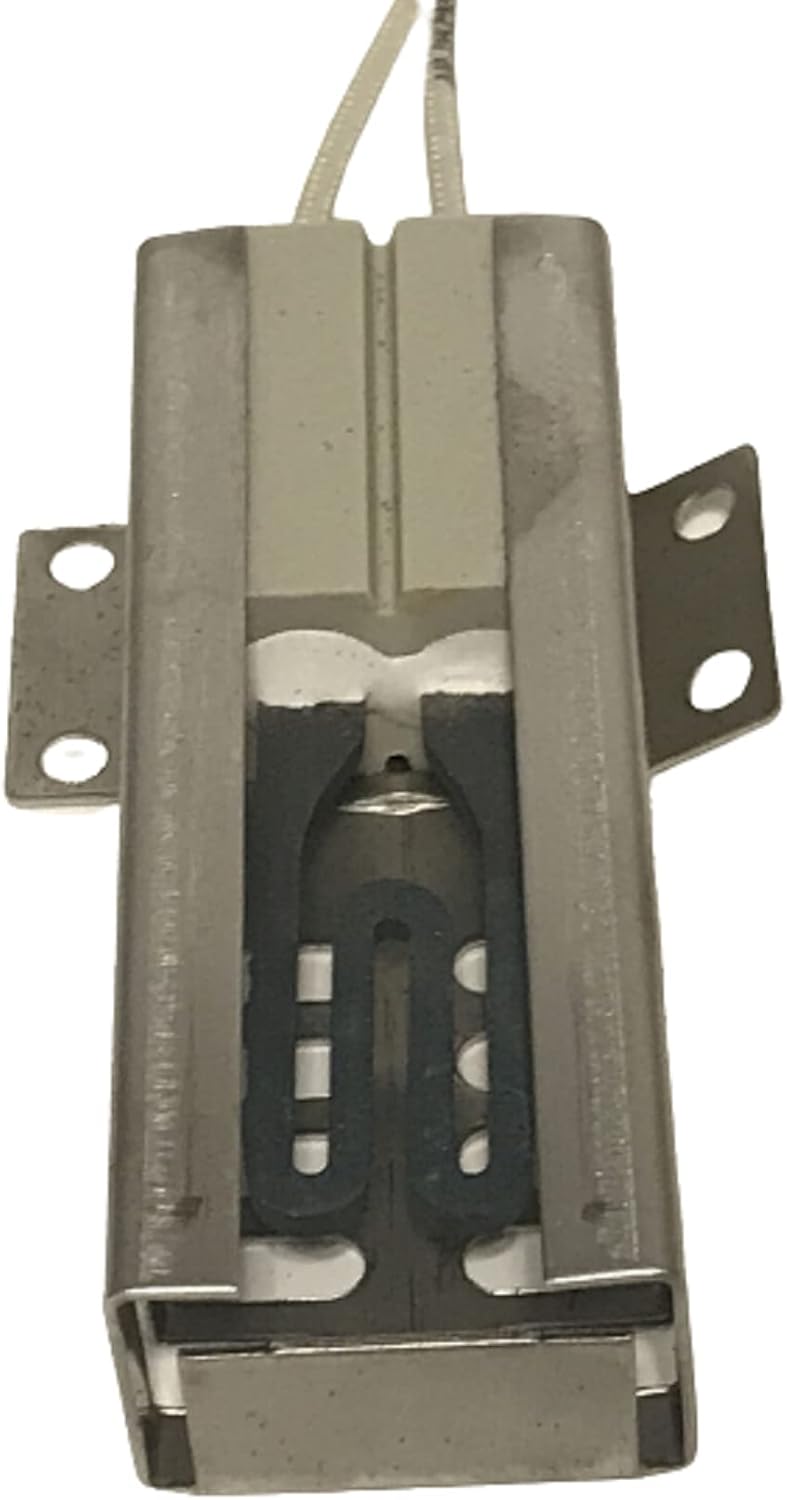
Image 2: Side view of the Owigift Oven Range Burner Igniter, illustrating the ceramic body, the heating element within, and the electrical leads extending from the base.
Operation Verification
After installation, perform a functional test:
- Ensure all panels are securely reinstalled and gas/electrical connections are restored.
- Turn on the oven to a bake setting.
- Observe the igniter. It should glow bright orange/red within 30-60 seconds.
- Once the igniter reaches sufficient temperature, the gas valve should open, and the burner should ignite.
- If the burner does not ignite, turn off the oven and refer to the Troubleshooting section.
Maintenance
The oven igniter is a wear-and-tear component and generally does not require routine maintenance. However, to prolong its life and ensure proper function:
- Keep the oven cavity clean to prevent grease or food debris from accumulating on or around the igniter.
- Avoid physical impact to the igniter, as the ceramic material is fragile.
- If cleaning the oven, ensure no harsh chemicals come into direct contact with the igniter.
Troubleshooting
If your oven is not heating or the igniter is not functioning correctly after installation, consider the following:
- Igniter Not Glowing:
- Check electrical connections to ensure they are secure.
- Verify the oven has power and the circuit breaker has not tripped.
- Ensure the oven door is fully closed.
- Igniter Glows but No Gas Ignition:
- Ensure the gas supply to the range is fully open.
- The igniter may not be reaching sufficient temperature to open the gas valve. This can indicate a weak igniter (though unlikely for a new part) or a faulty gas valve.
- Check for any obstructions in the burner ports.
- Burner Ignites but Flame is Weak/Uneven:
- This is usually not an igniter issue but could be related to gas pressure or burner cleanliness.
For persistent issues, it is recommended to consult a qualified appliance repair technician.
Specifications
- Part Type: Oven Range Burner Igniter
- Compatibility: Designed for specific GE Gas Range models (refer to Product Compatibility section)
- Material: Ceramic heating element, metal bracket, high-temperature wiring
- Function: Heats to ignite natural gas or LP gas in oven burners
Warranty Information
Specific warranty details for this Owigift product are not provided in this manual. Please refer to the product packaging or contact the seller directly for warranty terms and conditions.
Customer Support
For technical assistance or inquiries regarding this product, please contact your retailer or the Owigift customer service department. Contact information is typically available on the product packaging or the seller's website.