HOOBRO BF041BZ01G1 End Table
HOOBRO End Table with Charging Station Instruction Manual
Model: BF041BZ01G1 End Table
Brand: HOOBRO
Introduction
This manual provides detailed instructions for the assembly, operation, and maintenance of your HOOBRO End Table with Charging Station. Designed for versatility and convenience, this narrow side table features a built-in charging station, a sliding drawer, and additional storage shelves, making it ideal for small spaces in living rooms, bedrooms, or as a nightstand.

Figure 1: HOOBRO End Table with Charging Station, showcasing its rustic brown and black design.
Important Safety Information
- Keep the product away from heat sources, direct sunlight, and excessive moisture to prevent damage and ensure longevity.
- Ensure all screws and fasteners are securely tightened during assembly to maintain stability. Periodically check and re-tighten if necessary.
- Do not overload the table or drawer beyond the recommended maximum weight of 20 kilograms.
- The charging station is designed for standard electronic devices. Do not attempt to plug in appliances with high power consumption that exceed the unit's specifications.
- Keep children away from the charging station's separate storage area to prevent accidental contact with electrical outlets.
- Avoid spilling liquids directly onto the charging station or wooden surfaces. While designed to resist minor spills, excessive liquid can cause damage.
Package Contents
Before beginning assembly, please verify that all components listed below are present and undamaged.
| Component | Quantity |
|---|---|
| Side Table Panels (Engineered Wood) | Various (as per assembly diagram) |
| Metal Frame Components | Various (as per assembly diagram) |
| Accessory Kit (Screws, Allen Key, etc.) | 1 Set |
| Charging Station Unit (2 AC Outlets, 2 USB Ports) | 1 |
| Drawer Components | 1 Set |
| Instruction Manual | 1 |
Note: The exact quantity of individual screws and small parts is detailed in the assembly instructions provided in the accessory kit.
Setup and Assembly
Assembly is designed to be straightforward. It is recommended that one person performs the assembly. A screwdriver is the only additional tool required.
Assembly Video Guide
Video 1: Detailed assembly guide for the HOOBRO Side Table with Charging Station. This video demonstrates step-by-step construction, including attaching the metal frame, assembling the drawer, and installing the charging unit.
Step-by-Step Instructions (Refer to included Accessory Kit Instructions for detailed diagrams)
- Unpack and Identify Parts: Carefully remove all components from the packaging. Lay them out on a clean, soft surface to prevent scratches. Identify each part using the numbered and lettered labels from the accessory kit instructions.
- Assemble the Metal Frame: Connect the metal frame components (Parts 1 and 2) using the provided screws (Type C) and the Allen key. Ensure all connections are secure.
- Attach Side Panels: Secure the side panels (Parts 7 and 8) to the metal frame using screws (Type B). Ensure the pre-drilled holes align correctly.
- Install Drawer Runners: Attach the drawer runners (Part H) to the inner sides of the table panels (Parts 7 and 8) using screws (Type J).
- Assemble the Drawer: Construct the drawer box using panels (Parts 10, 11, 12, 13, 14) and screws (Type F1, F2). Attach the drawer knob (Part D) to the front panel.
- Insert Drawer: Slide the assembled drawer into the installed runners.
- Install Charging Station: Place the charging station unit (Part L) into its designated compartment at the back of the table top (Part 3). Secure it with screws (Type L).
- Attach Table Top: Secure the main table top (Part 3) and the hinged charging station cover (Part 4) to the assembled frame using screws (Type B). Ensure the hinges are correctly aligned for smooth operation of the cover.
- Attach Bottom Shelf: Secure the bottom shelf (Part 9) to the lower metal frame using screws (Type C).
- Adjust Feet: The table includes 4 adjustable feet (Part E). Adjust them to ensure perfect stability on uneven floors and to prevent scratches.

Figure 2: Detailed dimensions of the HOOBRO End Table, showing its compact and narrow design suitable for small spaces.
Operating Instructions
Using the Charging Station
The integrated charging station provides convenient power access for your devices.
- Power Connection: Plug the 4.9ft power cord from the charging station into a standard wall outlet.
- Accessing Ports: Lift the hinged section of the table top at the back to reveal the two 3-prong AC outlets (120V/12A) and two USB ports (5V/2A).
- Charging Devices: Connect your phone, tablet, desk lamp, or laptop to the appropriate outlets or USB ports.
- Cable Management: The separate storage area within the charging station helps manage cables, keeping the table surface tidy and preventing accidental contact.
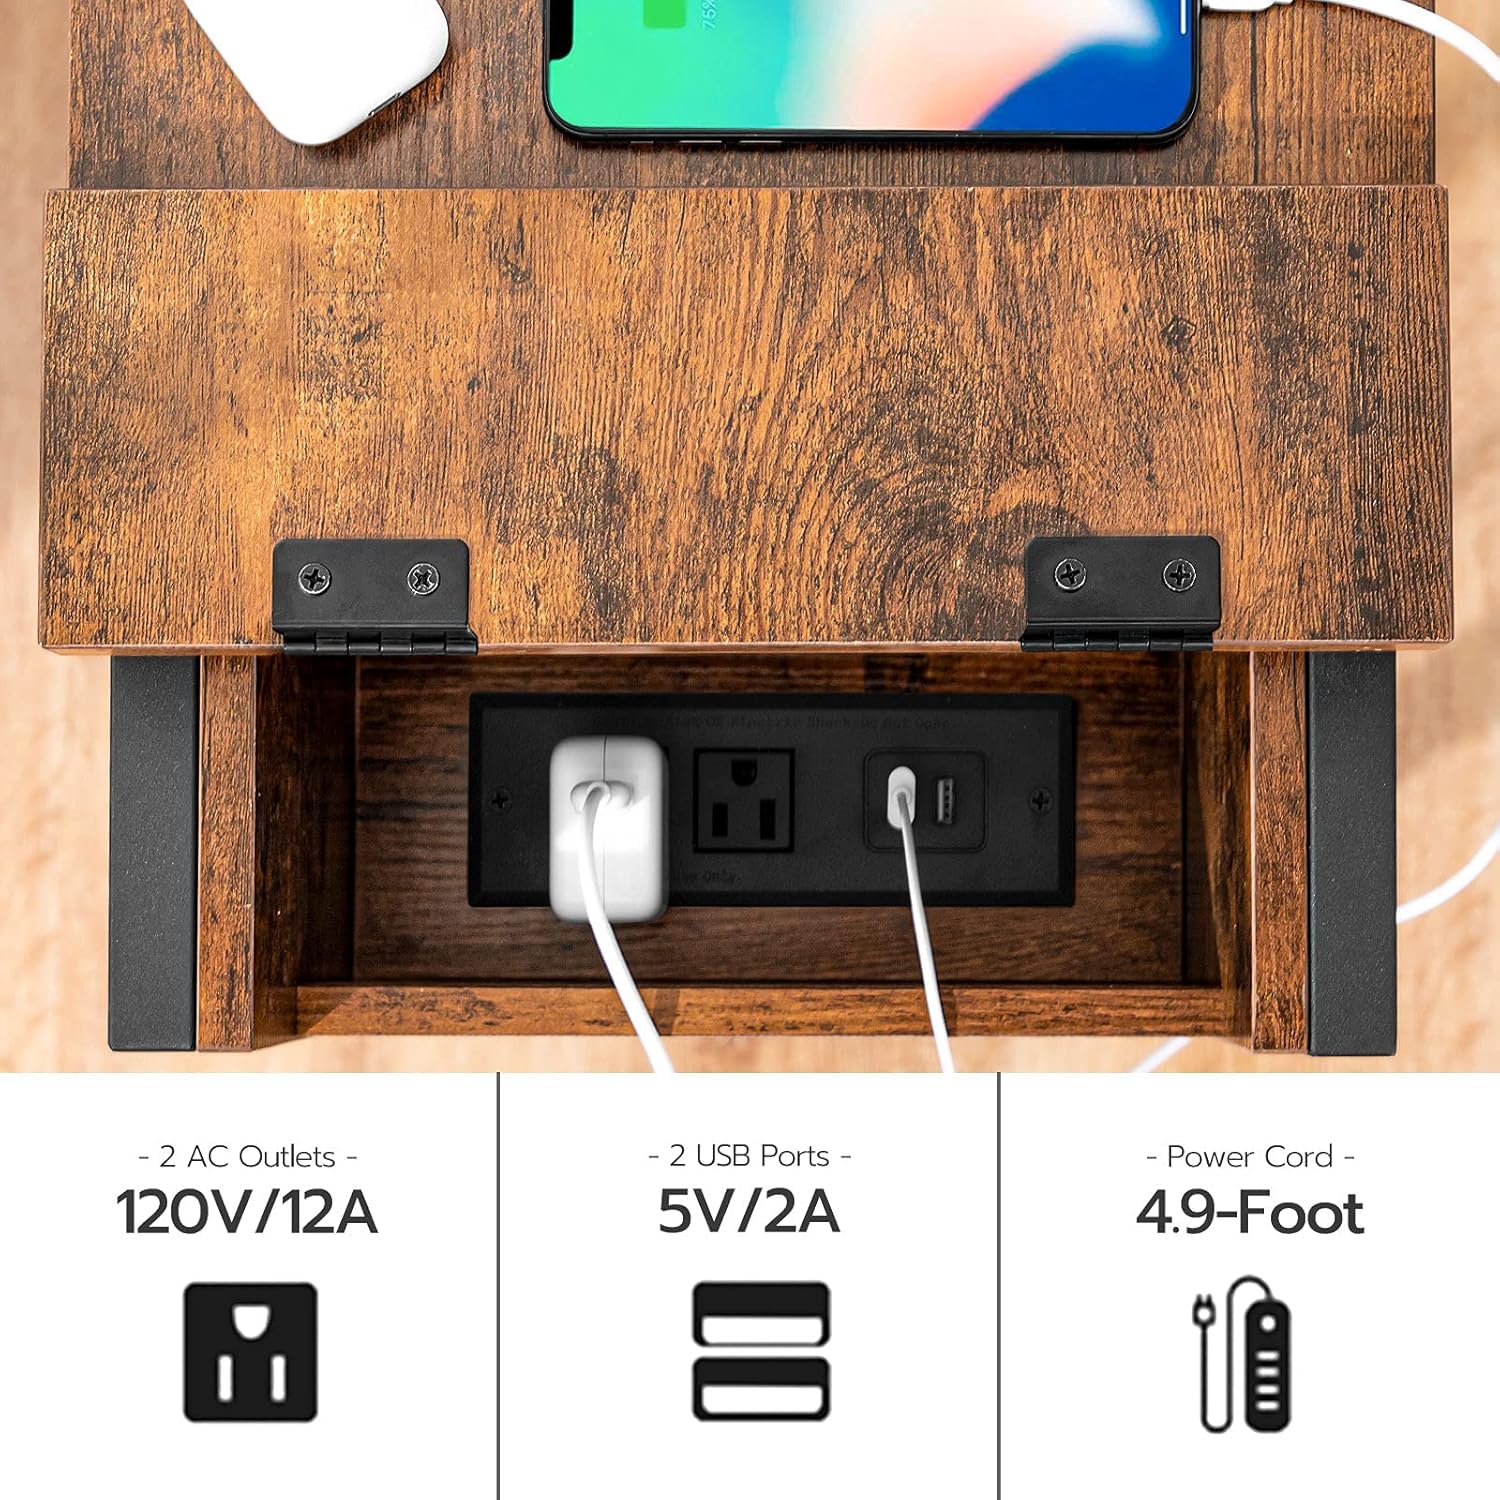
Figure 3: Close-up view of the charging station, highlighting the two AC outlets and two USB ports for convenient device charging.
Using the Sliding Drawer
The smooth-gliding drawer offers concealed storage for various items.
- Opening/Closing: Gently pull the knob to open the drawer. Push it back in until it is flush with the table front to close.
- Storage: Use the drawer to store small items such as remote controls, magazines, books, or personal accessories, helping to keep your space organized and clutter-free.

Figure 4: The sliding drawer of the end table, shown open and containing remote controls, demonstrating its practical storage capacity.
Maintenance
- Cleaning: Wipe surfaces with a soft, damp cloth. Avoid harsh chemicals or abrasive cleaners that could damage the finish.
- Dusting: Regularly dust the table with a dry, soft cloth to prevent dust buildup.
- Tightening Screws: Periodically check all screws and fasteners to ensure they remain tight. Re-tighten as needed to maintain the table's stability.
- Protection: Use coasters under drinks and placemats under hot items to protect the wood surface from stains and heat damage.
Troubleshooting
| Problem | Possible Cause | Solution |
|---|---|---|
| Table is wobbly/unstable. | Loose screws or uneven floor. | Tighten all assembly screws. Adjust the adjustable feet (Figure 5) on the bottom of the legs to level the table on uneven surfaces. |
| Charging station not working. | Not plugged in, power outage, or device issue. | Ensure the power cord is securely plugged into a working wall outlet. Check if the wall outlet has power. Test with a different device. |
| Drawer does not slide smoothly. | Improper installation of runners or obstruction. | Verify that the drawer runners were installed correctly and are free of debris. Ensure the drawer is not overloaded. |

Figure 5: Close-up of the adjustable feet, which can be rotated to stabilize the table on uneven floors and protect surfaces.
Specifications
- Brand: HOOBRO
- Model: BF041BZ01G1 End Table
- Product Dimensions: 11.8"D x 19.7"W x 24"H
- Maximum Weight Recommendation: 20 Kilograms (44 lbs)
- Color: Rustic Brown + Black
- Materials: Engineered Wood (Top), Metal (Frame)
- Number of Drawers: 1
- Charging Station: 2 AC Outlets (120V/12A), 2 USB Ports (5V/2A)
- Power Cord Length: 4.9 ft
- Assembly Required: Yes (Recommended 1 person, Screwdriver needed)
Warranty and Support
HOOBRO products are designed for quality and durability. For any questions regarding assembly, missing parts, or product performance, please contact HOOBRO customer support. Please refer to your purchase documentation for specific warranty details.
For additional support and product information, visit the official HOOBRO store: HOOBRO Store on Amazon.
Related Documents - BF041BZ01G1 End Table
 |
Hoobro Narrow End Table with Charging Station - Assembly Guide and User Manual Comprehensive assembly instructions and user guide for the Hoobro narrow end table featuring a built-in charging station. Learn how to assemble, use, and maintain your furniture safely. |
 |
Farmhouse End Table Assembly Instructions Step-by-step assembly guide for the Hlivelood Farmhouse End Table. Includes a complete parts list, hardware inventory, and detailed instructions for building the rustic wood side table with mesh barn doors and a charging station. |
 |
Assembly Instructions: Ebern Designs Modern Nightstand with Drawer Comprehensive assembly guide for the Ebern Designs modern nightstand. This manual provides step-by-step instructions, a detailed parts list, hardware identification, and safety information to help you build your bedside table. |
 |
17 Stories Side Table with Charging Station - Installation & Assembly Guide Comprehensive installation and assembly guide for the 17 Stories Side Table with Charging Station (Model: vclo4010). Includes parts list, tools required, and step-by-step instructions for assembling your new side table. |
 |
VASAGLE End Table & Nightstand User Manual and Assembly Guide Comprehensive user manual and assembly instructions for VASAGLE end tables and nightstands, including the ULET23X (Rustic Brown/Black, 2-Tier Mesh Shelves) and a 3-Tier Chestnut Brown model (LET23/023, LET201-1pc). Provides detailed assembly steps, safety warnings, and product care information. |
 |
Gurexl Nightstand Assembly Instructions and User Guide Detailed assembly instructions and user guide for the Gurexl Nightstand, including a guide for the intelligent controller with charging station, LED lighting, and induction features. |
Ask a question about this manual
Ask about setup, troubleshooting, compatibility, parts, safety, or missing instructions. Manuals+ will review the question and use this page’s manual context to help answer it.