1. Introduction
This manual provides detailed instructions for the installation, operation, and maintenance of your Hiseeu 10CH 4K NVR Wireless Security Camera System. This system features 4MP solar-powered cameras with AI human detection, two-way audio, color night vision, and IP66 waterproofing, all recorded to a pre-installed 1TB hard drive.
2. Package Contents
Verify that all items are present in your package:
- Hiseeu 10CH 4K NVR
- 4 x 4MP Solar Powered Wireless Cameras
- 4 x Solar Panels
- 1TB Hard Drive (pre-installed in NVR)
- Power Adapter for NVR
- USB Mouse
- Ethernet Cable
- Mounting Screws and Plugs
- User Manual (this document)

3. Product Overview
3.1 Camera Components
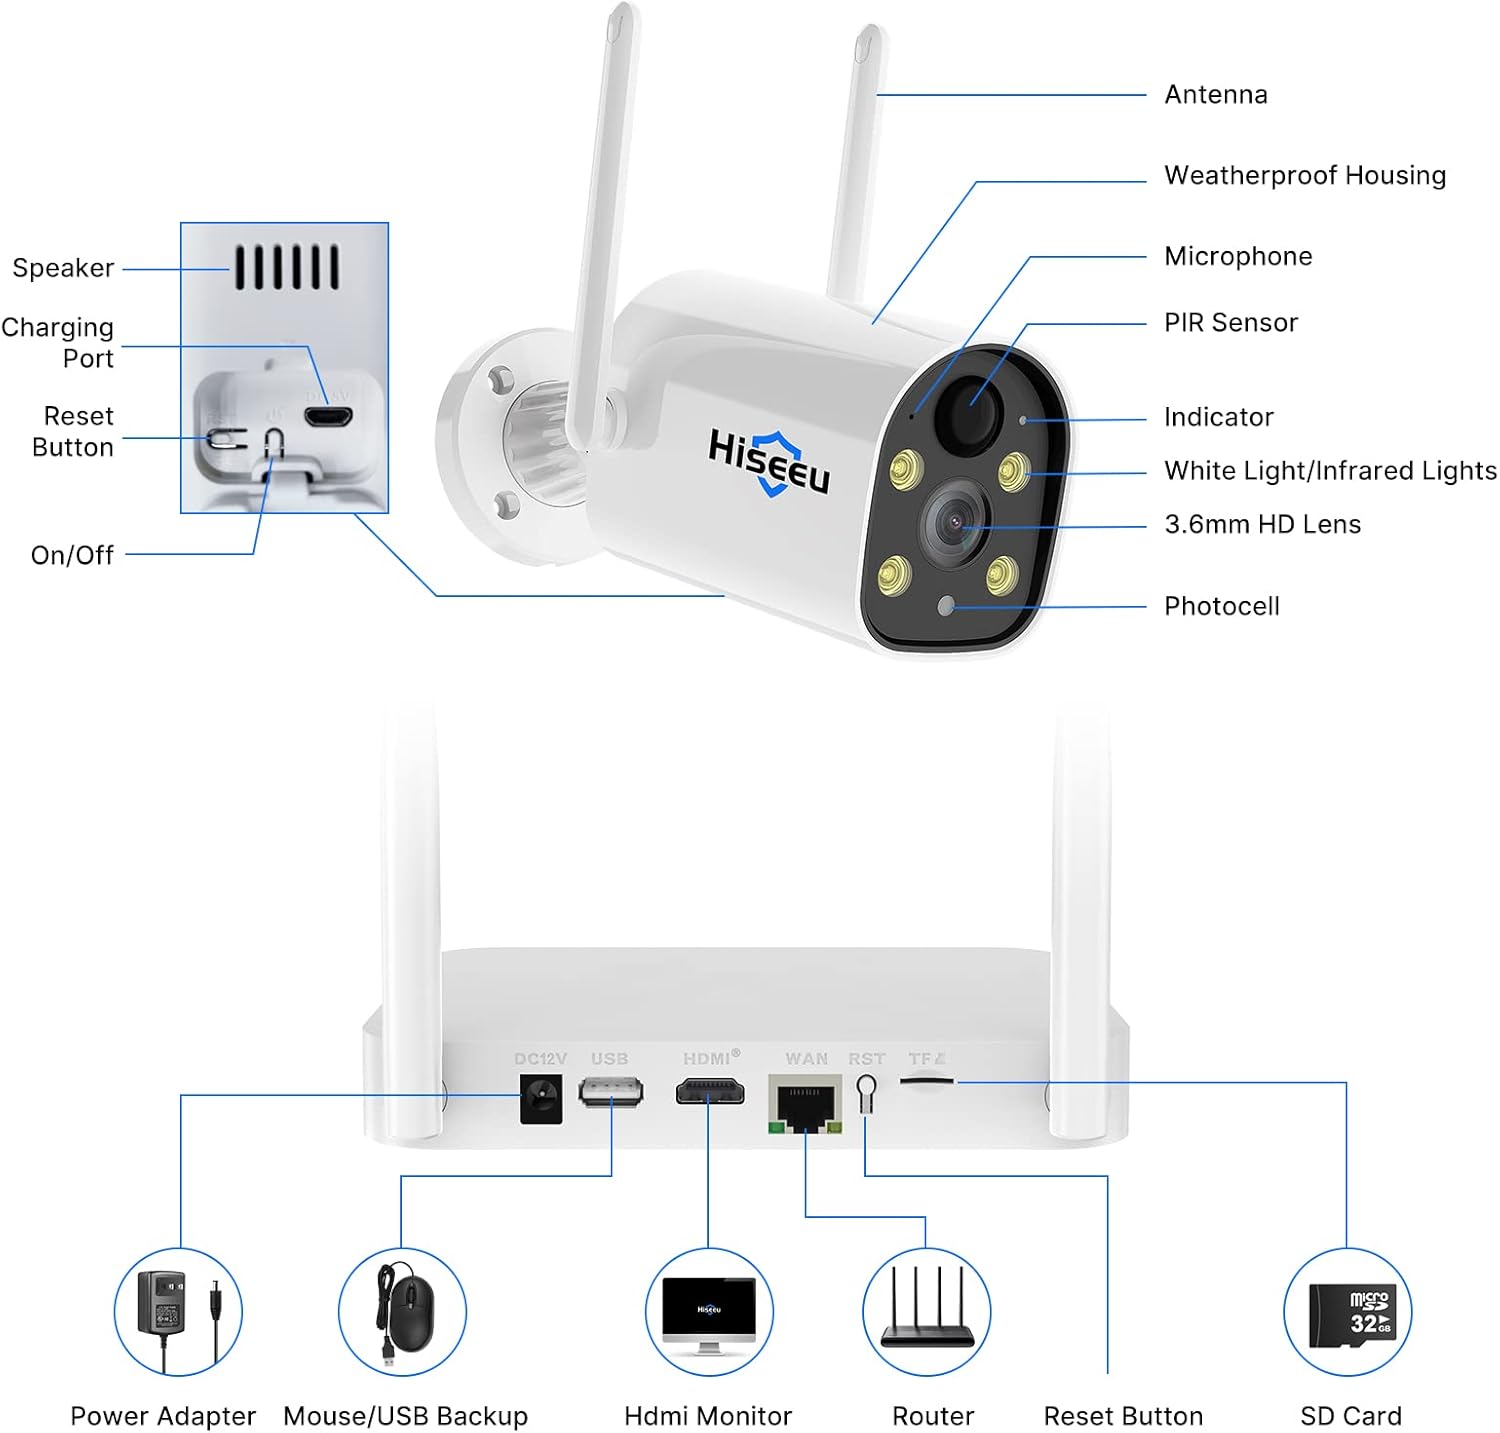
- Antenna: For wireless signal transmission.
- Weatherproof Housing: Protects internal components from environmental elements.
- Microphone: Captures audio for two-way communication.
- PIR Sensor: Passive Infrared sensor for human motion detection.
- Indicator Light: Displays camera status.
- White Light/Infrared Lights: Provides illumination for color night vision and infrared for standard night vision.
- 3.6mm HD Lens: Captures 4MP video footage.
- Photocell: Detects ambient light levels to activate night vision features.
- Speaker: Outputs audio for two-way communication and siren alarms.
- Charging Port: For connecting the solar panel or a power adapter.
- Reset Button: Used to reset the camera to factory settings.
- On/Off Switch: Powers the camera on or off.
3.2 NVR Ports
- DC12V: Power input for the NVR.
- USB Ports: For connecting a USB mouse or for USB backup.
- HDMI Port: Connects to a monitor or TV for video output.
- WAN Port: Connects to your router for internet access.
- RST Button: Resets the NVR.
- TF/SD Card Slot: For additional local storage (Micro SD card not included).
4. Setup Instructions
4.1 Initial NVR Setup
- Connect NVR to Power: Plug the NVR power adapter into the DC12V port and then into a power outlet.
- Connect to Monitor: Use an HDMI or VGA cable (not included) to connect the NVR to a monitor or TV.
- Connect USB Mouse: Plug the included USB mouse into one of the NVR's USB ports.
- Connect to Internet (Optional): For remote viewing and updates, connect an Ethernet cable from your router to the NVR's WAN port.
- Power On: The NVR will power on automatically. Follow the on-screen prompts for initial setup, including setting a password.
4.2 Camera Installation and Pairing
The cameras are pre-paired with the NVR from the factory. No manual pairing is typically required for initial setup.
- Charge Cameras: Ensure cameras are sufficiently charged. The solar panels will maintain the charge after installation.
- Select Mounting Location: Choose a location that provides the desired viewing angle and receives adequate sunlight for the solar panel. Ensure the location is within the NVR's wireless range.
- Mount Cameras: Use the provided screws and plugs to securely mount the cameras. Adjust the camera angle for optimal coverage.
- Connect Solar Panel: Connect the solar panel to the camera's charging port. Position the solar panel to maximize sun exposure.


5. Operating Instructions
5.1 Live View and Recording
Once the NVR and cameras are powered on, you should see the live feed on your connected monitor. The system is designed for motion detection recording to the pre-installed 1TB HDD.
- NVR HDD Storage: The 1TB hard drive stores motion-triggered recordings.
- SD Card Storage: An optional Micro SD card can be inserted into the NVR for additional local storage (not included).
- Cloud Storage: Cloud storage is available as an optional, paid service for remote backup.

5.2 AI Human Detection and Alerts
The system utilizes advanced AI human detection to minimize false alarms by distinguishing humans from other objects or animals.
- When a human is detected, the system can trigger alerts and rings on your screen.
- Notifications can be sent via email or app push to your mobile device.

5.3 Two-Way Audio
Each camera is equipped with a microphone and speaker, enabling two-way communication through the connected NVR or mobile application.

5.4 Night Vision and Siren Alarm
- Color Night Vision: When ambient light is low, the camera's floodlight can activate to provide full-color night vision.
- Infrared Night Vision: In complete darkness, infrared LEDs provide clear black and white night vision up to 65 feet.
- Siren Alarm: You can manually activate a siren function via the mobile app to deter intruders.


6. Maintenance
- Clean Lenses: Regularly clean camera lenses with a soft, damp cloth to ensure clear image quality.
- Solar Panel Cleaning: Keep solar panels free of dust, dirt, and debris to ensure efficient charging.
- Firmware Updates: Check for and install firmware updates for the NVR and cameras to ensure optimal performance and security.
- Battery Health: While solar-powered, monitor camera battery levels, especially during prolonged periods of low sunlight.
7. Troubleshooting
| Issue | Possible Cause | Solution |
|---|---|---|
| No image on monitor | NVR not powered on, monitor cable loose, incorrect input selected on monitor. | Check NVR power, ensure HDMI/VGA cable is secure, select correct input on monitor. |
| Camera not connecting/offline | Camera battery low, out of NVR range, interference, camera powered off. | Check camera battery and solar panel connection, move camera closer to NVR, restart camera. |
| Motion detection not working | PIR sensor blocked, sensitivity settings too low, incorrect detection zone. | Clear sensor, adjust sensitivity in NVR settings, configure detection zones. |
| Two-way audio issues | Microphone/speaker blocked, volume settings incorrect, network issues. | Ensure clear path for audio, check volume levels on NVR/app, verify network connection. |
| Poor night vision | Lens dirty, IR/white lights blocked, insufficient power for lights. | Clean lens, ensure lights are unobstructed, check camera battery level. |
8. Specifications
| Feature | Detail |
|---|---|
| Brand | Hiseeu |
| Model Number | WK-3C40-AT |
| Connectivity Technology | 2.4GHz WiFi |
| Video Capture Resolution | 2304*1296 (4MP) |
| Number of Channels | 10 (NVR supports up to 10 cameras) |
| Memory Storage Capacity | 1 TB (pre-installed HDD) |
| Power Source | Battery Powered (cameras with solar panels) |
| Item Dimensions (L x W x H) | 8.66 x 7.48 x 11.81 inches |
| Operating System Compatibility | Windows or Mac OS (for client software) |
| Compatible Devices | Phone, iPad, Computer |
| Low Light Technology | Color Night Vision |
| Night Vision Range | 65 Feet |
| Frame Rate | 15fps |
| Recording Mode | Motion Detection |
| Total USB Ports | 2 (on NVR) |
| Hardware Interface | 802.11 b/g/n |
| Lens Type | Fixed (F=3.6mm) |
| Viewing Angle | 75 Degrees |
| IP Rating | IP66 Waterproof |
| Batteries | 1 Lithium Ion battery required (included per camera) |
9. Warranty and Support
Hiseeu provides comprehensive customer support for your security camera system.
- Warranty: A 12-month warranty is provided from the date of purchase.
- Lifetime After-Sale Support: Access friendly lifetime support via online chat, email, or phone call. Refer to the detailed user guide (PDF) for contact information.


