1. Introduction
This manual provides detailed instructions for the operation and maintenance of your Marea Smartwatch B57002/7. Please read this manual thoroughly before using the device to ensure proper function and to avoid damage.
The Marea Smartwatch B57002/7 is a versatile device designed to assist you in monitoring your health and fitness, as well as providing convenient access to notifications and controls from your smartphone.
2. Product Overview
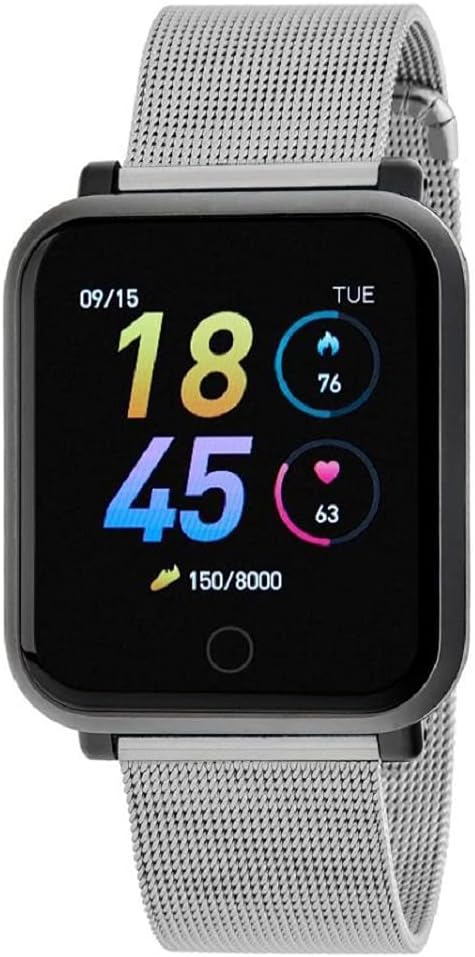
Figure 1: Marea Smartwatch B57002/7. The watch features a rectangular black display showing the time (18:45), date (09/15), day (TUE), calories burned (76), heart rate (63), and step count (150/8000). It is fitted with a silver-colored stainless steel mesh strap.
Key Features:
- 1.3-inch digital display
- Bluetooth connectivity for smartphone pairing
- Integrated fitness tracking: step counting, distance, calorie tracking
- Health monitoring: heart rate, blood pressure, blood oxygen, sleep analysis
- Smart notifications: calls, messages, social media alerts
- Convenience features: alarm, stopwatch, music control, remote camera control, weather display
- Durable design with stainless steel mesh strap
- Water-resistant (refer to safety information for limitations)
- Up to 7 days of battery life
3. Initial Setup
3.1 Charging the Device
Before first use, fully charge your Marea Smartwatch. Connect the charging cable to the charging port on the back of the watch and plug the USB end into a compatible power source (e.g., computer USB port, 5V/1A USB adapter). The watch display will indicate charging status. A full charge typically takes approximately 2 hours.
3.2 App Installation and Pairing
- Download the App: Search for the official Marea Smartwatch application in your smartphone's app store (iOS App Store or Google Play Store). Install the application.
- Create Account: Open the app and follow the on-screen instructions to create a user account or log in if you already have one.
- Enable Bluetooth: Ensure Bluetooth is enabled on your smartphone.
- Pair the Device: In the Marea app, navigate to the device pairing section. Select "Add Device" or a similar option. The app will search for available devices. Select "Marea B57002/7" from the list.
- Confirm Pairing: A pairing request may appear on your watch and/or phone. Confirm the pairing on both devices.
- Complete Setup: Once paired, the app will guide you through initial settings such as personal information (height, weight, age) for accurate fitness tracking, and notification preferences.
4. Operating Instructions
4.1 Basic Navigation
- Touch Screen: The watch features a full touch screen. Swipe left, right, up, or down to navigate through menus and functions.
- Wake Screen: Raise your wrist or press the side button (if present) to wake the screen.
- Return to Home: Typically, a short press of the side button or a swipe from a specific direction will return you to the main watch face.
4.2 Fitness Tracking
The smartwatch automatically tracks your daily activity.
- Step Counting: Displays the number of steps taken.
- Distance: Estimates the distance covered based on your steps and stride length.
- Calories: Calculates calories burned based on your activity and personal data.
- Setting Goals: You can set daily step goals within the Marea app. The watch will show your progress towards these goals.
4.3 Health Monitoring
- Heart Rate: Swipe to the heart rate interface to measure your current heart rate. For best results, ensure the watch is snug on your wrist.
- Blood Pressure: Access the blood pressure function on the watch. Remain still during measurement.
- Blood Oxygen: Navigate to the blood oxygen interface for measurement.
- Sleep Monitoring: The watch automatically monitors your sleep patterns when worn during sleep. View detailed sleep data in the Marea app.
- Sedentary Reminder: Configure sedentary reminders in the app to prompt you to move after periods of inactivity.
- Important Note: The health monitoring functions of this device are for reference purposes only and are not intended for medical diagnosis, treatment, or prevention of disease. Consult a medical professional for any health concerns.
4.4 Sport Mode
The watch includes various sport modes to track specific activities. Select the desired sport mode from the watch menu to begin tracking. Data such as duration, calories burned, and heart rate will be recorded for the activity.
4.5 Notifications and Controls
- Call Notifications: The watch will display incoming call alerts. You can typically reject calls from the watch.
- Message Reading: View incoming SMS messages and notifications from supported apps directly on your watch screen. Configure which app notifications to receive in the Marea app.
- Music Control: Control music playback on your paired smartphone (play, pause, skip tracks) from your watch.
- Photo Control: Use your watch as a remote shutter button for your smartphone's camera. Open the camera function in the Marea app, then use the watch to take photos.
- Weather: Displays current weather information after syncing with the app.
- Alarm & Stopwatch: Set alarms and use the stopwatch function directly on the watch.
5. Specifications
| Feature | Detail |
|---|---|
| Model Number | B57002/7 |
| Display | 1.3 inches, Digital |
| Dimensions | 34.5 x 40 mm |
| Connectivity | Bluetooth |
| Compatible Devices | Smartphone (iOS and Android) |
| Battery Life | Up to 7 days (typical usage) |
| Strap Material | Stainless Steel Mesh |
| Special Features | Time display, Pedometer, Alarm, Heart Rate Monitor, Blood Pressure Monitor, Blood Oxygen Monitor, Sleep Tracker, Sedentary Reminder, Music Control, Camera Control, Notifications |
6. Maintenance and Care
- Cleaning: Wipe the watch screen and body with a soft, dry, lint-free cloth. For the strap, use a slightly damp cloth if necessary, and dry thoroughly. Avoid harsh chemicals or abrasive cleaners.
- Charging: Use only the provided charging cable. Ensure the charging contacts are clean and dry before charging.
- Storage: Store the watch in a cool, dry place when not in use. Avoid extreme temperatures.
- Water Exposure: While the watch is water-resistant, avoid prolonged submersion, hot water, or exposure to high-pressure water jets. Do not operate buttons underwater. Dry the watch thoroughly if it gets wet.
7. Troubleshooting
- Watch not turning on: Ensure the watch is fully charged. Connect it to the charger for at least 30 minutes.
- Cannot pair with smartphone:
- Ensure Bluetooth is enabled on your smartphone.
- Make sure the watch is within Bluetooth range of your phone.
- Restart both your watch and smartphone.
- Try unpairing and re-pairing the device through the Marea app.
- Inaccurate health data:
- Ensure the watch is worn snugly on your wrist, not too loose or too tight.
- Keep the sensor clean and free from debris.
- Avoid excessive movement during measurements.
- Notifications not received:
- Check if the watch is successfully paired with your phone.
- Verify that app notifications are enabled in your smartphone's settings and within the Marea app.
- Ensure the Marea app is running in the background on your phone.
8. Safety Information
- Do not attempt to disassemble or modify the watch. This may cause damage and void the warranty.
- Keep the watch away from extreme temperatures, direct sunlight, and open flames.
- Avoid exposing the watch to strong impacts or drops.
- Keep out of reach of children and pets.
- Water Resistance: The watch is designed to be water-resistant for daily use (e.g., hand washing, rain). It is not suitable for swimming, diving, or showering with hot water. Water damage due to improper use is not covered under warranty.
- Medical Disclaimer: This device is not a medical device. Data provided by the watch (heart rate, blood pressure, blood oxygen, etc.) is for general fitness and wellness purposes only and should not be used for medical diagnosis or treatment. Consult a healthcare professional for any health concerns.
9. Warranty and Support
For warranty information and customer support, please refer to the warranty card included with your product or visit the official Marea website. Please retain your proof of purchase for warranty claims.