EBUYFIRE kx6
EBUYFIRE Bike Light User Manual
USB Rechargeable Bicycle Front Headlight and Back Taillight
Product Overview
The EBUYFIRE Bike Light set provides high-brightness illumination for cycling safety. It includes a powerful 6-LED front headlight and a bright rear taillight. Both lights are USB rechargeable and designed for durability and versatility, suitable for various outdoor activities beyond cycling.
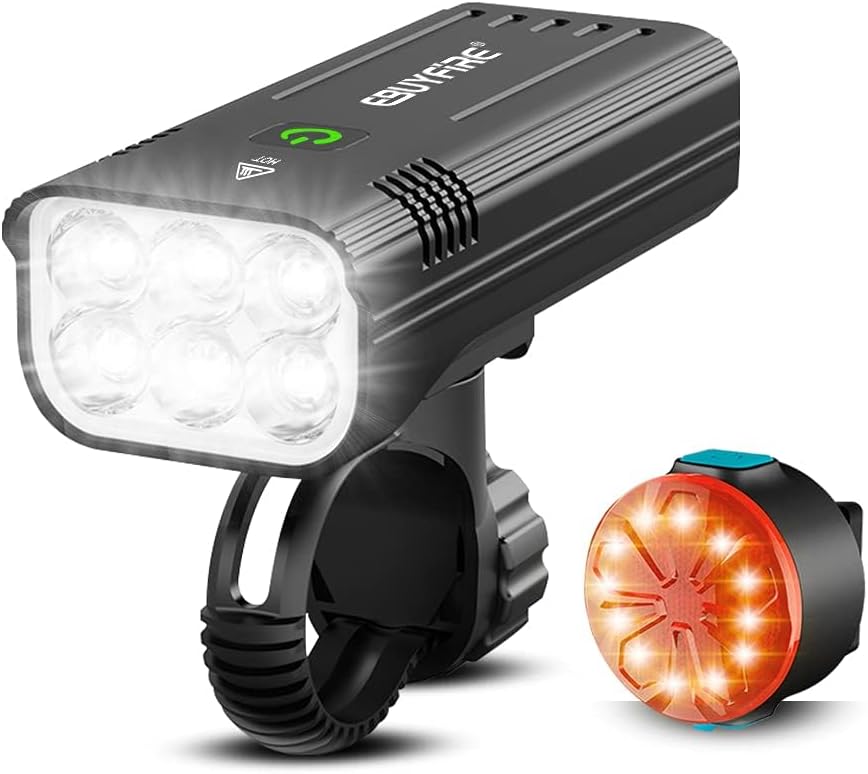
Key features include multiple light modes for different conditions, a robust aluminum alloy shell for the headlight, and the ability for the headlight to function as a portable power bank for charging mobile devices.

Package Contents
Please verify that all items listed below are included in your package:
- 1 x EBUYFIRE Bike Headlight
- 1 x EBUYFIRE Bike Taillight
- 1 x Headlight Mounting Bracket
- 1 x Taillight Mounting Strap
- 2 x USB Charging Cables
- 1 x User Manual

Setup & Installation
Follow these steps to properly install your EBUYFIRE Bike Light set on your bicycle.
Headlight Installation
- Attach the headlight mounting bracket to your bicycle's handlebar. Ensure it is securely fastened and positioned centrally.
- Slide the EBUYFIRE headlight onto the bracket until it clicks into place. The headlight features a quick-release mechanism for easy removal.

Taillight Installation
- Wrap the taillight silicone strap around your bicycle's seat post.
- Secure the strap by hooking it onto the taillight's designated slot.

Installation Demonstration Video
Watch this video for a visual guide on installing and uninstalling both the headlight and taillight:
Operating Instructions
Learn how to operate your EBUYFIRE Bike Lights and utilize their various modes.
Headlight Operation
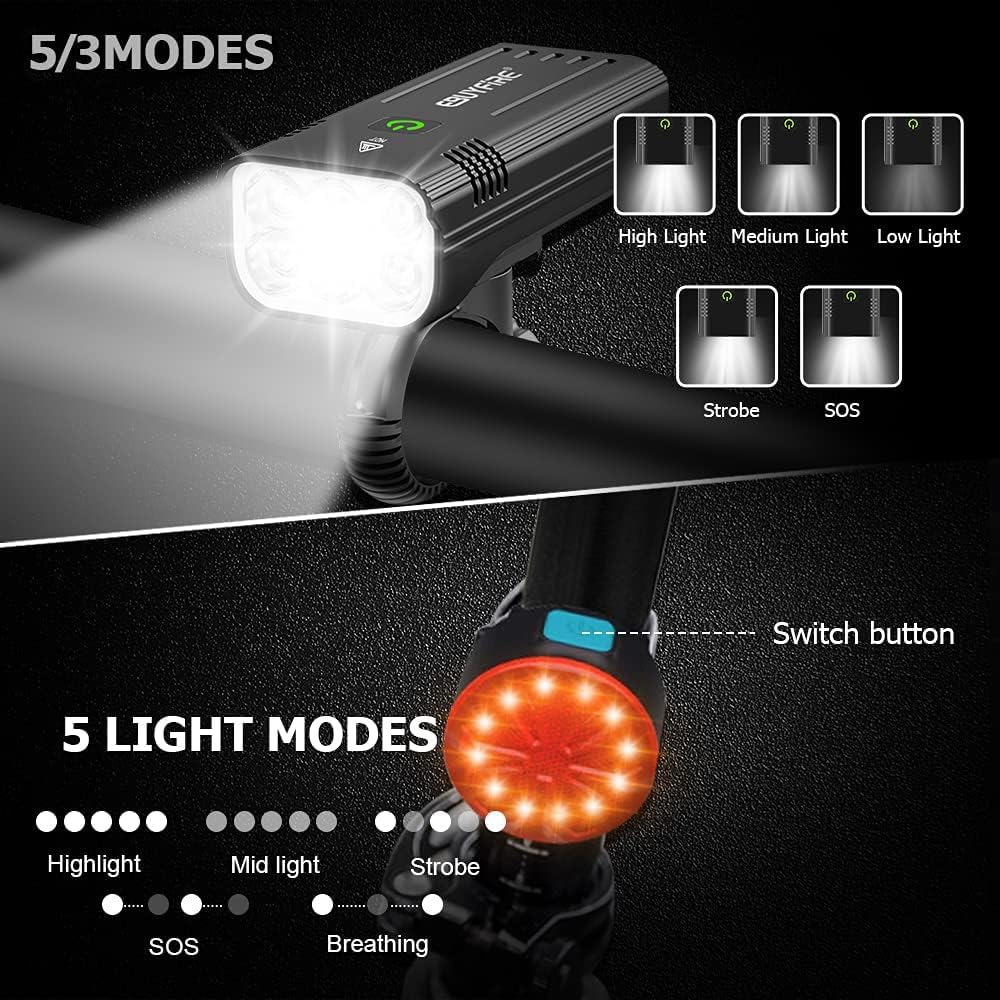
To turn the headlight ON/OFF, press and hold the power button for 2 seconds. Short press the power button to cycle through the different lighting modes.
- 5 Light Modes: High Light, Medium Light, Low Light, Strobe, SOS.
- 3 Light Modes: High Light, Medium Light, Flash.
Taillight Operation
To turn the taillight ON/OFF, press and hold the power button. Short press the button to cycle through its lighting modes.
- 5 Light Modes: Hi, Low, Flash, Slow Flash, Breathing.
Mode Switching Demonstration Video
This video illustrates how to switch between the various modes for both the headlight and taillight:
Power Bank Function
The EBUYFIRE headlight can serve as a portable power bank. Connect your mobile phone or other USB-powered device to the USB output port on the headlight to charge it.

Charging
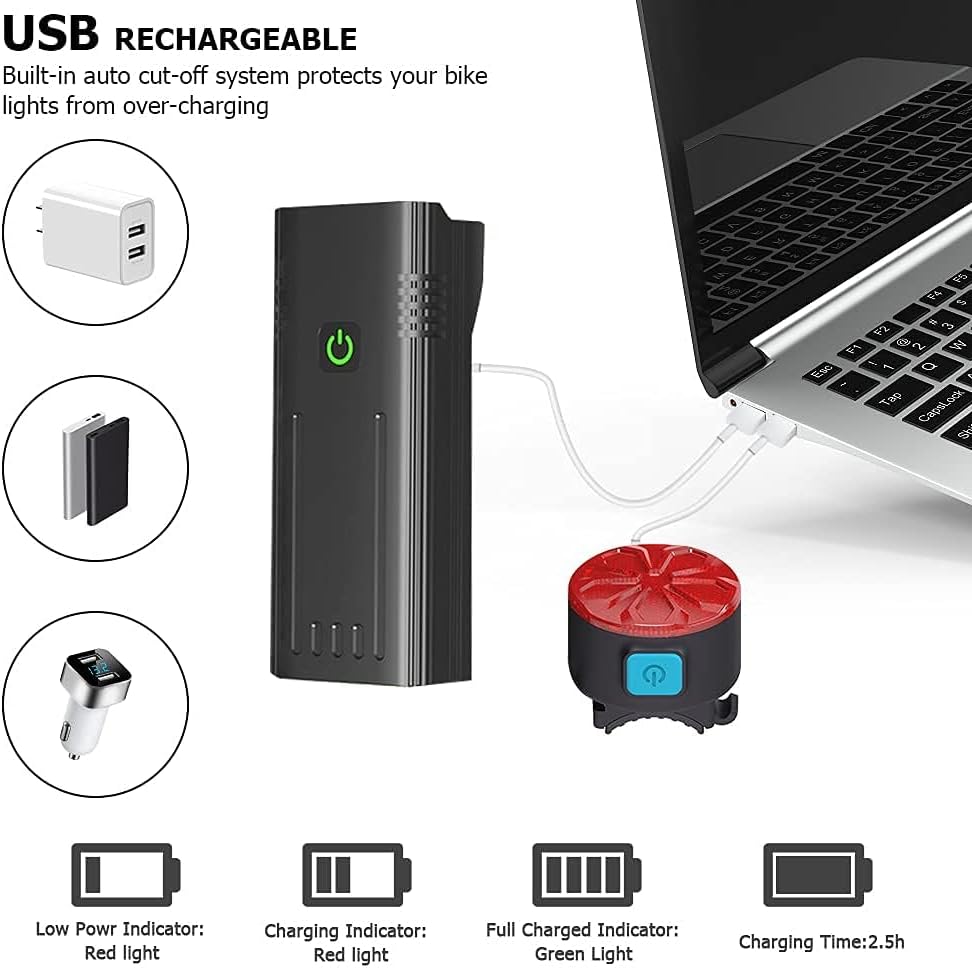
Both the headlight and taillight are USB rechargeable. Ensure they are fully charged before first use for optimal performance.
Charging the Headlight
Connect the provided USB charging cable to the headlight's input port and plug the other end into a USB power source (e.g., computer, wall adapter, power bank). The headlight has a built-in auto cut-off system to prevent overcharging.
Charging the Taillight
Connect the provided USB charging cable to the taillight's input port and plug the other end into a USB power source. The taillight also features charging indicators.
Charging Demonstration Video
This video demonstrates the charging process for both the headlight and taillight, including the power bank function:
Maintenance
Proper maintenance ensures the longevity and optimal performance of your EBUYFIRE Bike Lights.
- Cleaning: Wipe the lights with a soft, damp cloth to remove dirt and debris. Do not use abrasive cleaners or solvents.
- Storage: Store the lights in a cool, dry place when not in use. If storing for extended periods, charge the batteries every 3-6 months to maintain battery health.
- Water Resistance: The lights are rated IPX5 waterproof, meaning they are protected against low-pressure water jets from any direction. They can be used normally in rainy conditions but should not be submerged in water.

Water Resistance Demonstration Video
This video demonstrates the IPX5 waterproof capability of the EBUYFIRE bike lights:
Troubleshooting
If you encounter any issues with your EBUYFIRE Bike Lights, refer to the following common problems and solutions:
| Problem | Possible Cause | Solution |
|---|---|---|
| Light does not turn on. | Battery is depleted. | Charge the light fully using the provided USB cable. |
| Light does not charge. | Faulty charging cable or power source. | Try a different USB cable or power adapter. Ensure connections are secure. |
| Light is dim or battery life is short. | Battery not fully charged or aging battery. | Ensure a full charge cycle. If issues persist after multiple charges, battery degradation may be occurring. |
| Headlight mount feels loose or unstable. | Mounting bracket not tightened sufficiently or incorrect installation. | Re-tighten the mounting bracket screws. Ensure the headlight is fully clicked into the bracket. Consider adding a rubber shim if the handlebar is too narrow. |
Specifications
Detailed technical specifications for the EBUYFIRE Bike Light set:
| Feature | Specification |
|---|---|
| Brand | EBUYFIRE |
| Model Name | Kx6 |
| Color | 6Leds Set |
| Material | Aluminum |
| Power Source | Battery Powered |
| Water Resistance Level | IPX5 Waterproof |
| Item Weight | 0.31 Kilograms |
| Mounting Type | Handlebar Mount |
| Product Dimensions | 5.91"L x 3.94"W x 1.77"H |
| Number of Headlight Settings | 5 |
| Brightness | 3000 Lumen |
| Battery Capacity (Headlight) | Built-in 5200mAh batteries |
| USB Output (Headlight) | 5V2A |
| Included Components | Charging Cable |
Warranty & Support
EBUYFIRE products are designed for reliability and performance. This product comes with a 1-year warranty.
For technical support, warranty claims, or any product-related inquiries, please contact EBUYFIRE customer service through the retailer's platform or the official EBUYFIRE website. Please have your purchase details and product model number (Kx6) ready when contacting support.
Ask a question about this manual
Ask about setup, troubleshooting, compatibility, parts, safety, or missing instructions. Manuals+ will review the question and use this page’s manual context to help answer it.