hosote bxc997
hosote 26 Inch Full Suspension Mountain Bike User Manual
Model: bxc997
1. Introduction
Thank you for choosing the hosote 26 Inch Full Suspension Mountain Bike. This manual provides essential information for the safe assembly, operation, and maintenance of your bicycle. Please read this manual thoroughly before your first ride and keep it for future reference. Proper assembly and regular maintenance are crucial for your safety and the longevity of your bike.
2. Safety Information
Your safety is paramount. Always adhere to the following guidelines:
- Helmet Use: Always wear an approved bicycle helmet that fits correctly.
- Pre-Ride Check: Before each ride, inspect brakes, tires, gears, and all quick-release levers to ensure they are secure and functioning properly.
- Brake Operation: Learn to use both front and rear brakes effectively. The front brake provides more stopping power but can cause instability if applied too aggressively.
- Visibility: Use lights and reflective gear when riding in low-light conditions.
- Traffic Laws: Obey all local traffic laws and regulations.
- Rider Weight Limit: Do not exceed the recommended maximum rider weight of 330 lbs (approximately 150 kg).
- Tire Pressure: Maintain correct tire pressure as indicated on the tire sidewall.
- Regular Maintenance: Perform routine maintenance checks as outlined in this manual.
3. Package Contents
Your hosote mountain bike arrives approximately 80% assembled. Carefully unpack all components and verify that all parts are present before beginning assembly. The main components include:
- Bicycle Frame (with rear wheel, crankset, and rear derailleur pre-installed)
- Front Wheel
- Handlebar Assembly
- Seat Post with Saddle
- Pedals (Left and Right)
- Small Parts Bag (reflectors, tools, owner's manual)

Image 3.1: Overview of the hosote 26 Inch Full Suspension Mountain Bike. This image displays the complete bicycle from a side-front angle, highlighting its blue frame, 26-inch wheels, and full suspension system.
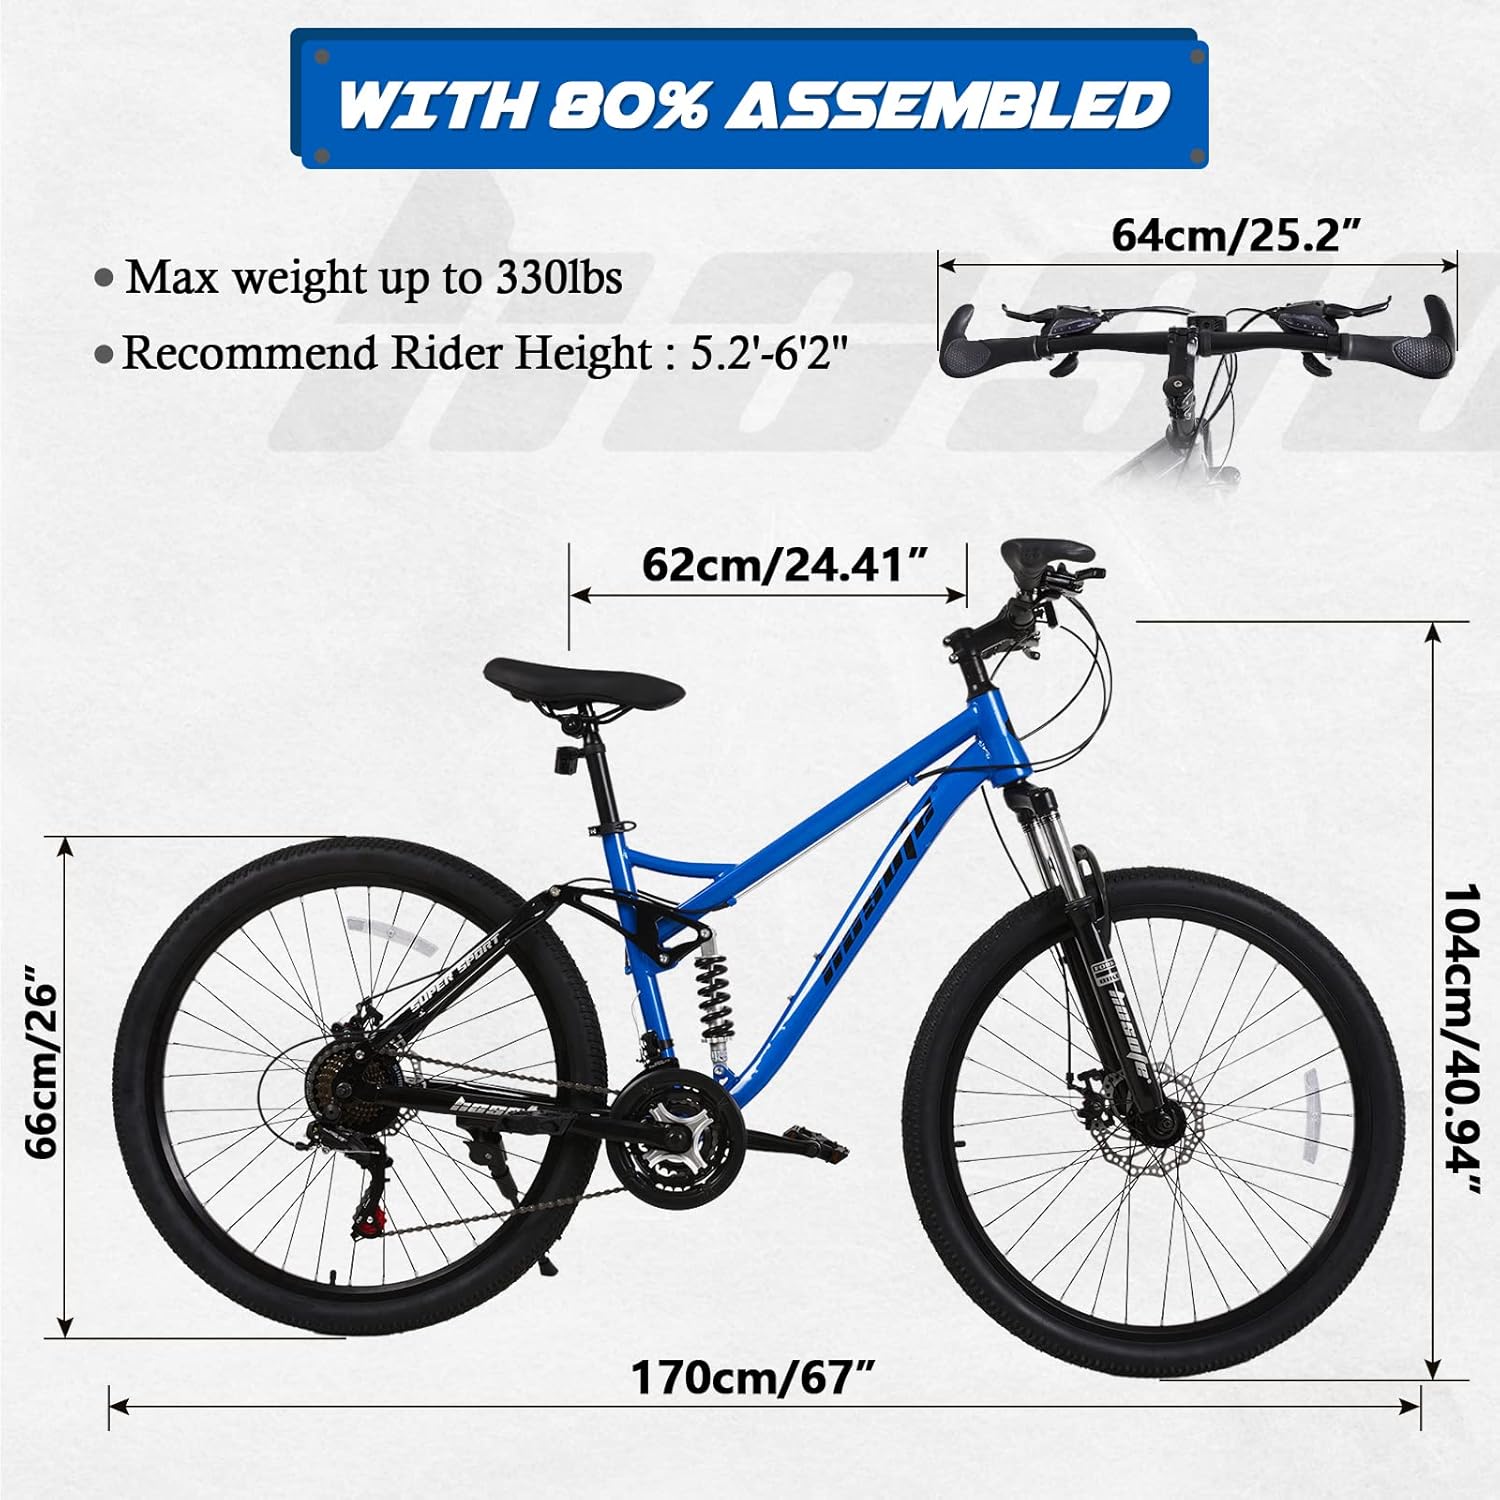
Image 3.2: The bicycle as it arrives, 80% assembled, with key dimensions. This image illustrates the bike's dimensions (wheel size, height, length, handlebar width) and indicates that it comes mostly pre-assembled, requiring final setup by the user.
4. Setup
Follow these steps to complete the assembly of your hosote mountain bike.
4.1 Handlebar Installation
- Loosen the bolts on the stem faceplate or side bolts, depending on your stem type.
- Carefully insert the handlebar into the stem, ensuring the brake levers and shifters are correctly oriented.
- Center the handlebar and tighten the stem bolts evenly to secure it. Ensure the handlebar is perpendicular to the front wheel.

Image 4.1: Close-up of the handlebar featuring the 21-speed Shimano shifter and ergonomic grip. This image highlights the controls for gear shifting and the comfortable design of the handlebar grips.
4.2 Front Wheel Installation
- Orient the front wheel so the disc rotor aligns with the brake caliper.
- Insert the wheel axle into the fork dropouts.
- If your bike has a quick-release skewer, ensure it is properly installed and tightened. If it has axle nuts, tighten them securely with a wrench.
- Spin the wheel to check for proper alignment and ensure it does not rub against the brake pads.

Image 4.2: Detail of the front wheel, disc brake, and suspension fork. This image provides a clear view of the front braking system and the shock-absorbing mechanism of the front suspension.
4.3 Seat Post Installation
- Apply a thin layer of grease to the seat post.
- Insert the seat post into the seat tube of the frame.
- Adjust the saddle height to a comfortable riding position (your leg should have a slight bend at the knee when the pedal is at its lowest point).
- Secure the seat post with the quick-release lever or seat post clamp bolt. Ensure it is tight enough to prevent the seat from slipping.
4.4 Pedal Installation
Important: Pedals are side-specific. The left pedal (marked 'L') has a left-hand thread and tightens counter-clockwise. The right pedal (marked 'R') has a right-hand thread and tightens clockwise.
- Identify the 'L' and 'R' pedals.
- Thread the 'L' pedal into the left crank arm (on the non-chainring side) by turning it counter-clockwise.
- Thread the 'R' pedal into the right crank arm (on the chainring side) by turning it clockwise.
- Tighten both pedals securely with a wrench.
4.5 Brake Adjustment
Ensure both front and rear disc brakes engage smoothly and effectively. The brake levers should not touch the handlebar when fully squeezed, and there should be no excessive drag when the wheels spin freely.
- Squeeze each brake lever firmly several times to seat the brake pads.
- Check for proper brake pad alignment with the rotor. Adjust the caliper if necessary.
- Adjust cable tension using the barrel adjusters on the brake levers or calipers to achieve desired lever feel and stopping power.
4.6 Gear Adjustment
Your 21-speed Shimano drivetrain should shift smoothly through all gears. If shifting is rough or gears skip, minor adjustments may be needed.
- Shift through all gears on both the front and rear derailleur to check for proper operation.
- If gears are not shifting correctly, use the barrel adjusters on the shifters or derailleurs to fine-tune cable tension. Turning the adjuster counter-clockwise increases tension, clockwise decreases it.
- Consult a professional bike mechanic if you are unsure about gear adjustments.
4.7 Tire Inflation
Inflate tires to the recommended pressure indicated on the tire sidewall. Do not over-inflate or under-inflate.
5. Operating the Bicycle
Understanding your bike's features will enhance your riding experience.
5.1 Shifting Gears (21 Speed Shimano Drivetrain)
Your bike is equipped with a 21-speed Shimano drivetrain, offering a wide range of gears for various terrains. The left shifter controls the front derailleur (3 speeds), and the right shifter controls the rear derailleur (7 speeds).
- Front Derailleur (Left Shifter): Use for large changes in resistance. Shift to a larger chainring for higher speeds or downhill, and to a smaller chainring for climbing.
- Rear Derailleur (Right Shifter): Use for fine-tuning resistance. Shift to a larger cog (lower gear) for easier pedaling on climbs, and to a smaller cog (higher gear) for faster pedaling on flats or descents.
- Shift gears smoothly by easing off pedal pressure slightly during the shift. Avoid shifting under heavy load.
5.2 Braking (Dual Disc Brakes)
The hosote mountain bike features dual disc brakes for reliable stopping power in various conditions.
- Front Brake (Left Lever): Provides significant stopping power. Use with caution, especially on loose surfaces, to avoid skidding or losing control.
- Rear Brake (Right Lever): Helps control speed and provides stability.
- For effective stopping, apply both brakes simultaneously, with slightly more pressure on the front brake. Shift your weight slightly backward to maintain balance.
5.3 Suspension System (Full Suspension)
This bike features a full suspension system, including both front and rear suspension, designed to absorb shocks and vibrations from uneven terrain, providing a smoother and more comfortable ride.

Image 5.1: Diagram illustrating the full suspension system, highlighting both the front suspension fork and the rear shock absorber. This image visually explains how the bike's suspension components work together to absorb impacts.
The suspension system is factory-tuned for general use. No user adjustments are typically required for basic operation. For advanced tuning, consult a professional bike mechanic.
6. Maintenance
Regular maintenance ensures the safety, performance, and longevity of your bicycle.
- Cleaning: Regularly clean your bike with mild soap and water, especially after riding in wet or muddy conditions. Avoid high-pressure washers directly on bearings.
- Lubrication: Keep the chain clean and lubricated. Apply bicycle-specific chain lubricant regularly, especially after wet rides. Lubricate pivot points on derailleurs and brake calipers as needed.
- Tire Pressure: Check tire pressure before each ride and inflate to the recommended PSI.
- Brake Check: Inspect brake pads for wear and replace them when necessary. Ensure brake levers feel firm and responsive.
- Gear Check: Periodically check that gears shift smoothly and accurately. Adjust cable tension if needed.
- Bolt Tightness: Regularly check all bolts and quick-release levers for proper tightness. Pay special attention to handlebar, stem, seat post, and wheel axles.
- Suspension: Keep suspension components clean. If you notice any leaks or unusual noises, consult a professional.
7. Troubleshooting
This section addresses common issues you might encounter.
| Problem | Possible Cause | Solution |
|---|---|---|
| Gears skip or don't shift smoothly | Incorrect cable tension, dirty chain, bent derailleur hanger | Adjust derailleur cable tension using barrel adjusters. Clean and lubricate chain. Inspect derailleur hanger for damage. |
| Brakes feel spongy or weak | Loose cable, worn brake pads, air in hydraulic system (if applicable) | Tighten brake cable. Replace worn brake pads. Consult a mechanic for hydraulic brake bleeding. |
| Tires lose air quickly | Puncture, leaky valve stem, improperly seated tire bead | Inspect tire and tube for punctures and repair/replace. Check valve stem for tightness. Re-seat tire bead. |
| Creaking noises | Loose bolts, dry bottom bracket, dry seat post | Check and tighten all bolts. Lubricate seat post. Consult a mechanic for bottom bracket issues. |
8. Specifications
Key specifications for the hosote 26 Inch Full Suspension Mountain Bike:
| Feature | Specification |
|---|---|
| Brand | hosote |
| Model Number | bxc997 |
| Bike Type | Mountain Bike |
| Wheel Size | 26 Inches |
| Number of Speeds | 21 Speed (Shimano Drivetrain) |
| Brake Type | Dual Disc Brakes |
| Suspension Type | Full Suspension (Front & Rear) |
| Frame Material | Carbon Steel |
| Special Feature | Foldable |
| Recommended Rider Height | 5'2" - 6'2" |
| Max Weight Capacity | 330 lbs (150 kg) |
| Item Weight | 18 kg (39.7 lbs) |
| Color | Blue |
9. Warranty and Support
For warranty information, specific product support, or to purchase replacement parts, please contact hosote customer service directly. Refer to the contact information provided with your purchase documentation or visit the official hosote website.
Related Documents - bxc997
 |
J1S040 Cabinet Assembly Instructions Step-by-step assembly guide for the J1S040 cabinet, including detailed part identification, hardware list, and instructions for safe installation and anti-tip hardware. |
 |
D3M555 Vanity Desk with Lighted Mirror - Assembly Instructions and Product Information Comprehensive assembly guide and product details for the D3M555 Vanity Desk with Lighted Mirror. Includes parts list, step-by-step instructions, and features of the adjustable LED vanity lights. |
 |
J3L111BR01/J3L111GR01 Bed Frame Installation Guide Comprehensive installation guide for the J3L111BR01 and J3L111GR01 bed frame. Includes parts identification, hardware list, and step-by-step assembly instructions with detailed diagrams. |
 |
JY9929 Corner Cabinet Installation Manual - Hosote Detailed installation guide for the Hosote JY9929 corner cabinet. Includes part identification, assembly steps, hardware list, and wall mounting instructions. Learn how to assemble your new corner storage unit. |