1. Introduction
Thank you for choosing the LITNIT Convoy S2+ SST40 Flashlight. This compact and powerful flashlight is designed for reliability and performance, featuring a Luminus SST40 LED, a copper DTP board for efficient heat dissipation, and an AR-coated glass lens for optimal light transmission. It includes built-in temperature protection and reverse polarity protection to ensure safe operation. This manual provides detailed instructions for setup, operation, and maintenance to help you get the most out of your device.

Image 1: The LITNIT Convoy S2+ SST40 Flashlight, showcasing its gray aluminum alloy body and lanyard.
2. Setup
2.1 Battery Installation
The Convoy S2+ flashlight requires one (1) 18650 lithium battery (protected or unprotected type). The battery is not included with the flashlight and must be purchased separately.
- Unscrew the tail cap of the flashlight by turning it counter-clockwise.
- Insert one 18650 lithium battery with the positive (+) terminal facing towards the head of the flashlight. The flashlight features reverse polarity protection, but correct insertion is always recommended.
- Screw the tail cap back on by turning it clockwise until it is securely tightened. Ensure a snug fit to maintain proper electrical contact and water resistance.

Image 2: The tail cap unscrewed, revealing the battery compartment and spring contact.

Image 3: The flashlight body separated from the tail cap, illustrating the internal components.
3. Operating Instructions
3.1 Basic Operation
- Turn On/Off: Click the tail switch once to turn the flashlight on or off.
- Change Brightness Modes: With the flashlight on, click the tail switch to cycle through the available brightness modes.
3.2 Advanced Mode Configuration
The Convoy S2+ offers advanced mode configuration with 12 distinct mode groups and a mode memory function. To access the configuration menu, perform 20 quick clicks of the tail switch while the flashlight is on. The flashlight will then enter a flashing sequence to indicate options.
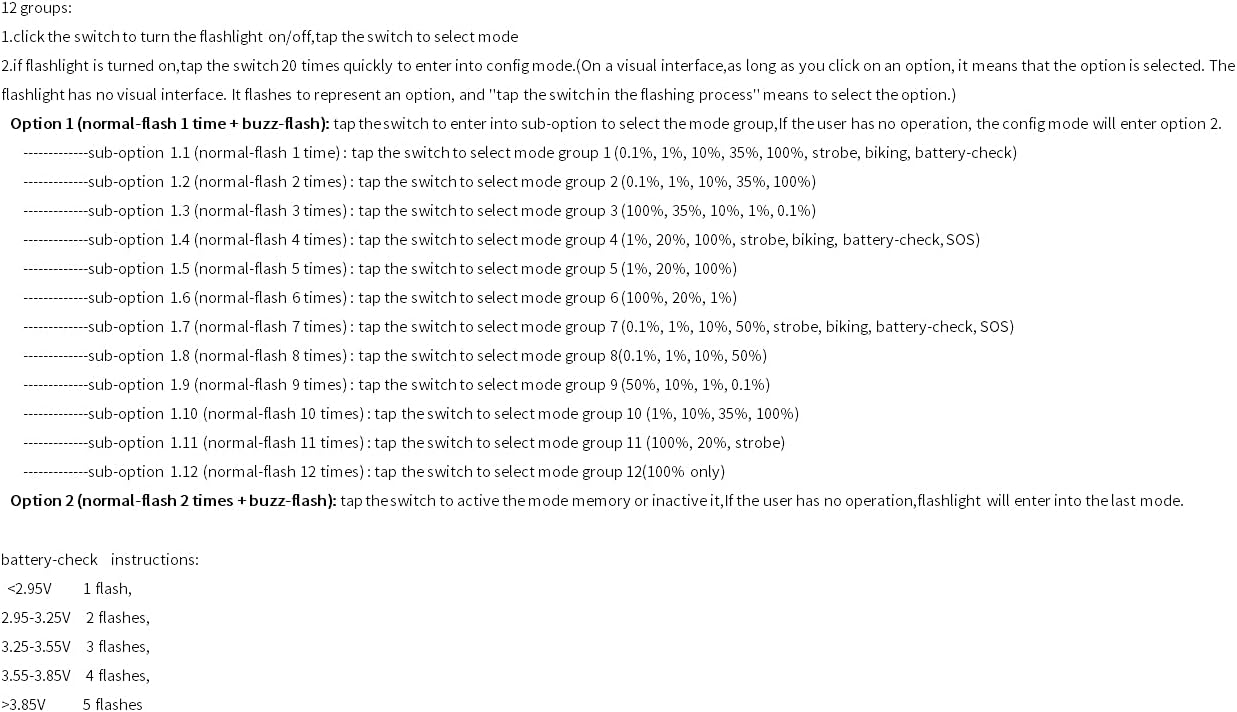
Image 4: Visual representation of the mode configuration options and battery check instructions.
Entering Configuration Mode:
From the ON state, perform 20 rapid clicks of the tail switch. The flashlight will then begin a series of flashes, indicating the configuration options.
Option 1: Select Mode Group
After entering configuration mode, the flashlight will flash once, then pause briefly, then flash again. This single flash represents 'Option 1'. To select this option, tap the switch during the single flash. This will allow you to choose one of the 12 predefined mode groups.
- The flashlight will then flash a number of times, corresponding to the mode group number (e.g., 1 flash for Group 1, 2 flashes for Group 2, etc.).
- To select a mode group, tap the switch during the flashing sequence that corresponds to your desired group. For example, if you want Group 5, wait for 5 flashes and then tap the switch.
Available Mode Groups:
- Group 1 (1 flash): 0.1%, 1%, 10%, 35%, 100%, Strobe, Biking, Battery-check
- Group 2 (2 flashes): 0.1%, 1%, 10%, 35%, 100%
- Group 3 (3 flashes): 100%, 35%, 10%, 1%, 0.1%
- Group 4 (4 flashes): 1%, 20%, 100%, Strobe, Biking, Battery-check, SOS
- Group 5 (5 flashes): 1%, 20%, 100%
- Group 6 (6 flashes): 100%, 20%, 1%
- Group 7 (7 flashes): 0.1%, 1%, 10%, 50%, Strobe, Biking, Battery-check, SOS
- Group 8 (8 flashes): 0.1%, 1%, 10%, 50%
- Group 9 (9 flashes): 50%, 10%, 1%, 0.1%
- Group 10 (10 flashes): 1%, 10%, 35%, 100%
- Group 11 (11 flashes): 1%, 20%, Strobe
- Group 12 (12 flashes): 100% (only)
Option 2: Activate/Deactivate Mode Memory
After entering configuration mode, the flashlight will flash twice, then pause briefly, then flash again. This double flash represents 'Option 2'. To select this option, tap the switch during the double flash. This will toggle the mode memory function.
- If mode memory is active, the flashlight will turn on in the last used brightness level.
- If mode memory is inactive, the flashlight will always start in the lowest brightness mode.
3.3 Battery Check Instructions
To check the battery voltage, activate the 'Battery-check' mode within a selected mode group (if available). The flashlight will flash to indicate the voltage level:
- <2.95V: 1 flash (Low battery, recharge immediately)
- 2.95-3.25V: 2 flashes
- 3.25-3.55V: 3 flashes
- 3.55-3.85V: 4 flashes
- >3.85V: 5 flashes (Full or near-full charge)
4. Maintenance
- Cleaning: Periodically clean the flashlight body with a soft, damp cloth. Avoid using harsh chemicals or abrasive materials.
- Threads and O-rings: Apply a thin layer of silicone grease to the threads and O-rings every few months to ensure smooth operation and maintain water resistance.
- Battery Care: Remove the battery if the flashlight will not be used for an extended period. Store batteries in a cool, dry place.
- Lens Care: Clean the AR-coated glass lens with a microfiber cloth to remove dust or smudges. Avoid touching the lens directly with fingers.
5. Troubleshooting
| Problem | Possible Cause | Solution |
|---|---|---|
| Flashlight does not turn on. | Low or dead battery, incorrect battery insertion, loose tail cap. | Charge or replace the battery. Ensure battery is inserted with positive (+) end towards the head. Tighten the tail cap securely. |
| Light flickers or turns off intermittently. | Loose connections (tail cap, driver board), dirty contacts, low battery. | Ensure tail cap is fully tightened. Clean battery contacts and flashlight threads. Check battery charge. If issue persists, inspect internal connections (driver board, switch board) for tightness. |
| Reduced brightness or unexpected dimming. | Low battery, overheating (temperature protection activated). | Recharge the battery. Allow the flashlight to cool down if it has been operating on high modes for an extended period. |
6. Specifications
| Material | Aluminum Alloy |
| LED Type | Luminus SST40 6500K |
| Max Output | 1800 Lumens |
| Driver | 4 modes (0.1%-3%-30%-100%), max current output 5000mA, Temperature protection management inside |
| Lens Type | AR-coated glass lens |
| Reflector | Smooth |
| Battery Type | 1 x 18650 Lithium (not included) |
| Low Voltage Warning | Yes |
| Reverse Polarity Protection | Yes |
| Mode Memory | Yes (toggleable) |
| Tailstand Capability | Yes |
| Water Resistance Level | Water Resistant |
| Height | 118mm |
| Width | 24.1mm |
| Weight | 76g (without battery) |
7. Warranty and Support
7.1 Limited Warranty
This LITNIT Convoy S2+ SST40 Flashlight comes with a limited warranty. Please refer to the product packaging or the retailer's website for specific warranty terms and conditions. The warranty typically covers manufacturing defects under normal use.
7.2 Customer Support
For technical assistance, warranty claims, or any questions regarding your LITNIT Convoy S2+ flashlight, please contact the retailer or manufacturer directly. Keep your purchase receipt as proof of purchase for warranty services.


