1. Introduction
This manual provides detailed instructions for the safe operation, setup, maintenance, and troubleshooting of your 4DRC H2 High Speed RC Car. Please read this manual thoroughly before operating the vehicle to ensure proper function and to prevent damage or injury. Keep this manual for future reference.

Image: The 4DRC H2 High Speed RC Car, highlighting its 4WD, 2.4Ghz control, dual batteries, 30KM/H speed, strong power, and drift tires.
2. Safety Precautions
Always observe the following safety guidelines to prevent injury or damage to the product:
- Operate the RC car in open areas away from people, pets, and obstacles.
- Do not operate near public roads, water, or high-voltage lines.
- Keep hands, hair, and loose clothing away from moving parts.
- Do not touch the motor immediately after use, as it may be hot.
- Ensure batteries are charged correctly and handled with care.
- Adult supervision is recommended for younger users.
- Do not modify the product, as this may void the warranty and cause unsafe operation.
3. Package Contents & Components Overview
3.1 Package Contents
Verify that all items are present in the package:
- 4DRC H2 RC Car
- Remote Controller
- Lithium Ion Batteries (x2)
- USB Charging Cable
- Racing Tires (pre-installed or separate set)
- Drift Tires (separate set)
- Instruction Manual

Image: An illustration showing the 4DRC H2 RC Car, remote controller, two batteries, USB charger, and two sets of tires (racing and drift), alongside the product box and manual.
3.2 Car Components
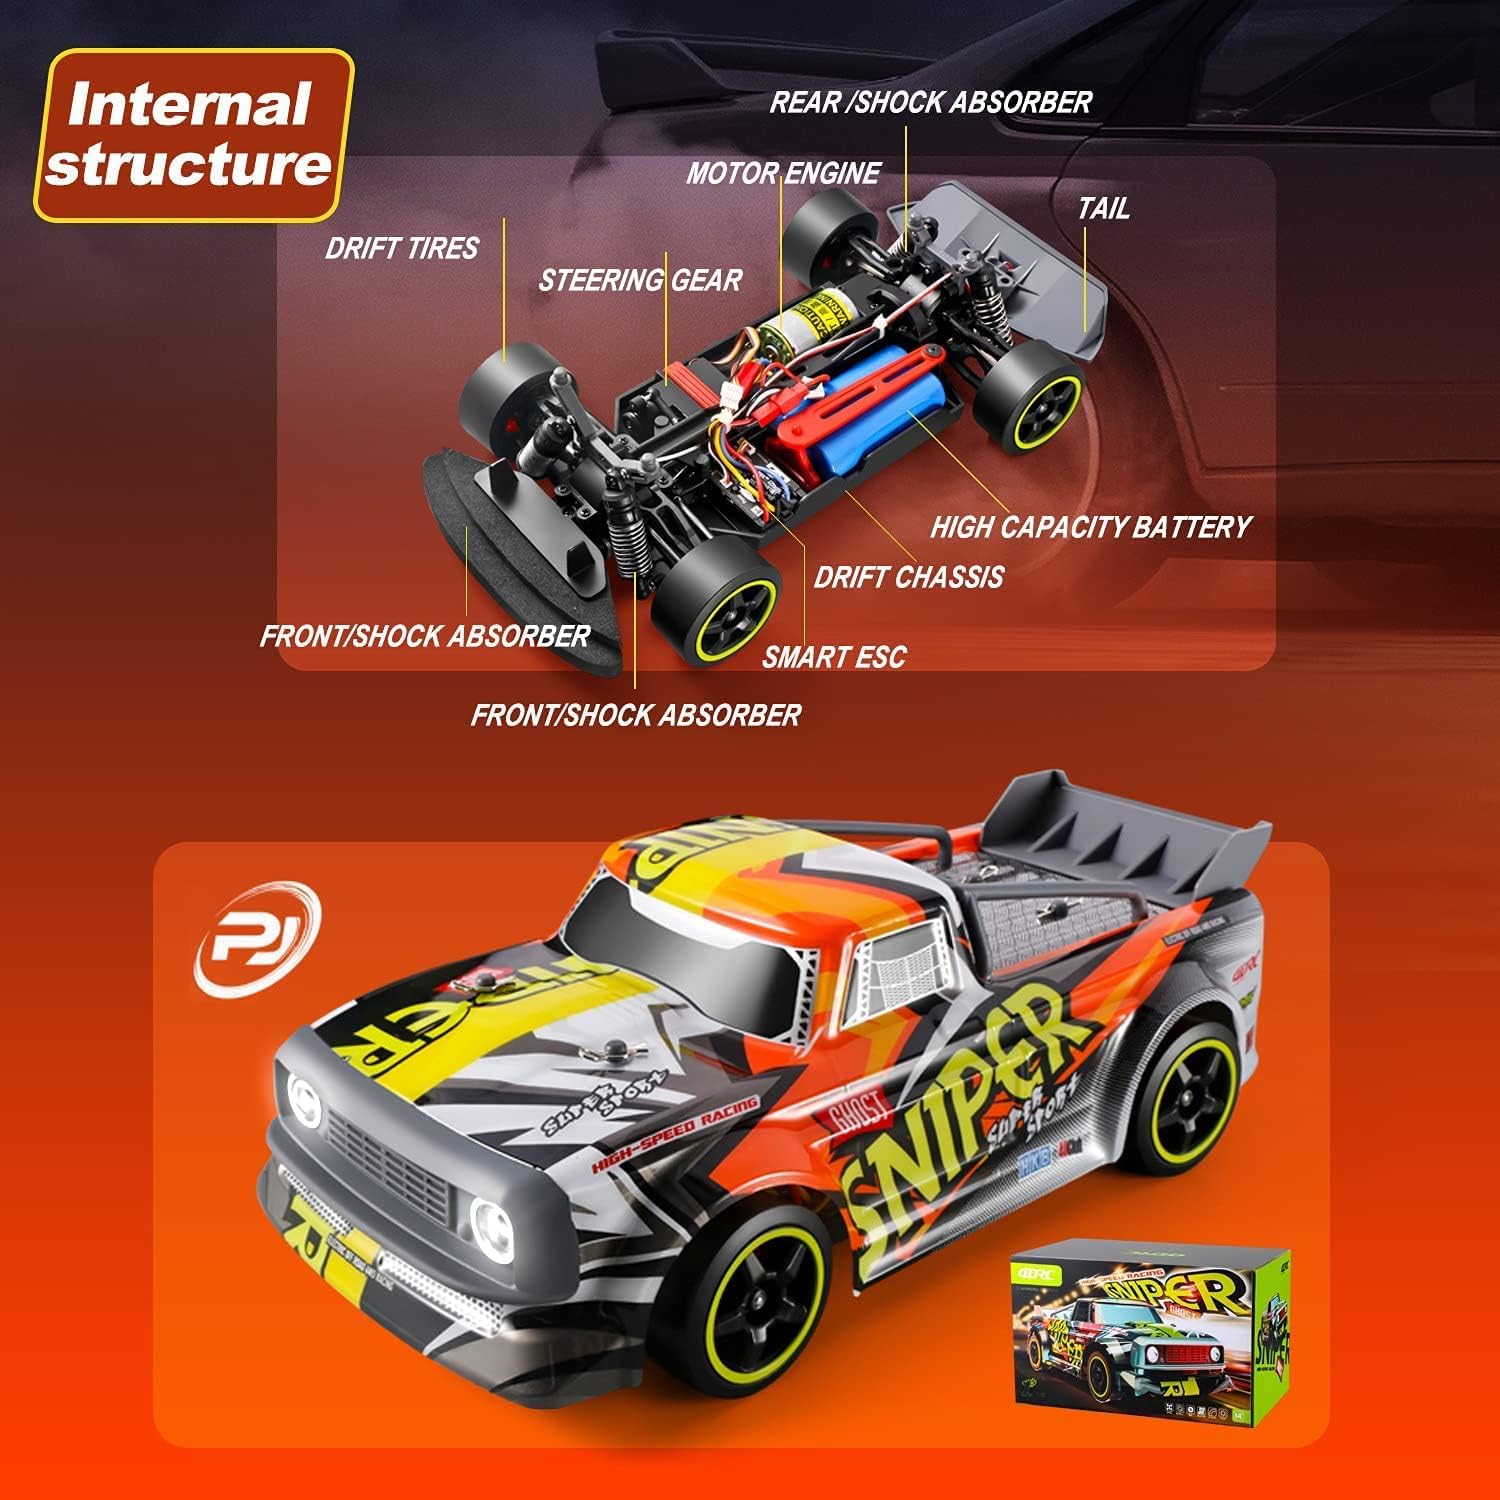
Image: A diagram illustrating the internal components of the RC car, including the motor engine, steering gear, smart ESC, high capacity battery, drift chassis, and front/rear shock absorbers.
3.3 Remote Controller Overview

Image: A detailed view of the remote control, labeling the Body Stability System (ESP+), Turn-to-Fine-Tuning, Reverse Throttle, Wheel Status Indicator Light (Green), TX (Transmitter), ST.TRIM, ST.D/R (Steering Range), ST.REV (Reverse Steering Amplitude), and Remote Control Status Indicator Light (Red).
4. Setup
4.1 Charging the Car Battery
- Connect the USB charging cable to the battery.
- Plug the USB end into a suitable USB power adapter (e.g., computer USB port, phone charger).
- The indicator light on the charger will show the charging status (refer to charger instructions for specific light patterns).
- Once fully charged, disconnect the battery from the charger.
Note:
- Do not overcharge the battery.
- Always supervise charging.
- Allow the battery to cool down before recharging after use.

Image: Two blue Lithium Ion batteries, indicating the power source for the RC car.
4.2 Installing Car Battery
- Locate the battery compartment on the underside of the RC car.
- Open the compartment cover.
- Insert the charged battery, ensuring correct polarity.
- Securely close the battery compartment cover.
4.3 Installing Remote Controller Batteries
- Open the battery compartment on the back of the remote controller.
- Insert the required batteries (usually AA, refer to packaging for exact type and quantity), observing correct polarity.
- Close the battery compartment cover.
4.4 Pairing the Remote Controller
- Turn on the RC car. The car's indicator light will flash.
- Turn on the remote controller.
- The remote controller and car will automatically pair. Once paired, the indicator lights on both the car and remote will become solid.
4.5 Changing Tires
The 4DRC H2 comes with two sets of tires: racing tires for grip and drift tires for sliding maneuvers.
- To change tires, carefully remove the wheel nuts using the provided tool.
- Remove the current tires and replace them with the desired set.
- Securely fasten the wheel nuts.

Image: The 4DRC H2 RC Car displayed with two distinct sets of tires: one labeled 'Racing Tires' suitable for all terrain, and another labeled 'Drift Tires' suitable for drifting.
5. Operation
5.1 Basic Controls
- Throttle Trigger: Pull to accelerate forward, push to brake/reverse.
- Steering Wheel: Turn left to steer left, turn right to steer right.

Image: A close-up of the remote control, indicating the steering wheel and accelerator trigger for controlling the RC car.
5.2 Advanced Controls & Adjustments
- ST.TRIM: Adjusts the steering trim to ensure the car drives straight when the steering wheel is centered.
- ST.D/R (Steering Dual Rate): Adjusts the maximum steering angle. Lowering this value reduces the steering sensitivity.
- TH.REV (Throttle Reverse): Reverses the throttle direction.
- ST.REV (Steering Reverse): Reverses the steering direction.
- ESP+ (Body Stability System): Activates or deactivates the electronic stability program for improved control, especially during high-speed maneuvers or on slippery surfaces.

Image: The remote control with a speed indicator, suggesting variable speed control.
5.3 Driving Tips
- Start slowly to get accustomed to the controls.
- Experiment with different tire types for various terrains and driving styles (racing vs. drifting).
- Utilize the ESP system for enhanced stability, especially when learning or on challenging surfaces.

Image: The RC car depicted on four different terrains: rocky ground (rock climbing), asphalt (racing), grassy field (grassland), and sand (sandy land), illustrating its versatility.
Video: An official product video demonstrating the 4DRC H2 high-speed RC car in action, showcasing its speed, drift capabilities, and performance on various surfaces.
6. Maintenance
6.1 Cleaning
- After each use, especially in dusty or dirty conditions, clean the car with a soft brush or cloth.
- Do not use water or harsh chemicals, as this can damage electronic components.
- Remove any debris from the wheels, suspension, and motor area.
6.2 Battery Care
- Store batteries in a cool, dry place away from direct sunlight.
- Do not store fully charged or completely depleted batteries for extended periods. Charge them to about 50% for long-term storage.
- If the car will not be used for a long time, remove the batteries from both the car and the remote controller.
6.3 General Inspection
- Regularly check for loose screws or damaged parts.
- Ensure the shock absorbers are functioning correctly.
- Inspect the tires for wear and tear.

Image: A detailed view of the RC car's shock absorber, indicating its role in suspension and handling.

Image: The underside of the RC car chassis, highlighting the anti-collision cotton for impact protection.
7. Troubleshooting
| Problem | Possible Cause | Solution |
|---|---|---|
| Car does not respond to remote. | Low batteries in car or remote; Not paired; Out of range. | Charge/replace batteries; Re-pair car and remote; Operate within range. |
| Car drives crooked. | Steering trim needs adjustment. | Adjust the ST.TRIM knob on the remote controller. |
| Reduced speed or power. | Low car battery; Motor/drivetrain obstruction. | Recharge car battery; Check for debris in gears or wheels. |
| Car stops unexpectedly. | Overheating; Low battery. | Allow car to cool down; Recharge battery. |
8. Specifications
- Brand: 4DRC
- Model: H2
- Scale: 1:16
- Drive System: 4WD (Four-Wheel Drive)
- Max Speed: Up to 30 KM/H
- Control Frequency: 2.4 GHz
- Batteries: 2 Lithium Ion batteries (included)
- Item Weight: Approximately 3.48 pounds
- Package Dimensions: 13.7 x 8.11 x 7.56 inches
- Features: High-speed motor, independent shock absorption, drift tires, racing tires, LED lights, body stability system.
9. Warranty & Support
For warranty information and customer support, please refer to the contact details provided on the product packaging or visit the official 4DRC website. Keep your purchase receipt as proof of purchase for any warranty claims.


