Introduction
The Skysonic R3 is an innovative acoustic guitar pickup system designed to provide reverb and chorus effects directly from your guitar, without the need for an external amplifier. It can also function as an electro-acoustic system when connected to an amplifier via a cable. This manual provides detailed instructions for the installation, operation, and maintenance of your Skysonic R3 system.
Important Safety and Installation Information
Disclaimer: This product is intended for installation by qualified professionals, such as guitar repair technicians. The installation process requires drilling holes in the guitar body, which can be complex. The manufacturer is not responsible for any malfunctions or damages resulting from self-installation.
If you are not confident in performing such modifications, it is strongly recommended to seek professional assistance.
Package Contents
Please verify that all components are present before beginning installation.
- Skysonic R3 Control Panel
- Integrated Output Terminal & Battery Box
- Piezo Pickup Sensor
- Rechargeable 3.7V Battery (approx. 67mm length)
- Battery Charger
- Mounting Hardware (screws, washers, nuts)
- Cables and Connectors
- Instruction Leaflet (Japanese)

Figure 1: Overview of the Skysonic R3 system components. This image displays the control panel, the integrated output jack and battery compartment, the rechargeable battery, charger, and various cables and mounting hardware.
Product Overview
The Skysonic R3 system consists of a control panel for effects and volume, an integrated output jack with a battery compartment, and a piezo pickup. It allows for direct acoustic effects and can also be used as a standard electro-acoustic pickup.
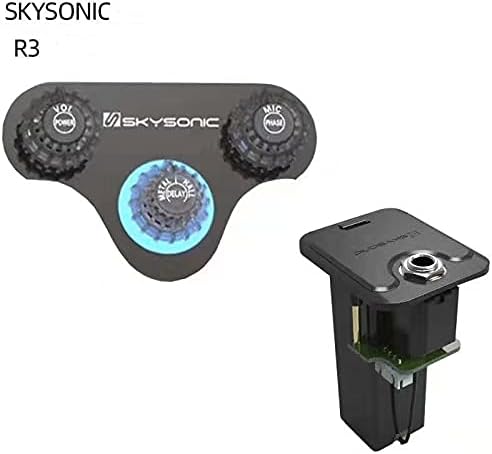
Figure 2: Close-up of the Skysonic R3 control panel and the integrated output terminal with battery box. The control panel features knobs for volume, microphone blend, and effects (reverb/chorus).
Installation Guide
Installation of the Skysonic R3 system requires modifications to your guitar body. Proceed with caution or seek professional installation.
- Prepare the Guitar: Ensure your guitar is clean and protected. Remove strings and any existing pickup systems if necessary.
- Mark Drilling Locations: Carefully determine the placement for the control panel and the integrated output terminal/battery box on the side of the guitar body. Mark the drilling points precisely.
- Drill Holes: Using appropriate tools, drill the necessary holes for mounting the control panel and the larger hole for the integrated output terminal/battery box. Note: Drilling the output terminal hole can be challenging due to its size and location.
- Install Internal Components: Mount the piezo pickup under the saddle. Route the wiring inside the guitar body.
- Mount External Components: Secure the control panel to the side of the guitar body using the provided screws. Install the integrated output terminal/battery box into its designated hole.
- Connect Wiring: Connect all internal wiring according to the provided diagram (refer to the Japanese instruction leaflet for detailed schematics). Ensure all connections are secure.
- Insert Battery: Place the fully charged 3.7V rechargeable battery into the battery compartment within the integrated output terminal.
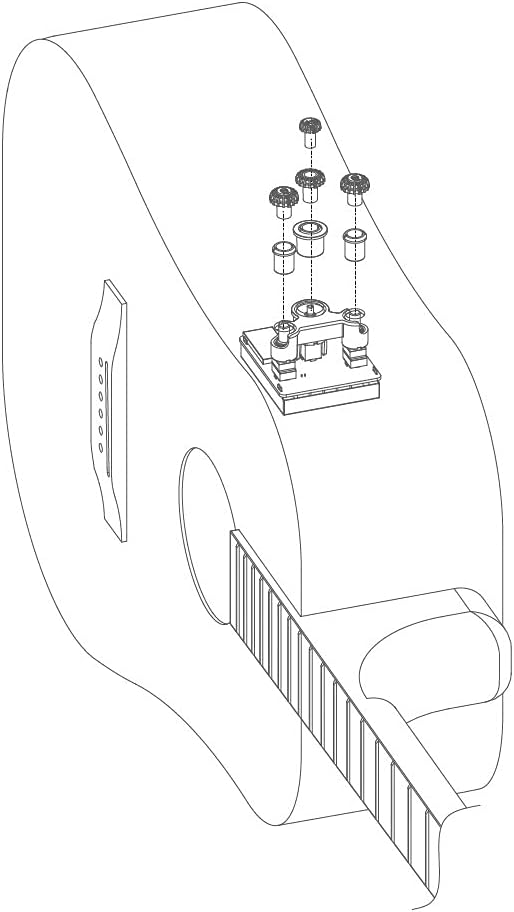
Figure 3: Exploded view diagram illustrating the external mounting of the control panel and its components on the guitar body.

Figure 4: Internal wiring diagram showing the placement of the piezo pickup, control panel connections, and the integrated output jack/battery box inside the guitar.
Operating Instructions
Once installed, the Skysonic R3 system is ready for use. The control panel allows you to adjust volume, microphone blend, and activate built-in effects.

Figure 5: Detailed view of the control knobs and their functions. The left knob controls volume and power, the right knob controls microphone blend and phase, and the center knob controls delay, reverb, and chorus effects.
- Power On/Off & Volume (VOL/POWER): Rotate the left knob to turn the system on and adjust the overall volume.
- Microphone Blend & Phase (MIC/PHASE): Rotate the right knob to blend the internal microphone signal with the piezo pickup. Press the knob to toggle the phase.
- Effects Control (DELAY/REVERB/CHORUS): The center knob controls the built-in effects. Rotate to select and adjust the intensity of Delay, Reverb (Metal/Hall), and Chorus.
- Electro-Acoustic Mode: To use the system as an electro-acoustic pickup, connect a standard instrument cable from the output jack to an amplifier or PA system.
Battery Charging
The Skysonic R3 uses a dedicated 3.7V rechargeable battery. When the battery level is low, the system's performance may degrade, or it may cease to function.
- Remove Battery: Carefully open the battery compartment on the integrated output terminal and remove the rechargeable battery.
- Connect to Charger: Insert the battery into the provided battery charger.
- Charge: Plug the charger into a suitable power source. The charger will indicate when the battery is fully charged (refer to charger instructions for specific indicators).
- Reinstall Battery: Once fully charged, remove the battery from the charger and reinsert it into the battery compartment, ensuring correct polarity.
Note: The provided charger is specifically designed for this battery. Do not use other chargers unless explicitly stated as compatible.
Maintenance
- Cleaning: Wipe the control panel and output jack with a soft, dry cloth. Avoid using abrasive cleaners or solvents.
- Battery Care: For optimal battery life, avoid fully discharging the battery frequently. If storing the system for an extended period, ensure the battery is partially charged (around 50%) and remove it from the unit.
- Connections: Periodically check all internal and external connections to ensure they are secure.
Troubleshooting
| Problem | Possible Cause | Solution |
|---|---|---|
| No sound or weak sound |
|
|
| Effects not working |
|
|
| Humming or buzzing noise |
|
|
Specifications
| Model | R3 |
| Brand | SKYSONIC |
| Battery Type | 3.7V Rechargeable Lithium-ion (approx. 67mm length) |
| Effects | Reverb (Metal/Hall), Chorus, Delay |
| Output Terminal | Integrated Output Jack & Battery Box (side-mounted) |
| ASIN | B096SW9QLC |
| First Available | June 7, 2021 |
Warranty and Support
For warranty information and technical support, please contact your retailer or the manufacturer directly. Keep your proof of purchase for warranty claims.
As noted in the important safety information, the manufacturer is not responsible for issues arising from improper self-installation.


