1. Introduction and Product Overview
This manual provides essential information and guidelines for the installation and use of the A-MIND LCD Display Touch Screen Digitizer Assembly for the Huawei MediaPad M5 Lite 10. This replacement screen is designed to fix issues such as cracked screens, non-responsive touch, dead pixels, and display problems.
Compatibility:
- Huawei MediaPad M5 Lite 10 (BAH2-W19)
- Huawei MediaPad M5 Lite 10 (BAH2-L09)
- Huawei MediaPad M5 Lite 10 (BAH2-W09)
Please verify your tablet's model number before proceeding with the replacement.
2. Package Contents
The package includes the following items:
- 1x Touch Screen Assembly Replacement (TFT LCD, 10.1 inch, 1200x1920 pixels)
- 1x Opening Tools Kit
- 1x Adhesive Tape

Image: Front and back view of the A-MIND screen replacement for Huawei MediaPad M5 Lite 10. The front shows the black display panel, and the back reveals the internal components and flex cables.
3. Important Pre-Installation Notes and Safety Information
Warning:
- Screen replacement requires technical expertise. If you lack experience in electronic equipment repair, it is strongly recommended to seek professional assistance to avoid damage to your device or the new screen.
- Damage incurred during self-installation is not covered under warranty.
Before Installation:
- Remove Battery: Before connecting the new screen, ensure the tablet's battery is disconnected to prevent short circuits or damage.
- Test Thoroughly: Connect the new screen to the tablet's motherboard without using any adhesive. Re-start your equipment and test all functions (display, touch response, colors) to confirm the screen is working perfectly.
- Do Not Apply Adhesive Prematurely: Do not apply adhesive to install the screen until you have fully tested and confirmed its functionality. Once adhesive is applied, returns or refunds for functional issues may not be accepted.
- Handle with Care: Screens are made of glass. Handle the product with extreme care during unpacking and installation to prevent damage.

Image: A graphic indicating that the product has undergone 100% quality control testing before shipment.
4. Installation Guide (Setup)
Due to the complexity of tablet screen replacement, detailed step-by-step instructions are best conveyed visually. We highly recommend watching the official installation video provided by the seller for a comprehensive guide.
Video: Official installation guide for replacing the LCD screen on a Huawei MediaPad M5 Lite 10. This video demonstrates the necessary steps and precautions for a successful replacement.
General Steps (Refer to video for details):
- Power off your tablet and disconnect the battery.
- Carefully remove the old screen assembly.
- Clean any old adhesive residue from the tablet frame.
- Connect the new screen's flex cables to the motherboard (do not apply adhesive yet).
- Perform a functional test (see Section 5).
- If the screen functions correctly, apply the provided adhesive tape to secure the new screen.
- Carefully press the new screen into place, ensuring a snug fit.
- Reconnect the battery and reassemble the tablet.

Image: Detailed view of the back of the replacement screen, highlighting the flex cables and connection points for the digitizer and LCD.
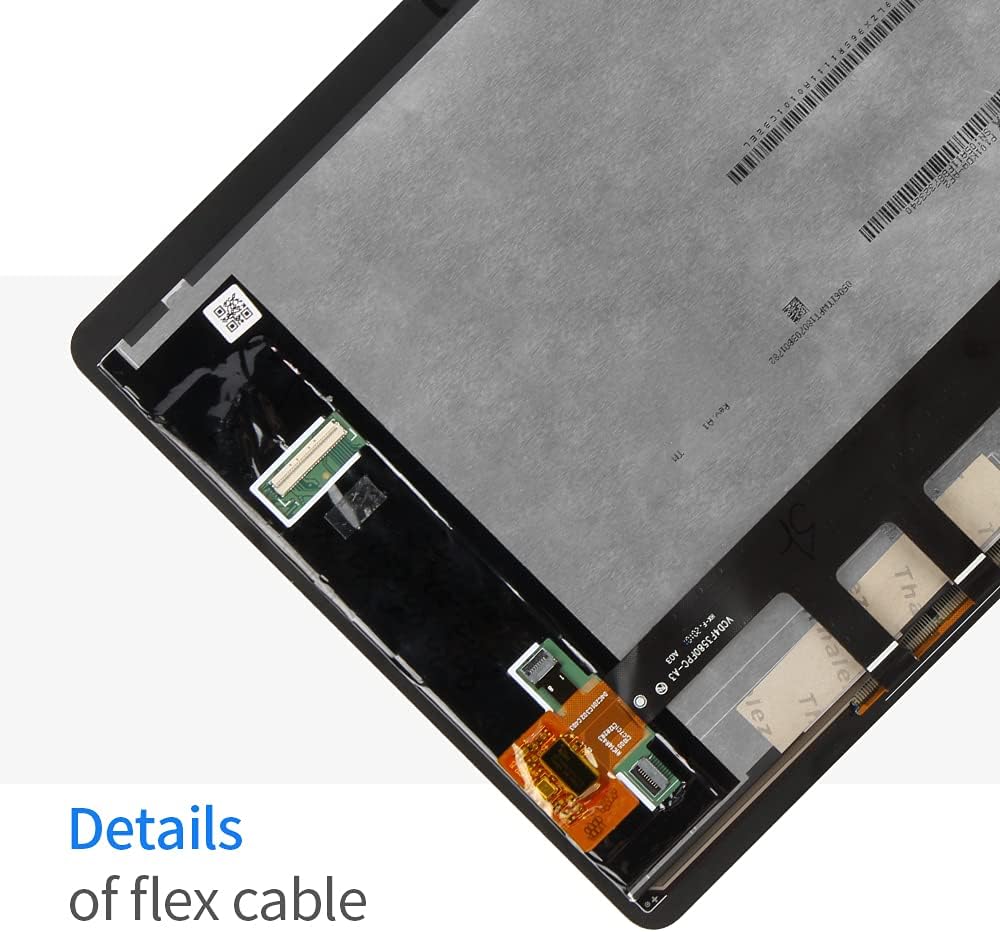
Image: A closer look at the flex cable details, showing the delicate connections that need to be handled with care during installation.
5. Testing the Screen (Operating)
Before permanently installing the screen with adhesive, it is crucial to test its functionality. Follow these steps:
- With the tablet's battery disconnected, carefully connect the new screen's flex cables to the corresponding ports on the tablet's motherboard.
- Reconnect the battery.
- Power on the tablet.
- Check the display for any abnormalities:
- Ensure there are no dead pixels, lines, or discoloration.
- Verify brightness and color reproduction.
- Test the touch functionality across the entire screen:
- Drag an icon across the screen to check for dead spots.
- Test multi-touch gestures if applicable.
- Ensure touch response is accurate and smooth.
- If any issues are detected, disconnect the screen and re-check all connections. If problems persist, contact customer support before proceeding.
- Only proceed with adhesive application once all tests are successful.
6. Maintenance
To ensure the longevity and optimal performance of your new screen, follow these maintenance tips:
- Cleaning: Use a soft, lint-free cloth (e.g., microfiber) slightly dampened with water or a screen cleaner specifically designed for electronics. Avoid harsh chemicals, abrasive materials, or excessive moisture.
- Protection: Consider using a screen protector and a protective case for your tablet to guard against scratches and impacts.
- Handling: Avoid placing heavy objects on the screen or applying excessive pressure, which can lead to damage.
- Temperature: Do not expose the tablet to extreme temperatures (very hot or very cold) as this can affect screen performance and lifespan.
7. Troubleshooting
If you encounter issues after installation, refer to the following troubleshooting steps:
| Problem | Possible Cause | Solution |
|---|---|---|
| Screen not turning on / No display | Loose flex cable connection, battery not reconnected, damaged screen. |
|
| Touch not responding or inaccurate | Digitizer flex cable loose, software glitch, damaged digitizer. |
|
| Dead pixels or lines on display | Screen damage during installation, manufacturing defect. |
|
If these steps do not resolve the issue, please contact A-MIND customer service for further assistance.
8. Specifications
| Feature | Detail |
|---|---|
| Model Number | Screen Replacement For Huawei MediaPad M5 Lite 10 |
| Compatible Models | Huawei M5 Lite BAH2-L09, BAH2-W09, BAH2-W19 |
| Material | TFT LCD (Glass) |
| Screen Size | 10.1 inches |
| Resolution | 1200x1920 pixels |
| Screen Surface | Glossy |
| Color | Black |
| Brand | A-MIND |
| UPC | 735279505733 |
9. Warranty and Support
Warranty:
A-MIND provides a 3-month warranty for this product. The warranty covers functional defects under normal use. It does not cover damage caused by improper installation, misuse, or physical damage.
Customer Support:
If you encounter any problems with your order or require assistance, please do not hesitate to contact our customer service team. We are committed to providing support within 24 hours.
For support, please use the Amazon messaging system to reach A-MIND customer service.