1. Introduction
Thank you for choosing the Kruger&Matz Connect C10 Tuya Wi-Fi Indoor Camera. This device is designed to provide reliable indoor surveillance with features such as 720p HD video, two-way audio, motion detection, and night vision. It offers flexible control via the Tuya application, allowing you to monitor your home from anywhere. This manual will guide you through the installation, operation, and maintenance of your camera.

Image: The Kruger&Matz Connect C10 Wi-Fi Indoor Camera product box, showing key features and branding.
2. Safety Information
- Read all instructions carefully before use.
- Keep the device away from water and moisture.
- Do not attempt to disassemble or repair the camera yourself. Contact qualified service personnel.
- Use only the provided power adapter and cable to prevent damage.
- Ensure the camera is installed securely to prevent it from falling.
- This camera is designed for indoor use only.
3. Package Contents
Please check the package for the following items:
- Kruger&Matz Connect C10 Wi-Fi Indoor Camera
- Power adapter
- MicroUSB cable (95 cm)
- Mounting anchors
- Mounting screws
- Mounting key (for reset or microSD slot access)

Image: White power adapter.

Image: White MicroUSB cable.

Image: Mounting accessories: screws, wall anchors, and a small key.
4. Product Overview
Familiarize yourself with the main components of your Kruger&Matz Connect C10 camera.

Image: Front view of the camera, showing the lens and "connect C10" logo.

Image: Back view of the camera, highlighting the speaker grille and MicroUSB power input.
- Camera Lens: Captures 720p HD video.
- Microphone: For audio input and two-way communication.
- Speaker: For audio output and two-way communication.
- MicroUSB Port: For power supply (DC 5V).
- Reset Button: (Often located near the MicroSD slot, accessible with the included key).
- MicroSD Card Slot: Supports up to 128 GB for local storage.
5. Setup
5.1 Powering On the Camera
- Connect the MicroUSB cable to the camera's MicroUSB port.
- Connect the other end of the MicroUSB cable to the power adapter.
- Plug the power adapter into a wall outlet. The camera will power on and initiate its startup sequence.
5.2 Installing the Tuya App
The Kruger&Matz Connect C10 camera operates with the Tuya Smart or Smart Life application.
- Download the "Tuya Smart" or "Smart Life" app from the App Store (iOS) or Google Play Store (Android).
- Register for a new account or log in if you already have one.

Image: A smartphone showing the Tuya app interface, positioned next to the camera.
5.3 Connecting to Wi-Fi
Ensure your Wi-Fi network is 2.4 GHz. The camera does not support 5 GHz Wi-Fi.
- Open the Tuya Smart app and tap "+" or "Add Device".
- Select "Security & Video Surveillance" then "Smart Camera (Wi-Fi)".
- Follow the on-screen instructions to connect the camera to your Wi-Fi network. This usually involves scanning a QR code generated by the app with the camera's lens.
- Wait for the camera to connect and confirm successful pairing.
5.4 Installing a MicroSD Card
A MicroSD card (up to 128 GB, not included) is required for local video recording.
- Power off the camera by unplugging it.
- Locate the MicroSD card slot (often under the camera lens, requiring the camera head to be tilted up or the included key to open a cover).
- Gently insert the MicroSD card into the slot until it clicks into place.
- Power on the camera. You may need to format the card via the app settings.

Image: A hand inserting a MicroSD card into the camera's slot.
5.5 Mounting the Camera
The camera supports ceiling mounting.
- Choose a suitable location for mounting.
- Use the included mounting base, screws, and anchors to secure the camera to the ceiling or a flat surface.
- Attach the camera to the mounting base by twisting it into place.
6. Operating the Camera
6.1 Live View
Open the Tuya Smart app and select your camera from the device list to access the live video feed.
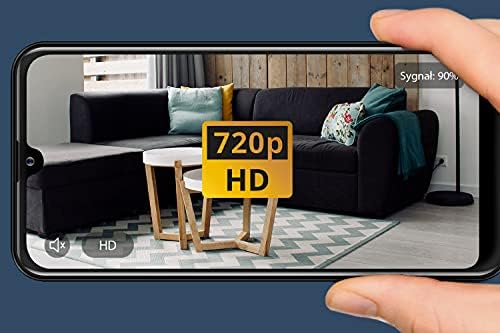
Image: A smartphone displaying a 720p HD live video feed from the camera.
6.2 Pan and Tilt Control
You can remotely adjust the camera's viewing angle using the controls in the Tuya app.
- Horizontal Rotation: 355 degrees
- Vertical Tilt: 70 degrees
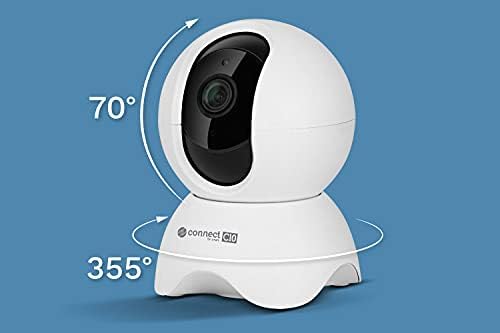
Image: The camera illustrating its 355-degree horizontal rotation and 70-degree vertical tilt capabilities.
6.3 Motion Detection and Tracking
The camera can detect motion and send alerts to your smartphone. It also features automatic tracking to follow detected movement.
- Enable motion detection in the app settings.
- Adjust sensitivity levels as needed.
- Receive push notifications when motion is detected.

Image: A smartphone displaying a motion detection alert, showing a person with a flashlight, indicating a security event.
6.4 Two-Way Audio
Communicate through the camera using its built-in microphone and speaker.
- In the live view interface, tap the microphone icon to speak.
- Tap the speaker icon to listen to audio from the camera's location.

Image: A person interacting with the camera, with a speech bubble indicating two-way audio communication.
6.5 Night Vision
The camera automatically switches to night vision mode in low-light conditions, providing clear video up to 10 meters.

Image: The camera operating in low light, with visible red infrared LEDs indicating night vision mode.
6.6 Video Recording
Record video footage to the installed MicroSD card.
- Configure recording settings (e.g., continuous recording, event-triggered recording) in the Tuya app.
- Access recorded footage through the app's playback feature.
7. Maintenance
- Cleaning: Gently wipe the camera lens and body with a soft, dry cloth. Do not use liquid cleaners or abrasive materials.
- Software Updates: Regularly check the Tuya app for firmware updates to ensure optimal performance and security.
- MicroSD Card: Periodically check the MicroSD card for errors and ensure it has sufficient storage space. Format the card through the app if necessary.
8. Troubleshooting
- Camera not connecting to Wi-Fi:
- Ensure your Wi-Fi network is 2.4 GHz.
- Check Wi-Fi signal strength.
- Restart your router and the camera.
- Perform a factory reset on the camera (refer to the app for reset instructions, usually involves pressing a hidden button with the included key).
- Ensure correct Wi-Fi password is entered in the app.
- No video feed:
- Check if the camera is powered on and connected to Wi-Fi.
- Restart the app and the camera.
- Verify your internet connection.
- MicroSD card not recording:
- Ensure the MicroSD card is correctly inserted.
- Check if the card is formatted (format via app if needed).
- Verify recording settings in the app.
- Try a different MicroSD card if the issue persists.
- Poor video quality:
- Ensure the camera lens is clean.
- Check your Wi-Fi signal strength.
- Adjust video quality settings in the app if available.
9. Specifications
| Feature | Specification |
|---|---|
| Model Name | Connect C10 |
| Model Number | KM2205 |
| Video Resolution | 720p (1 MPx) |
| Frame Rate | 15 frames per second |
| Pan Angle | 355 degrees |
| Tilt Angle | 70 degrees |
| Night Vision Range | 10 meters |
| Wireless Connectivity | Wi-Fi (2.4 GHz) |
| Storage | MicroSD card up to 128 GB |
| Power Input | DC 5V |
| Power Consumption | 5 W |
| Dimensions (L x W x H) | 8.2 x 8.2 x 11.4 cm |
| Weight | 179 g |
| Material | Plastic |
| Mounting Type | Ceiling mount |
| App Control | TUYA |
10. Warranty Information
Kruger&Matz products are covered by a manufacturer's warranty. Please refer to the warranty card included with your product or visit the official Kruger&Matz website for detailed warranty terms and conditions. Keep your purchase receipt as proof of purchase.
11. Support
For technical support, troubleshooting assistance, or further inquiries, please contact Kruger&Matz customer service. You can find contact information on the official Kruger&Matz website or in the product packaging.
Online Resources: Visit the Kruger&Matz website for FAQs, updated manuals, and support articles.


