Introduction
This manual provides detailed instructions for the safe assembly, operation, and maintenance of your Appleya Natural Gas Patio Heater, Model QSS. Designed for outdoor use, this heater features an adjustable height mechanism (140-200cm / 55-78 inches) and delivers a powerful 46,000 BTU heat output, making it ideal for patios, gardens, and other outdoor spaces. Please read this manual thoroughly before installation and use.

Image Description: The Appleya Natural Gas Patio Heater, featuring a tall, adjustable pole, a wide reflective top, and a sturdy base. A coiled 24-foot natural gas hose with connectors is shown alongside the heater.
Important Safety Information
WARNING: For outdoor use only. Improper installation, adjustment, alteration, service, or maintenance can cause injury or property damage. Read the installation, operating, and maintenance instructions thoroughly before installing or servicing this equipment.
- Always use natural gas fuel. This heater is designed exclusively for natural gas.
- Ensure adequate ventilation. Do not operate in enclosed spaces.
- Maintain clear distances from combustible materials. Refer to local codes for specific clearances.
- The heater is equipped with a safety auto shut-off tilt valve, which will turn off the gas supply if the unit tips over.
- The unit also features a safety auto shut-off if the gas supply runs out.
- Always check for gas leaks after assembly and before each use. Use a soap and water solution; bubbles indicate a leak.
- Keep children and pets away from the heater during operation.
- Do not move the heater while it is operating or still hot.
- Fill the base with water or sand for stability before use to prevent tipping.
Product Components
The Appleya Natural Gas Patio Heater consists of several key components. Please verify all parts are present and undamaged before assembly.

Image Description: A diagram illustrating the main components of the patio heater. Key parts labeled include the reflective cover, burning net, manual switch, burning burner, main brace, and base.
- Reflective Cover: Directs heat downwards.
- Burning Net: Protects the burner and helps distribute heat.
- Manual Switch: For controlling gas flow and ignition.
- Burning Burner: The heat-generating element.
- Main Brace: The central support pole, adjustable in height.
- Base: Provides stability for the heater. Must be filled with water or sand.
- Natural Gas Hose: Connects the heater to the natural gas supply. (Note: A 24 ft hose is included).
Setup and Assembly Instructions
Follow these steps carefully for proper assembly. It is recommended to have two people for certain steps.

Image Description: An exploded view diagram showing the assembly sequence of the patio heater. It highlights the connection of the main brace to the base, the lifting rod, combustion head assembly, and reflective cover. Also shows the water tank in the base and the gas hose connection.
- Prepare the Base: Fill the base with water or sand to ensure stability. This is crucial to prevent the product from tipping over.
- Connect Main Brace to Base: Attach the 65mm main brace to the base using the provided 3 M8 hex screws. Ensure the bolt holder grooves on the base are correctly aligned.
- Install Lifting Rod: Pass the 50mm diameter lifting rod through the adjusting screw sleeve and fix it onto the main support rod.
- Attach Combustion Head Assembly: Pass the skin tube of the combustion head assembly through the tube from the exit of the skin tube at the bottom of the 65mm main probe rod. Tighten it securely.
- Secure Reflective Cover: Install the reflective cover on the combustion head assembly.
- Adjust Height and Align: Adjust the heater's height as desired (between 140-200cm / 55-78 inches) and align the gap of the decorative cover with the leather tube.
- Connect Gas Hose: Connect the leather hose to the natural gas pipeline. Ensure all connections are tight to prevent any gas leakage. It is recommended to install the gas hose from the bottom to the top.
- Leak Test: After assembly and before first use, perform a leak test on all gas connections using a soap and water solution. Bubbles indicate a leak. Do not use the heater if a leak is detected.
Operating Instructions
This section details how to safely ignite and operate your natural gas patio heater.
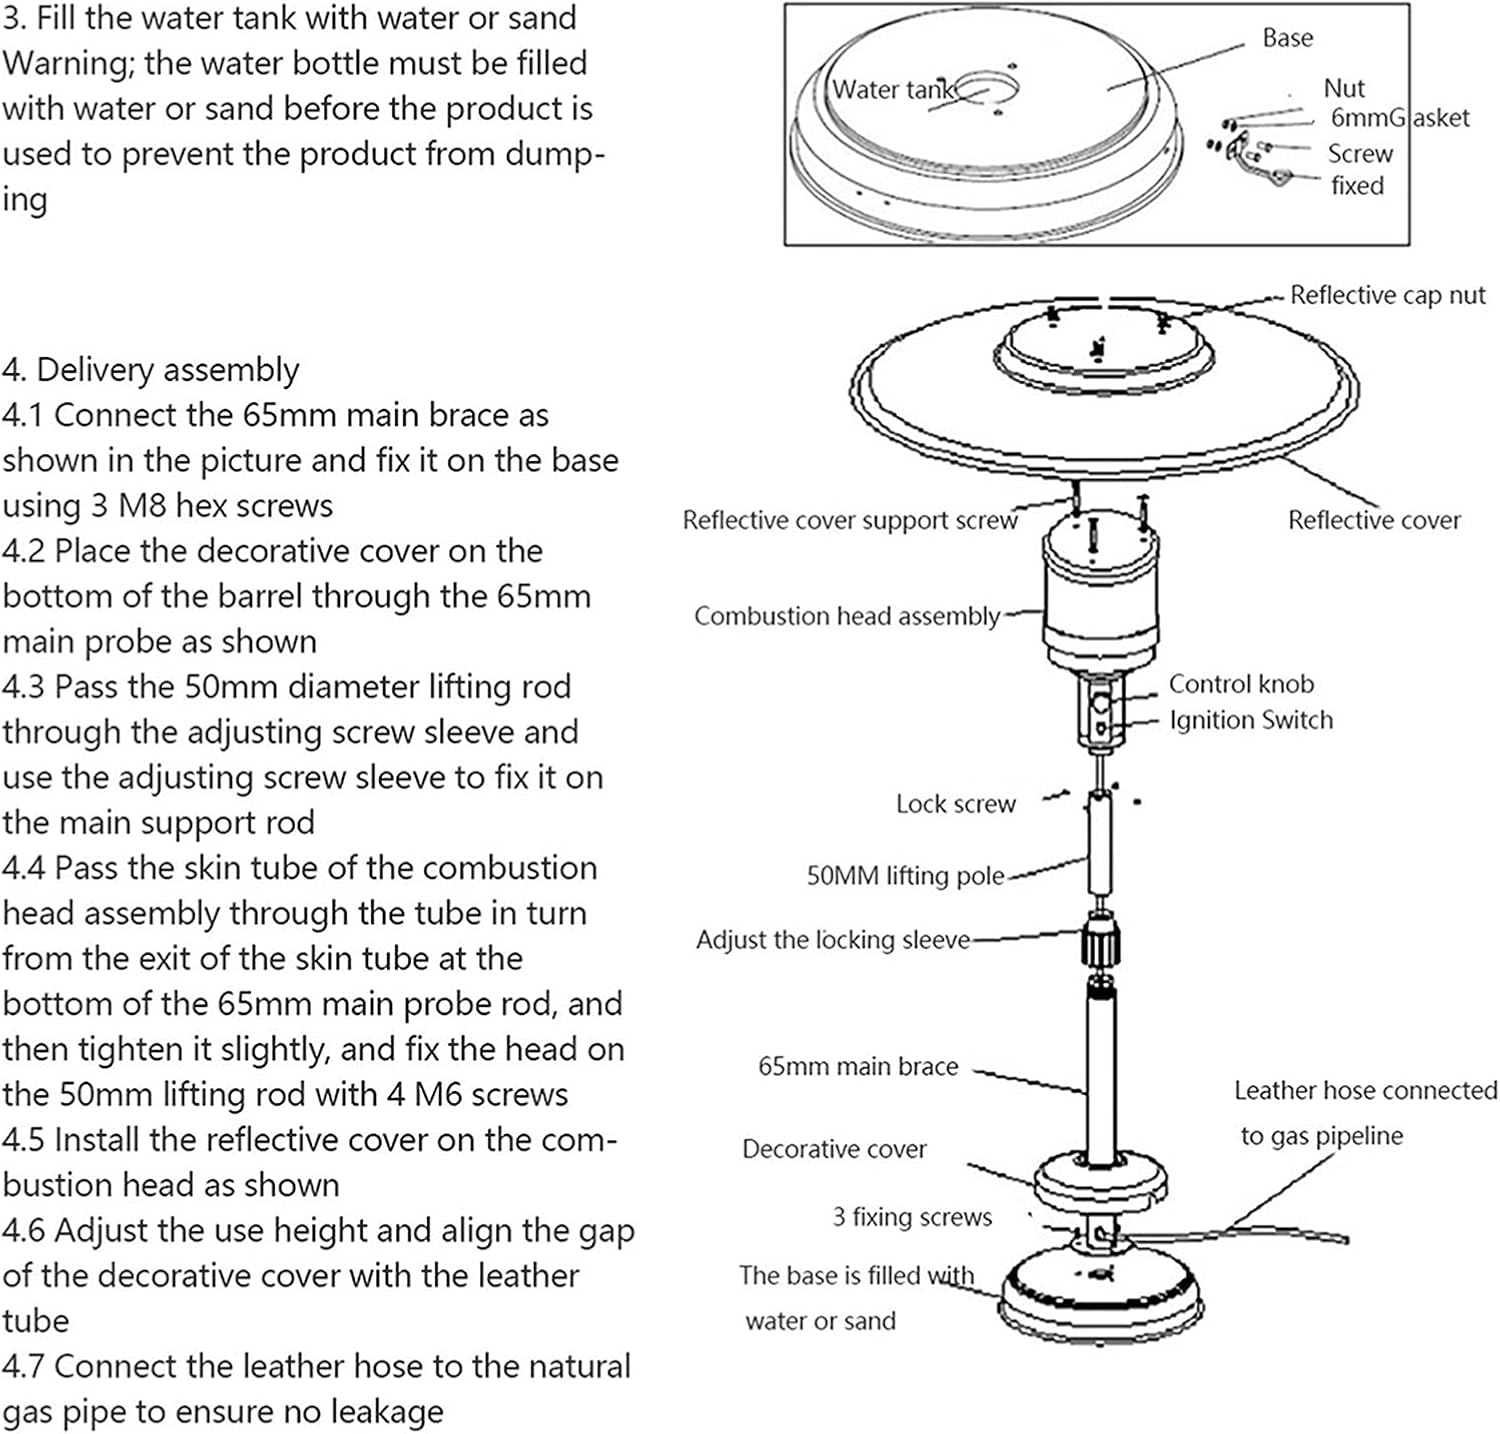
Image Description: This image shows three detailed views: the pure aluminum reflective cover, the stainless steel burner with 304 mesh cover, and the control panel with the pulse igniter (red button) and control knob (black switch).
- Ensure Gas Supply: Confirm that the natural gas supply valve is open.
- Ignition Procedure:
- Press and hold the red igniter button.
- While holding the igniter button, turn the black control knob to the "Pilot" or "Ignite" position.
- Continue to hold the igniter button for 10-15 seconds after ignition to allow the thermocouple to heat up.
- If the pilot light does not ignite, release the igniter button and repeat the process after a few minutes.
- Adjust Heat Output: Once the pilot is lit, release the igniter button and turn the control knob to your desired heat setting (Low to High). The heater can produce up to 46,000 BTU.
- Shutting Down: To turn off the heater, turn the control knob to the "OFF" position. Close the main natural gas supply valve when the heater is not in use.
Maintenance
Regular maintenance ensures the longevity and safe operation of your heater.
- Cleaning: Clean the exterior surfaces with a soft, damp cloth. Do not use abrasive cleaners or solvents.
- Burner and Reflective Cover: Periodically inspect the burner and reflective cover for any debris or obstructions. Ensure the burning net is clear.
- Gas Connections: Annually inspect all gas connections and the hose for wear, damage, or leaks. Replace any damaged components immediately.
- Storage: If storing the heater for an extended period, ensure it is clean and dry. Store in a protected area away from direct weather exposure.
Troubleshooting
If you encounter issues with your heater, refer to the following common problems and solutions.
- Heater does not ignite:
- Check if the natural gas supply valve is fully open.
- Ensure the igniter button is pressed and held long enough during ignition.
- Verify there is gas flow to the unit.
- Clean the pilot light and thermocouple if they appear obstructed.
- Low heat output:
- Ensure the control knob is set to a higher heat setting.
- Check for proper gas pressure.
- Pilot light goes out:
- Ensure the thermocouple is properly heated by holding the igniter button longer.
- Check for strong drafts or wind that might be extinguishing the pilot.
- Gas odor detected:
- Immediately turn off the gas supply.
- Perform a leak test on all connections.
- Do not operate the heater until the leak is found and repaired. If unable to resolve, contact a qualified service technician.
Specifications

Image Description: A diagram illustrating the adjustable height range of the patio heater, from a minimum of 55 inches (140 cm) to a maximum of 78.7 inches (200 cm). The base diameter is also shown as 17.7 inches.
| Feature | Detail |
|---|---|
| Brand | Appleya |
| Model Number | QSS |
| Fuel Type | Natural Gas |
| Heat Output | 46,000 BTU |
| Adjustable Height | 140-200 cm (55-78 inches) |
| Base Diameter | 17.7 inches (45 cm) |
| Heating Coverage | Approximately 160 square feet |
| Ignition Method | Piezoelectric ignition/Pulse ignition |
| Safety Features | Auto shut-off tilt valve, Gas run-out shut-off |
| Certification | cETL Certified |
| Item Weight | 36.3 pounds |
Warranty and Support
For any questions regarding your Appleya Natural Gas Patio Heater, Model QSS, or if you encounter any issues not covered in this manual, please contact Appleya customer support. We aim to respond within 12 hours and provide a satisfactory solution.
Please refer to your purchase documentation for specific warranty terms and contact information.