1. Introduction
Thank you for choosing the AGARO Maple Ice Cream Maker. This appliance is designed to help you create delicious homemade ice cream, sorbet, slush, and frozen yogurt with ease. Please read this instruction manual carefully before using the appliance to ensure safe and efficient operation. Keep this manual for future reference.
2. Safety Information
- Always unplug the appliance from the power outlet before cleaning or when not in use.
- Do not immerse the motor unit in water or any other liquid. Wipe with a damp cloth.
- Ensure the voltage indicated on the appliance matches your local power supply before connecting.
- Keep hands and utensils out of the freezer bowl during operation to prevent injury and damage to the appliance.
- Do not use metal utensils to scrape the freezer bowl, as this may damage the non-stick coating. Use plastic or wooden utensils.
- This appliance is not intended for use by persons with reduced physical, sensory, or mental capabilities, or lack of experience and knowledge, unless they have been given supervision or instruction concerning use of the appliance by a person responsible for their safety.
- Children should be supervised to ensure that they do not play with the appliance.
3. Product Overview and Components
The AGARO Maple Ice Cream Maker is a compact and efficient appliance designed for homemade frozen treats. It features a 1.2-liter capacity bowl and a simple one-switch control for ease of use.

Figure 1: AGARO Maple Ice Cream Maker with its main components visible.
Key Components:
- Motor Unit with Lid: Contains the power button and the mechanism to drive the paddle. The transparent lid allows you to monitor the churning process and has a spout for adding ingredients.
- Double-Insulated Freezer Bowl: This bowl contains a special cooling liquid between its inner food-grade aluminum layer and outer anti-freeze plastic layer. It must be pre-frozen before use.
- Mixing Paddle: Designed to churn and aerate the mixture, creating a smooth and creamy texture. It fits onto a stem on the lid.
- Power Cable: For connecting the appliance to a power source.

Figure 2: Cross-section diagram illustrating the double-insulated freezer bowl construction.

Figure 3: Details of the transparent lid with feed inlet and the low-noise copper motor.
4. Setup
- Freeze the Bowl: Place the double-insulated freezer bowl in a double-door or above refrigerator freezer for 12-18 hours. Ensure the liquid inside the bowl is completely frozen and does not move when shaken. Single-door refrigerators may not provide the required freezing temperature.
- Assemble the Paddle: Insert the paddle onto the stem located on the underside of the motor unit's lid. The paddle is designed for a loose fit, which is normal for proper operation.
- Place the Bowl: Once the freezer bowl is thoroughly frozen, place it into the outer bowl of the machine.
- Attach the Lid: Place the motor unit with the assembled paddle onto the freezer bowl. Turn the lid anti-clockwise to secure it, ensuring it fits well into the notches on the machine base.

Figure 4: The 1.2-liter mixing bowl requires pre-freezing for at least 12 hours.
5. Operation
- Prepare Your Mixture: Prepare your desired ice cream, sorbet, or frozen yogurt mixture. For best results, chill the mixture in the refrigerator for at least 2 hours or in a deep freezer for 30 minutes before churning.
- Start the Machine: Plug in the power cable and press the power button to turn on the machine. The paddle should begin to rotate.
- Pour the Mixture: Gradually pour the chilled mixture through the spout in the lid while the machine is running. Pouring the mixture slowly prevents it from freezing instantly on the sides of the cold bowl and allows the paddle to move freely.
- Churning Process: Allow the machine to churn for approximately 15-30 minutes. The churning time may vary depending on the recipe and the desired consistency. Mixtures with higher fat content may take longer.
- Check Consistency: The ice cream is ready when the paddle rotation slows down significantly or stops due to the mixture thickening.
- Serve or Store: Turn off the machine and unplug it. Remove the lid and paddle. You can serve the soft-serve ice cream immediately or transfer it to an airtight container and freeze it for a firmer consistency.

Figure 5: Step-by-step guide for preparing ice cream.

Figure 6: Visual steps for preparing and serving your frozen dessert.
Video 1: A comprehensive demonstration of unboxing, assembling, operating, and cleaning the AGARO Maple Ice Cream Maker, including an example recipe.
6. Maintenance and Cleaning
- Disassembly: Unplug the machine. Separate the motor unit from the freezer bowl. Remove the paddle from the lid. The lid can be further separated from the motor unit by pressing the two release buttons.
- Cleaning the Lid and Paddle: The transparent lid and mixing paddle can be washed with warm, soapy water. Rinse thoroughly and dry completely before reassembling.
- Cleaning the Freezer Bowl: After removing the ice cream, allow the freezer bowl to reach room temperature before washing. Wash the bowl with a soft sponge and mild soap. Do not immerse the freezer bowl in water while it is still frozen, as this can damage the internal cooling liquid. Do not use abrasive cleaners or metal utensils, which can scratch the inner surface.
- Cleaning the Motor Unit: Wipe the motor unit with a damp cloth. Do not immerse the motor unit in water.
- Storage: Ensure all parts are completely dry before storing the appliance. Store in a cool, dry place.
7. Troubleshooting
- Machine does not turn on: Ensure the power cable is securely plugged into a working outlet and the power button is pressed.
- Paddle is not rotating: Check if the lid is properly secured and the paddle is correctly inserted onto the stem. If the mixture is too thick or has frozen to the sides, the paddle may stop. Ensure the freezer bowl was adequately pre-frozen and the mixture was poured gradually.
- Ice cream is not firm enough: Ensure the freezer bowl was frozen for the recommended 12-18 hours in a suitable freezer (double-door or above). The mixture should also be pre-chilled. Mixtures with lower fat content may result in a softer consistency.
- Ice cream freezes to the side of the bowl: Always start the machine and let the paddle rotate before gradually pouring in the mixture. This prevents immediate freezing upon contact with the cold bowl.
8. Specifications
| Brand | AGARO |
| Model Name | 33539 |
| Colour | Blue |
| Capacity | 1.2 litres |
| Material | Plastic |
| Operation Mode | Automatic |
| Product Dimensions | 20.4L x 20.4W x 23H Centimeters |
| Item Weight | 2230 Grams |
| Included Components | Bowl |
| Product Care Instructions | Hand Wash |
| Special Feature | Compact Design, Extended Warranty, Healthy & Safe Desserts, Versatile Dessert Making |
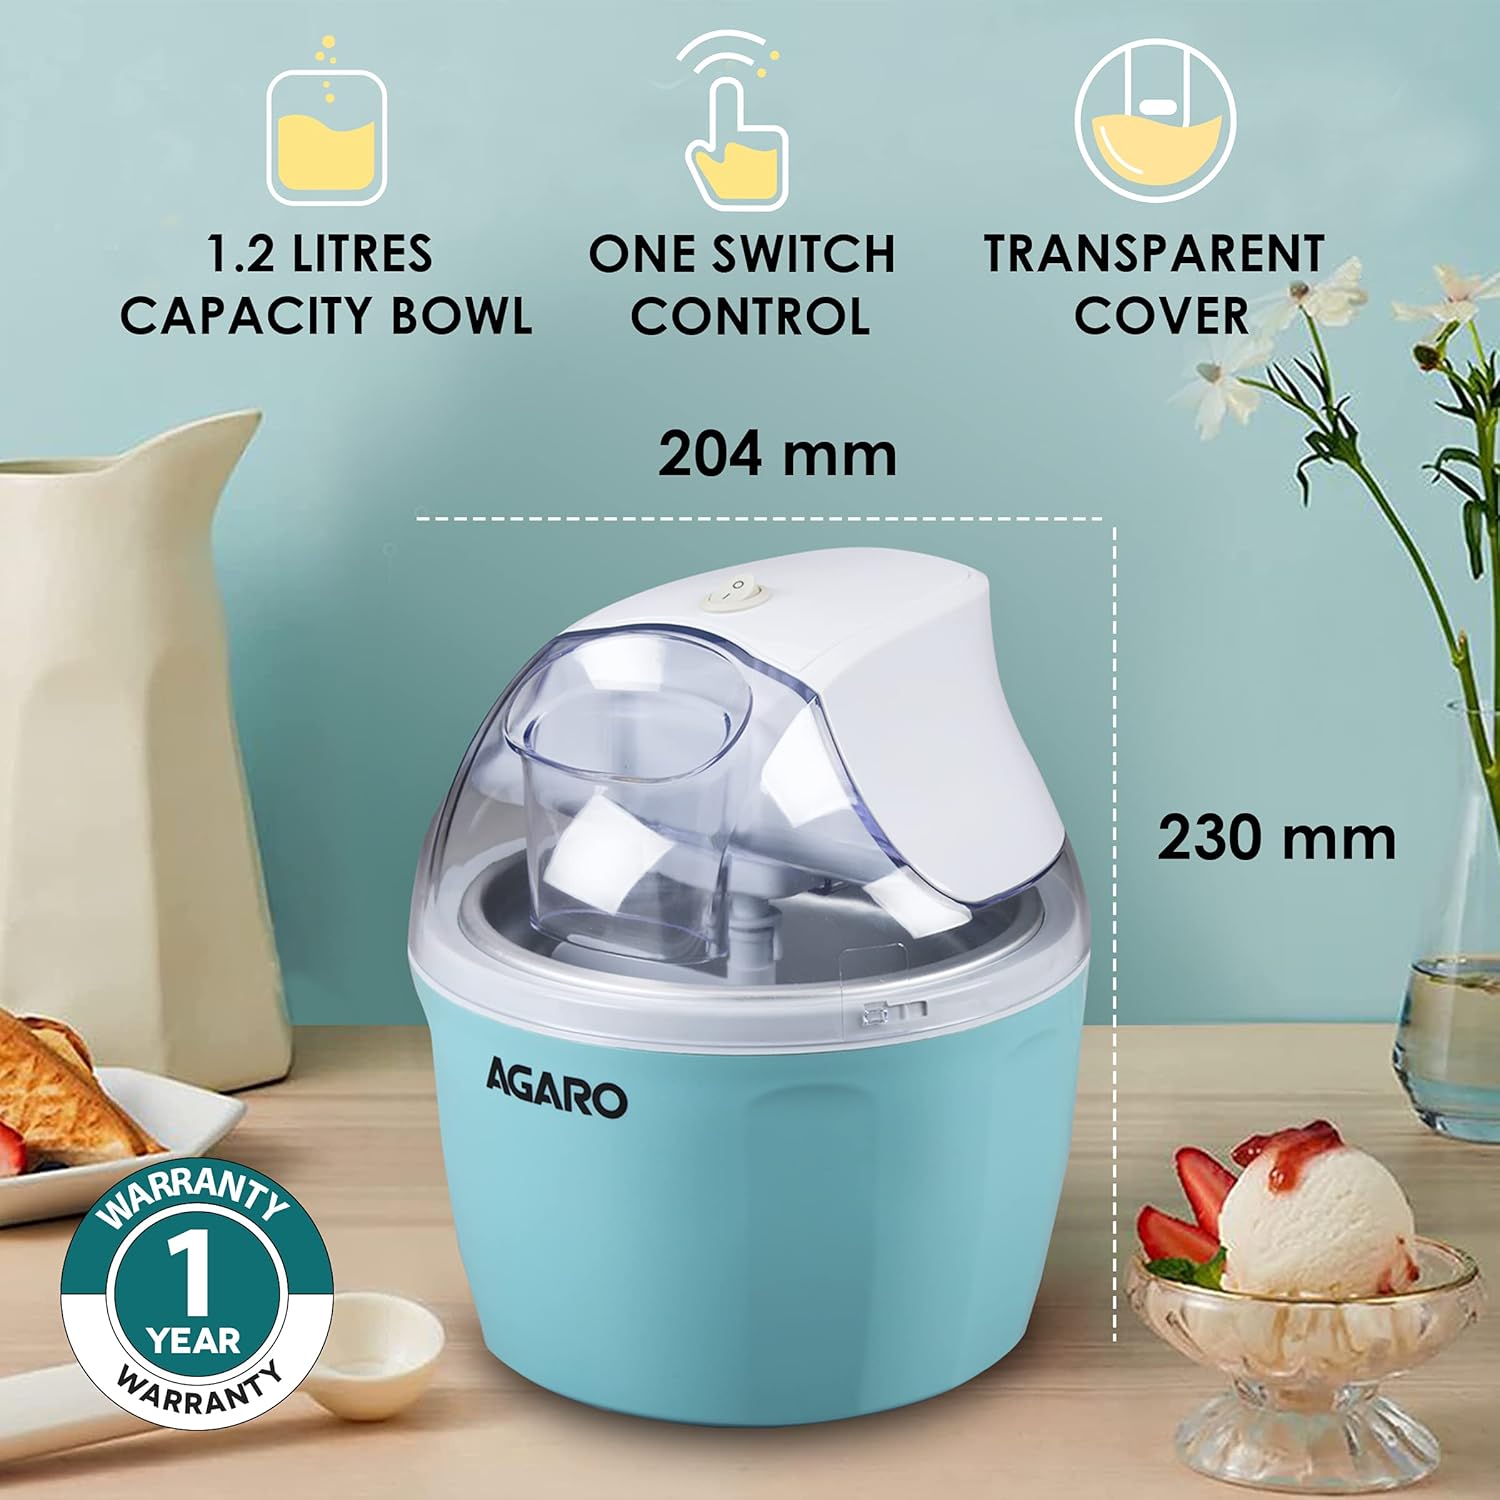
Figure 7: Key features and dimensions of the AGARO Maple Ice Cream Maker.
9. Warranty and Support
The AGARO Maple Ice Cream Maker comes with a 1-year warranty. An additional 6 months warranty can be obtained upon product registration. Please refer to the warranty card included with your product for detailed terms and conditions.
For customer support, inquiries, or service requests, please contact Universal Corporation Limited at 9821486487 or email info@uclindia.com.