1. Introduction
This manual provides comprehensive instructions for the installation, operation, and maintenance of your new Mintu Refrigerator Icemaker Replacement. Please read this manual thoroughly before beginning installation to ensure proper function and safety. This icemaker is designed to replace original units in various Kenmore, Amana, Maytag, and Whirlpool refrigerator models.
2. Safety Information
Always prioritize safety when working with electrical appliances. Failure to follow these safety guidelines may result in electric shock, injury, or damage to your appliance.
- Disconnect Power: Before attempting any installation, maintenance, or repair, always disconnect the refrigerator from its power source by unplugging it or turning off the circuit breaker.
- Water Supply: Turn off the water supply to the refrigerator before beginning installation to prevent leaks.
- Wear Protective Gear: Wear appropriate personal protective equipment, such as gloves, to protect your hands.
- Professional Assistance: If you are unsure about any step or uncomfortable performing the installation, consult a qualified appliance technician.
- Sharp Edges: Be aware of potential sharp edges inside the refrigerator or on the icemaker components.
3. Package Contents
Verify that all components are present and undamaged before proceeding with installation.
- Mintu Refrigerator Icemaker Unit
- Mounting Bracket
- Mounting Screw

Figure 3.1: Overview of the Mintu Refrigerator Icemaker Replacement Unit. This image shows the complete icemaker assembly, including the ice mold, motor housing, and the metal shut-off arm.

Figure 3.2: Included mounting bracket and screw. This image displays the white plastic mounting bracket and a single hex-head screw, used to secure the icemaker in place.
4. Compatibility
This Mintu icemaker replacement is compatible with a wide range of Kenmore, Amana, Maytag, and Whirlpool refrigerator models. Please verify your refrigerator's model number against the list below to ensure compatibility.
Partial List of Compatible Models:
- Kenmore 596.55652500
- Kenmore 596.72283202
- Kenmore 596.71103101
- Kenmore 596.72289200
- Kenmore 596.77599804
- Kenmore 596.76529500
- Kenmore 596.76603600
- Amana AFD2535DES
- Amana ARB8057CSL
- Maytag MFD2560HES
- Maytag MSD2356AEA
- Whirlpool ED25RFXFW01
- Whirlpool GD5THGXKS03
- And many more...
For a complete list of compatible models, refer to the product listing or contact Mintu customer support.
5. Installation Instructions
Follow these steps carefully to install your new icemaker. It is recommended to have a helper for moving the refrigerator if necessary.
- Prepare the Refrigerator:
- Unplug the refrigerator from the electrical outlet.
- Turn off the water supply valve to the refrigerator. This valve is typically located behind the refrigerator or under the sink.
- Move the refrigerator away from the wall to access the back panel if needed.
- Remove the Old Icemaker:
- Locate the existing icemaker inside the freezer compartment.
- Disconnect the electrical harness from the old icemaker. This usually involves pressing a tab and pulling the connector apart.
- Remove any screws or clips securing the old icemaker to the freezer wall. Carefully detach the icemaker and remove it from the freezer.
- Prepare the New Icemaker:
The new icemaker may have a knockout plug for the water fill tube, depending on your refrigerator's configuration. This plug needs to be removed if your refrigerator's water fill tube enters from the side of the icemaker.
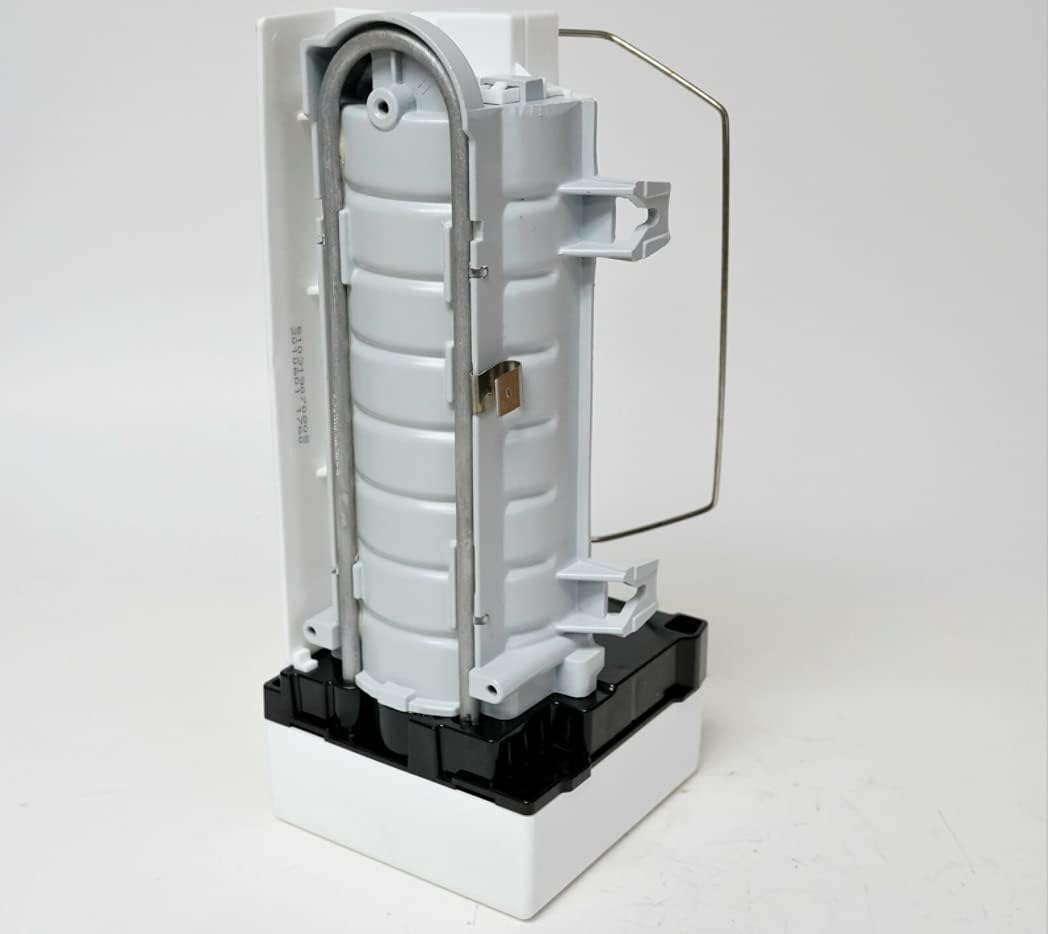
Figure 5.1: Rear view of the icemaker, highlighting the water inlet area. This image shows the back of the icemaker unit, where the water fill tube connects. Note the potential knockout plug location.
- Examine the back of the new icemaker. If your refrigerator's water fill tube requires a side entry, carefully remove the corresponding knockout plug.
- Caution: Removing the knockout plug can be challenging. To avoid cracking the plastic, consider using a heated utility knife or a small drill bit to start the removal process, then carefully pry it out.
- Install the New Icemaker:

Figure 5.2: The Mintu Icemaker unit from a different angle, showing the ice mold and shut-off arm. This view provides a clearer perspective of the ice-making components.
- Position the new icemaker in the freezer compartment, aligning it with the mounting holes.
- Secure the icemaker using the provided mounting bracket and screw, or reuse the hardware from the old unit if compatible. Ensure it is firmly attached.
- Connect the electrical harness to the new icemaker. Ensure the connection is secure.
- Ensure the metal shut-off arm is in the down position, indicating it is ready to make ice.
- Final Steps:
- Turn the water supply valve back on. Check for any leaks around the water inlet.
- Plug the refrigerator back into the electrical outlet.
- Allow several hours for the freezer to reach the correct temperature and for the icemaker to begin producing ice.
6. Operating Instructions
Once installed and connected, the Mintu Refrigerator Icemaker operates automatically. It will fill with water, freeze the water into ice cubes, and then eject them into the ice bin.
- Initial Operation: After installation, it may take 12 to 24 hours for the icemaker to produce its first batch of ice, as the freezer needs to reach optimal temperature and the water line needs to fill. Discard the first few batches of ice to ensure the system is clean.
- Ice Production Rate: The icemaker will produce approximately 7-10 batches of ice per day under normal operating conditions.
- Shut-off Arm: The metal shut-off arm controls ice production. When the ice bin is full, the arm will be pushed up by the ice, stopping further production. When ice is removed, the arm will drop, and production will resume. Ensure the arm can move freely.

Figure 6.1: Close-up of the icemaker's control module. This image shows the internal mechanism responsible for controlling the ice-making cycle, including the gear and the "DO NOT ROTATE MANUALLY" warning.
7. Maintenance
Regular maintenance helps ensure optimal performance and longevity of your icemaker.
- Cleaning the Ice Bin: Periodically empty and clean the ice bin with mild soap and warm water. Rinse thoroughly and dry before returning it to the freezer.
- Checking the Water Line: Occasionally inspect the water supply line for kinks, leaks, or blockages. Ensure the water filter (if your refrigerator has one) is replaced according to the manufacturer's recommendations.
- Icemaker Cleaning: If mineral deposits build up in the ice mold, you may need to clean the icemaker. Disconnect power and water, remove the icemaker, and gently clean the mold with a soft cloth and a solution of equal parts white vinegar and water. Rinse thoroughly.
8. Troubleshooting
If your icemaker is not functioning correctly, refer to the following common issues and solutions before contacting service.
| Problem | Possible Cause | Solution |
|---|---|---|
| No ice production |
|
|
| Slow ice production |
|
|
| Small or hollow ice cubes |
|
|
If these steps do not resolve the issue, contact a qualified service technician.
9. Specifications
| Feature | Detail |
|---|---|
| Brand | Mintu |
| Model Numbers | KBFS20EVMS0, KBFA25ERSS01 |
| Compatible Refrigerator Brands | Kenmore, Amana, Maytag, Whirlpool (and others) |
| UPC | 017015804943 |
| Power Requirements | Standard household electrical connection (specifics depend on refrigerator model) |
10. Warranty and Support
Specific warranty information for this Mintu product is not provided within this manual. Please refer to the original product packaging, the seller's website, or contact Mintu customer support for details regarding warranty coverage and technical assistance.
For support, visit the Mintu Store on Amazon or consult your purchase documentation.