Fral DD21LCD
FRAL Dry Digit 21 Dehumidifier User Manual
Model: DD21LCD
1. Introduction
This manual provides comprehensive instructions for the safe and efficient operation, maintenance, and troubleshooting of your FRAL Dry Digit 21 Dehumidifier. Please read this manual thoroughly before operating the appliance and retain it for future reference.
The FRAL Dry Digit 21 is designed to effectively remove excess moisture from the air in residential environments, helping to prevent mold, mildew, and other humidity-related issues. This model replaces the previous Dry Digit 20.
2. Safety Information
Always observe the following safety precautions to reduce the risk of fire, electric shock, or injury:
- Ensure the power supply matches the rating label on the unit.
- Do not operate the dehumidifier with a damaged cord or plug.
- Do not block air inlets or outlets.
- Keep the unit on a stable, level surface.
- Unplug the unit before cleaning or performing any maintenance.
- Do not immerse the unit in water or other liquids.
- This appliance is not intended for use by persons (including children) with reduced physical, sensory or mental capabilities, or lack of experience and knowledge, unless they have been given supervision or instruction concerning use of the appliance by a person responsible for their safety.
3. Product Overview
Familiarize yourself with the main components of your FRAL Dry Digit 21 Dehumidifier.

Figure 3.1: Front view of the FRAL Dry Digit 21 Dehumidifier. Shows the compact, white casing with the control panel on top and air outlet grille.

Figure 3.2: Front view of the FRAL Dry Digit 21 Dehumidifier with the water collection tank partially pulled out. This illustrates how to access the tank for emptying.
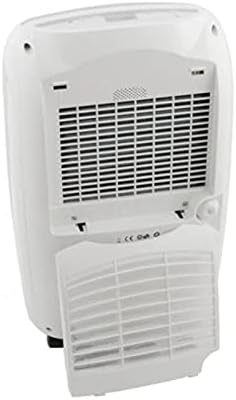
Figure 3.3: Rear view of the FRAL Dry Digit 21 Dehumidifier, showing the air intake grille and the removable air filter cover. This is where the air filter is located for cleaning or replacement.
Key Components:
- Control Panel: Located on the top of the unit, featuring a digital display and control buttons.
- Air Inlet Grille: Located at the rear, where air is drawn into the unit.
- Air Outlet Grille: Located at the top, where dehumidified air is expelled.
- Water Collection Tank: Removable tank at the front for collecting condensed water.
- Air Filter: Located behind the rear grille, filters dust and particles from the air.
- Continuous Drain Outlet: A port for connecting a hose for continuous drainage.
4. Setup
- Unpacking: Carefully remove the dehumidifier from its packaging. Retain packaging materials for future storage or transport.
- Placement: Place the unit on a firm, level surface in the desired location. Ensure there is at least 20 cm (8 inches) of clear space around all sides for proper air circulation. Do not place it near heat sources or in direct sunlight.
- Power Connection: Plug the power cord into a grounded electrical outlet. Ensure the voltage matches the specifications of the unit.
- Initial Operation: Allow the unit to stand upright for at least 1 hour before plugging it in if it was transported on its side. This allows the refrigerant to settle.
- Water Tank Installation: Ensure the water collection tank is correctly inserted into the unit. The unit will not operate if the tank is full or incorrectly positioned.
5. Operating Instructions
Control Panel:
The FRAL Dry Digit 21 features a user-friendly digital control panel. Specific button functions may vary slightly, but generally include:
- Power Button: Turns the unit ON/OFF.
- Humidity Setting Buttons (Up/Down Arrows): Adjusts the desired humidity level (e.g., from 30% to 80% Relative Humidity).
- Mode Button: Selects operating modes (e.g., Continuous, Auto, Laundry Dry).
- Timer Button: Sets a timer for automatic ON/OFF operation.
- Fan Speed Button: Adjusts fan speed (e.g., Low, High).
- Display: Shows current humidity, set humidity, or timer settings.
Basic Operation:
- Turn On: Press the Power button to switch on the dehumidifier. The display will show the current room humidity.
- Set Desired Humidity: Use the Up/Down arrow buttons to set your desired humidity level. The unit will operate until the room humidity reaches this level, then cycle on and off to maintain it. A common comfortable range is 40-60% RH.
- Select Mode (Optional): Press the Mode button to cycle through available operating modes.
- Adjust Fan Speed (Optional): Press the Fan Speed button to select your preferred fan speed. Higher fan speed results in faster dehumidification but may produce more noise.
- Turn Off: Press the Power button again to turn off the unit.
Continuous Drainage:
For continuous operation without needing to empty the water tank, connect a suitable drain hose (not included) to the continuous drain outlet at the back of the unit. Ensure the hose is sloped downwards to allow gravity drainage into a floor drain or larger container.
6. Maintenance
Regular maintenance ensures optimal performance and extends the lifespan of your dehumidifier.
Emptying the Water Tank:
When the water tank is full, the unit will automatically shut off and an indicator light (or message on display) will illuminate. Carefully pull out the water tank, empty the collected water, and reinsert the tank firmly until it clicks into place. The unit will resume operation.
Cleaning the Air Filter:
The air filter should be cleaned every two weeks or more frequently depending on usage and air quality. A dirty filter reduces efficiency and can damage the unit.
- Turn off and unplug the dehumidifier.
- Remove the filter cover from the rear of the unit (refer to Figure 3.3).
- Gently pull out the air filter.
- Wash the filter with warm, soapy water, or use a vacuum cleaner to remove dust.
- Rinse thoroughly and allow the filter to air dry completely before reinserting.
- Reinstall the dry filter and close the filter cover.
Cleaning the Unit Exterior:
Wipe the exterior of the dehumidifier with a soft, damp cloth. Do not use abrasive cleaners or solvents, as these can damage the surface.
7. Troubleshooting
Before contacting customer support, please refer to the following common issues and their solutions:
| Problem | Possible Cause | Solution |
|---|---|---|
| Unit does not turn on. | No power; Water tank full or incorrectly inserted; Room temperature too low. | Check power connection; Empty and reinsert water tank correctly; Ensure room temperature is above 5°C (41°F). |
| No water collected. | Humidity level already low; Air filter clogged; Unit in continuous drain mode. | Increase desired humidity setting; Clean air filter; Check continuous drain hose connection. |
| Unit is noisy. | Unit not on a level surface; Air filter clogged; Internal components vibrating. | Place on a level surface; Clean air filter; Contact customer support if noise persists. |
| Dehumidification is slow. | Room size too large; Air filter clogged; Doors/windows open. | Ensure unit is appropriate for room size; Clean air filter; Close doors and windows. |
8. Specifications
| Feature | Specification |
|---|---|
| Model | DD21LCD |
| Brand | Fral |
| Dehumidification Capacity | 21 Liters/day |
| Dimensions (L x W x H) | 50 x 50 x 28 cm |
| Weight | 13 kg |
| Special Function | Automatic humidity removal |
| Recommended Use | Residential |
| Operating Mode | Continuous |
9. Warranty and Support
For warranty information and technical support, please refer to the warranty card included with your product or visit the official FRAL website. Keep your purchase receipt as proof of purchase for any warranty claims.
If you encounter issues not covered in the troubleshooting section, or require further assistance, please contact FRAL customer service.
Related Documents - DD21LCD
 |
FRAL FSW63 Swimming Pool Dehumidifier Technical Manual Comprehensive technical manual for the FRAL FSW63 swimming pool dehumidifier, covering installation, operation, maintenance, safety, and troubleshooting. Includes technical specifications and compliance information. |
 |
FRAL FDNP96S.3 Mobile Dehumidifier - Technical Manual This document is the technical manual and user guide for the FRAL FDNP96S.3 mobile dehumidifier. It provides detailed information on operation, safety precautions, maintenance, troubleshooting, and technical specifications for the device. |
 |
FRAL FDNP33S/FDNF33S Instrukcja Obsługi - Profesjonalny Osuszacz Powietrza Kompleksowa instrukcja obsługi dla profesjonalnych osuszaczy powietrza FRAL FDNP33S i FDNF33S, obejmująca bezpieczeństwo, obsługę, konserwację i dane techniczne. |
 |
FRAL FSC25 Portable Air Conditioner: Use and Maintenance Manual Official use and maintenance manual for the FRAL FSC25 portable air conditioner, detailing its features, operation, technical specifications, and safety guidelines. |
 |
Manuale Tecnico Deumidificatore Professionale FRAL FDK44S.2001 Manuale tecnico completo per il deumidificatore professionale FRAL FDK44S.2001. Include istruzioni dettagliate per l'installazione, la sicurezza, l'uso del pannello di controllo, la manutenzione e le specifiche tecniche. |
 |
Manuale Tecnico Deumidificatore Professionale FRAL FDK44S.2001 Manuale tecnico completo per il deumidificatore professionale FRAL FDK44S.2001, contenente istruzioni di sicurezza, manutenzione, dati tecnici e schemi elettrici. |
Ask a question about this manual
Ask about setup, troubleshooting, compatibility, parts, safety, or missing instructions. Manuals+ will review the question and use this page’s manual context to help answer it.