1. Introduction and Safety Information
This manual provides detailed instructions for the safe and effective use of your SMOTIVEPRO 2L Manual Brake Bleeder Fluid Pump. Please read all instructions carefully before operation.
Safety Precautions:
- Always wear appropriate personal protective equipment, including eye protection and gloves, when handling brake fluid.
- Brake fluid is corrosive and can damage paint and other surfaces. Clean up spills immediately.
- Refer to your vehicle's service manual for specific brake bleeding procedures and brake fluid type recommendations.
- Do not over-pressurize the system. Monitor the pressure gauge during operation.
- Ensure all connections are secure before applying pressure.
2. Product Overview
The SMOTIVEPRO 2L Manual Brake Bleeder Fluid Pump is designed for efficient, single-person bleeding of hydraulic braking and clutch systems. It features a durable construction and a 45mm adapter suitable for many European vehicle master cylinder reservoirs.
Components:
- 2-Liter Fluid Reservoir with integrated pump handle and pressure gauge.
- 1-Liter Waste Oil Bottle with transparent hose and hanging chain.
- 45mm Master Cylinder Adapter.
- Quick-connect hose assembly with pressure relief valve.

Figure 2.1: Complete SMOTIVEPRO 2L Manual Brake Bleeder Fluid Pump kit.
Key Features:
- 2L Tank Capacity: Sufficient volume for most brake bleeding tasks.
- Integrated Pressure Gauge: Allows for continuous monitoring of system pressure.
- Pressure Relief Valve: For safe release of excess pressure.
- Durable Construction: Made from high-rigidity plastic for enhanced durability and corrosion resistance.
- One-Man Operation: Designed for ease of use by a single individual.

Figure 2.2: Detailed view of the brake bleeder pump highlighting the handle, relief valve, pressure gauge, tank base, and adapter connector.
3. Setup
Proper setup is crucial for effective and safe brake bleeding.
Preparation:
- Ensure the vehicle is on a level surface and securely supported.
- Locate the brake master cylinder reservoir.
- Clean the area around the master cylinder cap to prevent contaminants from entering the system.
- Remove the original master cylinder cap.
- Fill the 2-liter bleeder tank with new, clean brake fluid of the recommended type for your vehicle. Do not overfill.
Connecting the Bleeder:
- Screw the 45mm adapter onto the vehicle's master cylinder reservoir. Ensure a tight, leak-free seal.
- Connect the quick-connect fitting from the bleeder hose to the 45mm adapter. Verify the connection is secure.
- Attach the 1-liter waste oil bottle to a suitable location near the brake caliper/wheel cylinder using its hanging chain.
- Connect the transparent hose from the waste oil bottle to the bleeder nipple on the brake caliper/wheel cylinder you intend to bleed first.
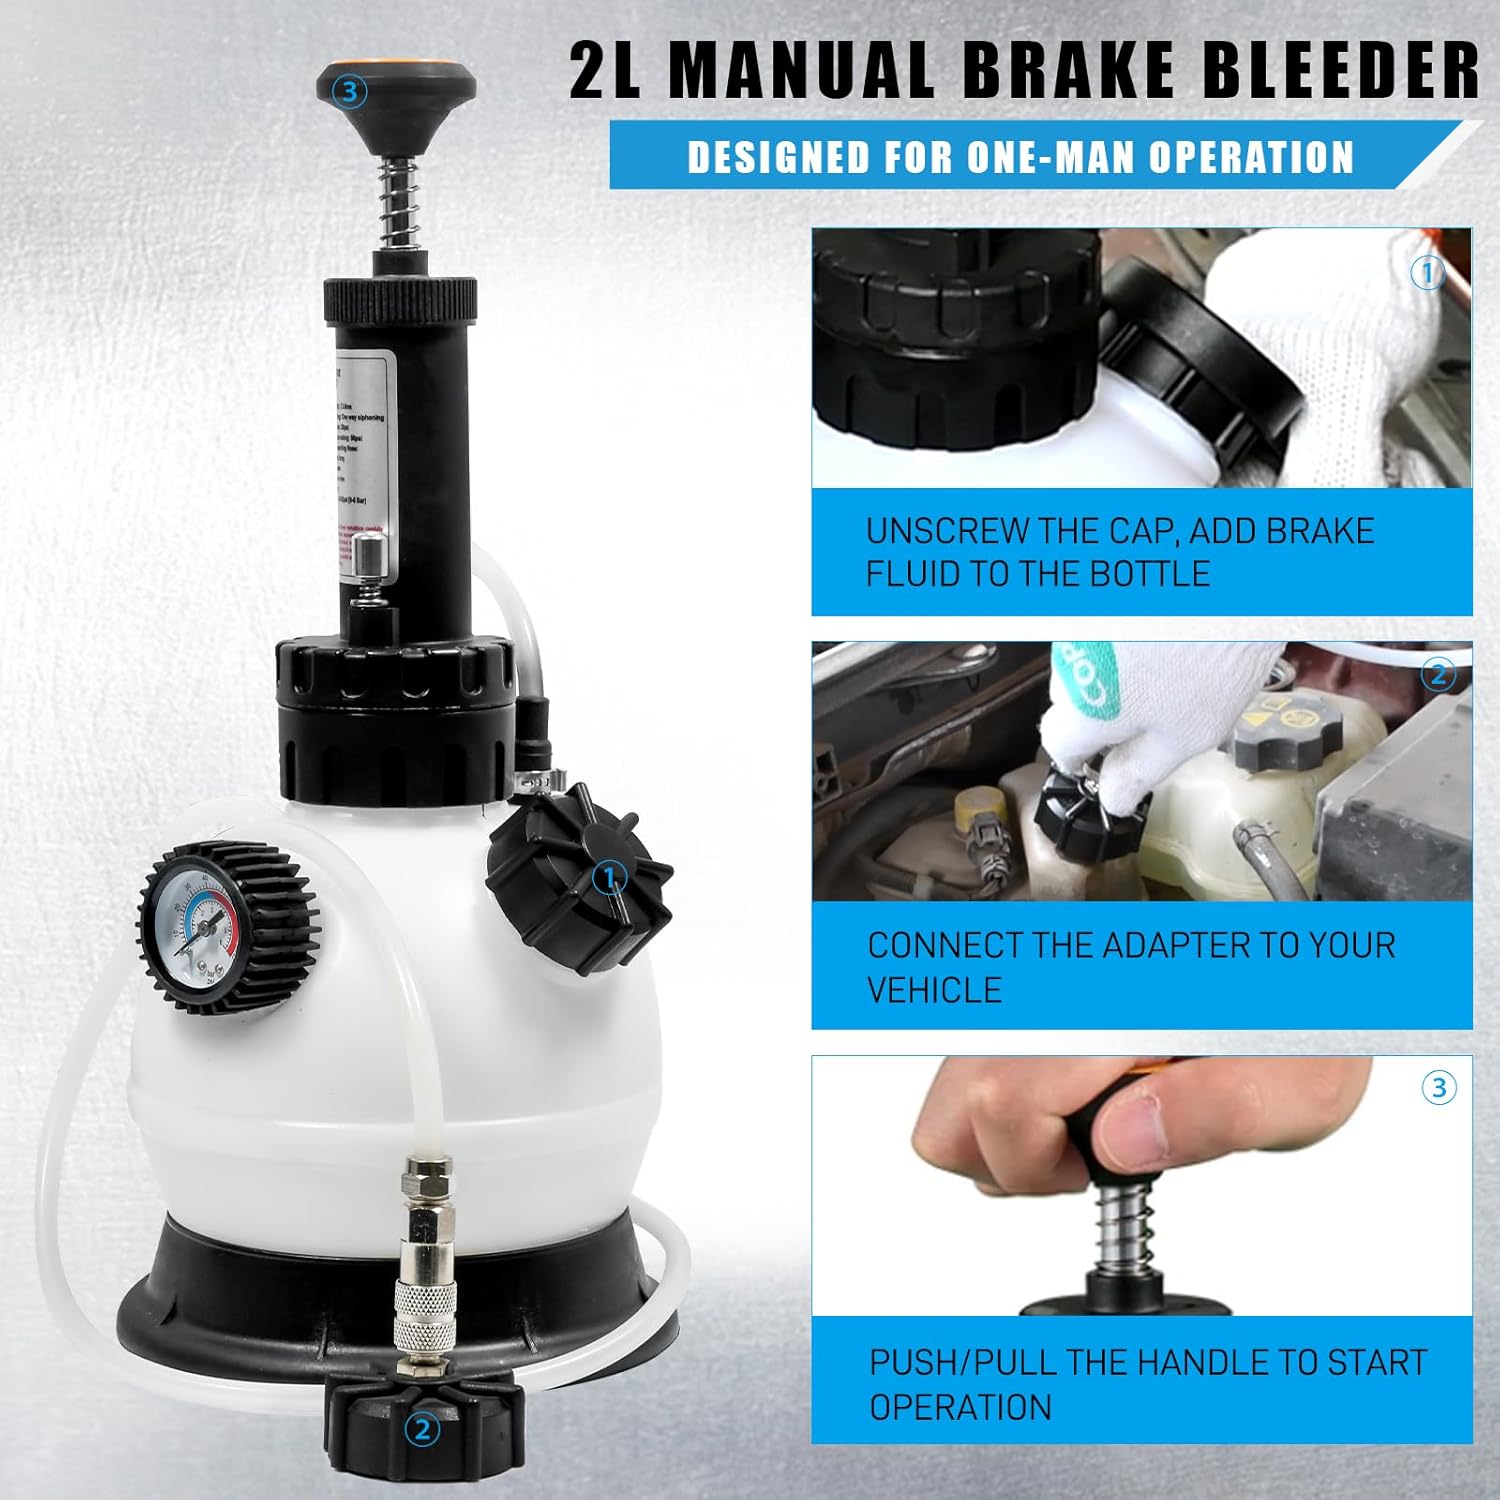
Figure 3.1: Visual guide for initial setup, including adding brake fluid and connecting the adapter.

Figure 3.2: Detail of the 45mm master cylinder adapter.
4. Operation (Brake Bleeding Procedure)
Follow these steps to bleed your vehicle's hydraulic braking or clutch system.
- Apply Pressure: With all connections secure, pump the handle on the 2-liter bleeder tank to build pressure in the system. Observe the pressure gauge and maintain pressure within the vehicle manufacturer's recommended range, typically 10-15 PSI. Do not exceed 20 PSI.
- Bleed the Farthest Caliper First: Begin with the brake caliper or wheel cylinder located farthest from the master cylinder (e.g., rear passenger side).
- Open Bleeder Nipple: Using an appropriate wrench, slowly open the bleeder nipple on the caliper/wheel cylinder. Old brake fluid and air bubbles will flow into the waste oil bottle.
- Monitor Fluid Flow: Observe the fluid flowing into the waste bottle. Close the bleeder nipple when the fluid runs clear and free of air bubbles.
- Repeat for All Calipers: Repeat steps 2-4 for each remaining brake caliper/wheel cylinder, working progressively closer to the master cylinder (e.g., rear driver side, front passenger side, front driver side).
- Maintain Fluid Level: Periodically check the fluid level in the 2-liter bleeder tank and refill as necessary to prevent air from entering the system.
- Release Pressure: Once all calipers are bled, release the pressure from the bleeder tank using the pressure relief valve.
- Disconnect: Disconnect the quick-connect fitting from the master cylinder adapter, then remove the adapter.
- Replace Cap: Reinstall the vehicle's original master cylinder cap.
- Test Brakes: Before driving, pump the brake pedal several times to ensure a firm pedal feel. Test the brakes at low speed in a safe area.

Figure 4.1: Illustrates the 2L capacity tank in use, connected to the vehicle's master cylinder.

Figure 4.2: The 1L waste oil bottle collecting used brake fluid from a bleeder nipple.
5. Maintenance
Proper maintenance ensures the longevity and reliable performance of your brake bleeder.
- Cleaning: After each use, thoroughly rinse the bleeder tank, hoses, and waste bottle with clean water to remove all traces of brake fluid. Brake fluid can degrade rubber and plastic components over time.
- Drying: Allow all components to air dry completely before storage.
- Storage: Store the brake bleeder kit in a clean, dry place, away from direct sunlight and extreme temperatures.
- Inspection: Periodically inspect hoses, seals, and connections for signs of wear, cracks, or damage. Replace any damaged components immediately.
6. Troubleshooting
Refer to this section for common issues and their resolutions.
Common Issues:
- Pressure Not Holding:
- Check all connections, especially the master cylinder adapter, for a secure and leak-free seal.
- Inspect hoses and fittings for cracks or damage.
- Ensure the pressure relief valve is fully closed.
- Verify the master cylinder adapter is the correct size and type for your vehicle and is sealing properly.
- Fluid Not Flowing:
- Ensure sufficient pressure is built in the bleeder tank.
- Confirm the bleeder nipple on the caliper/wheel cylinder is open.
- Check for kinks or blockages in the hoses.
- Air Bubbles Persist:
- Ensure the master cylinder reservoir does not run dry during the process.
- Verify all connections are tight to prevent air ingress.
- Bleed each caliper thoroughly until no bubbles are visible.
7. Specifications
| Attribute | Detail |
|---|---|
| Brand | SMOTIVEPRO |
| Model Number | MYBL1004 |
| Manufacturer | SUNBRIGHT TOOLS CO.,LTD |
| Item Weight | 3.74 pounds |
| Package Dimensions | 15.91 x 7.64 x 7.24 inches |
| Tank Capacity | 2 Liters |
| Waste Bottle Capacity | 1 Liter |
| Adapter Size | 45mm |
8. Warranty and Support
For warranty information, technical support, or replacement parts, please contact SMOTIVEPRO customer service directly. Refer to the product packaging or the official SMOTIVEPRO website for contact details.