1. Product Overview
This document provides essential information for the installation, operation, and maintenance of the mc-toolparts Replacement Pull Start Recoil Starter Assembly. This durable and high-quality tool part is designed as a direct replacement for specific hedge trimmer models.
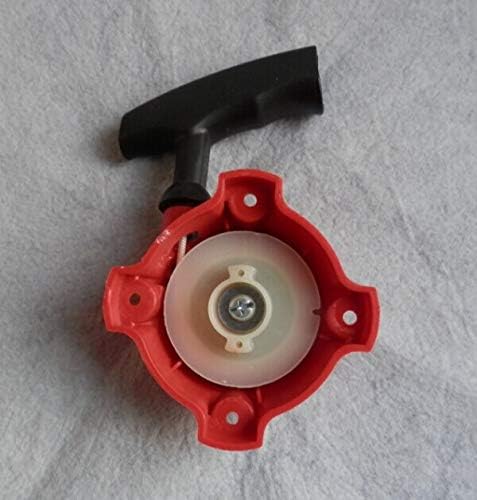
Image 1.1: Front view of the mc-toolparts Recoil Starter Assembly. The assembly features a red housing with a black pull handle and cord, showing the central white pulley mechanism.

Image 1.2: Rear view of the mc-toolparts Recoil Starter Assembly. This view shows the back of the red housing, highlighting the mounting points and the overall compact design of the unit.
2. Safety Information
Always prioritize safety when working with power tools and replacement parts. Failure to follow these instructions may result in injury or damage to equipment.
- Ensure the hedge trimmer is turned off and the spark plug wire is disconnected before attempting any installation or maintenance.
- Wear appropriate personal protective equipment (PPE), including gloves and eye protection.
- Work in a well-lit and stable environment.
- Keep children and bystanders away from the work area.
- If you are unsure about any step, consult a qualified technician.
3. Package Contents
Verify that all components are present upon opening the package:
- 1 x mc-toolparts Replacement Pull Start Recoil Starter Assembly (Type: 2T Single Start)
Note: Package quantity is 1 set/lot/pcs as per product specification.
4. Compatibility and Pre-Installation Check
This replacement part is designed for specific models. It is crucial to verify compatibility with your original part before installation. Do not proceed with installation if the appearance or specifications do not match your original component.
- Compare Visually: Carefully examine the new recoil starter assembly and compare it with the original part from your hedge trimmer. Pay attention to the shape, mounting holes, and overall design.
- Check Dimensions: Measure your original part and compare it with the dimensions of this replacement. The image below demonstrates how to measure a key dimension.
- Verify Model Numbers: Confirm that your hedge trimmer model (e.g., Zenoah 753S, TOPSUN GJB25D, GJB700, HT250, AMK 6010, M.C 603D 24.5CC) is listed as compatible.

Image 4.1: Measurement of the Recoil Starter Assembly. A digital caliper is shown measuring a dimension of the white pulley mechanism, indicating a reading of 45.7 mm. This measurement is critical for ensuring proper fit.
IMPORTANT NOTE: Please check item Color, Size, Quantity, and Part Number carefully before ordering and do not order if item appearance does not match with your original.
5. Installation Instructions
Follow these general steps for replacing the recoil starter assembly. Specific steps may vary slightly depending on your hedge trimmer model. Refer to your hedge trimmer's service manual for detailed instructions if available.
- Prepare the Trimmer: Ensure the hedge trimmer is completely off, cool, and the spark plug wire is disconnected to prevent accidental starting.
- Locate the Old Starter: Identify the existing recoil starter assembly on your hedge trimmer. It is typically mounted on the engine housing.
- Remove the Old Starter: Using appropriate tools (e.g., screwdriver, wrench), carefully unbolt or unscrew the old recoil starter assembly from the engine. Note the position and orientation of any washers or spacers.
- Inspect the Area: Clean any debris, dirt, or old gasket material from the mounting surface on the engine.
- Install the New Starter: Align the new mc-toolparts recoil starter assembly with the mounting holes on the engine. Ensure the pull cord is oriented correctly.
- Secure the New Starter: Fasten the new assembly using the original bolts/screws. Tighten them securely but do not overtighten, as this can strip threads or crack the housing.
- Reconnect Spark Plug: Once the new starter is securely installed, reconnect the spark plug wire.
- Test Functionality: Gently pull the starter cord a few times to ensure smooth operation and proper engagement with the engine's flywheel.
6. Operation
Once the recoil starter assembly is correctly installed, its operation is straightforward:
- Starting the Engine: Follow your hedge trimmer's specific starting procedure, which typically involves priming the carburetor (if applicable) and setting the choke.
- Pulling the Cord: Grip the pull handle firmly and pull the cord with a smooth, steady motion until the engine starts. Avoid yanking the cord abruptly or letting it snap back uncontrolled, as this can damage the recoil mechanism.
- Cord Retraction: The spring mechanism inside the recoil starter will automatically retract the cord once released. Ensure the cord retracts fully and smoothly after each pull.
7. Maintenance
Proper maintenance can extend the life of your recoil starter assembly:
- Keep Clean: Regularly clean the exterior of the recoil starter assembly to prevent dirt and debris from entering the mechanism. Use a soft brush or cloth.
- Inspect Cord: Periodically inspect the pull cord for fraying, cuts, or excessive wear. Replace the cord if any damage is observed.
- Check Mounting: Ensure the mounting bolts remain tight. Loose bolts can cause vibration and premature wear.
- Avoid Over-Pulling: Do not pull the cord to its absolute maximum extension repeatedly, as this can overstress the spring.
- Lubrication (Advanced): For experienced users, a very light application of dry lubricant (e.g., graphite powder) to the internal spring and pulley mechanism can improve smoothness, but this typically requires disassembly and is not recommended for general users.
8. Troubleshooting
If you encounter issues with your recoil starter assembly, consider the following common problems and solutions:
| Problem | Possible Cause | Solution |
|---|---|---|
| Cord does not retract fully | Weak or broken spring; debris inside mechanism | Replace the recoil starter assembly; clean out debris (if accessible) |
| Cord pulls out but does not engage engine | Pawls (dogs) not extending; worn engagement teeth on flywheel | Replace the recoil starter assembly; inspect flywheel for damage |
| Cord is frayed or broken | Normal wear and tear; improper pulling technique | Replace the recoil starter assembly (or just the cord if experienced) |
| Starter feels stiff or gritty | Dirt/debris inside; lack of lubrication | Clean the assembly; consider light lubrication (see Maintenance) |
If troubleshooting steps do not resolve the issue, it may be necessary to replace the entire recoil starter assembly.
9. Specifications
- Item Type: Tool Part
- Material: Plastic
- Type: 2T Single Start
- Application: Replacement part for M.C 603D, Zenoah 753S, TOPSUN GJB25D, GJB700, HT250, AMK 6010 24.5CC Hedge Trimmers
- Model Number: TPS-TNH-240321-46601
- Manufacturer: mc-toolparts
- Item Package Quantity: 1
- ASIN: B095JRGM29
- Date First Available: Sept. 3 2022
10. Warranty and Support
For information regarding warranty coverage or technical support, please refer to the seller's policies on the platform where the product was purchased. For specific item information or details not covered in this manual, please feel free to contact the seller directly.
Note: The real color of the item may be slightly different from the pictures shown on the website caused by many factors such as the brightness of your monitor and light brightness.