1. Introduction
This manual provides detailed instructions for the installation, operation, and maintenance of your Anspo 4-Channel 5-in-1 H.264 DVR Recorder. This device is designed for comprehensive surveillance, supporting multiple camera types including AHD, CVI, TVI, IP, and traditional analog cameras. It features H.264 video compression, 1080N/720P recording capabilities, and various output options for monitoring.
2. Package Contents
Please verify that all items listed below are included in your package. If any items are missing or damaged, contact your retailer.
- Anspo 4-Channel DVR Recorder
- Power Adapter
- Remote Control
- USB Mouse
- User Manual (this document)

Figure 2.1: The Anspo DVR Recorder shown with its standard accessories, including the power adapter, remote control, and USB mouse.
3. Product Features
The Anspo DVR Recorder offers a range of features designed for effective surveillance:
- 5-in-1 Compatibility: Supports AHD, CVI, TVI, IP, and Analog cameras.
- High-Resolution Recording: Capable of recording in 1080N and 720P resolutions.
- H.264 Video Compression: Efficiently compresses video to save storage space while maintaining quality.
- Multiple Video Outputs: Features HDMI, VGA, and BNC outputs for versatile display options.
- Remote Access: View live footage and playback recordings from anywhere via P2P Cloud technology and mobile applications.
- Smart Playback Function: Quickly search and review specific moments from recorded footage.
- 3D Digital Noise Reduction (3D DNR): Enhances image clarity by reducing visual noise in low-light conditions.
- 1TB Storage Capacity: Supports up to 1TB internal storage for extensive recording.

Figure 3.1: The DVR unit with an illustration of an internal hard drive, indicating its storage capability for recorded video.

Figure 3.2: A visual comparison demonstrating the effect of 3D Digital Noise Reduction, showing a clearer image on the right with 3DNR applied compared to the noisy image on the left without it.
4. Setup Guide
Follow these steps to set up your Anspo DVR Recorder.
4.1 Physical Connections
- Connect Cameras: Connect your surveillance cameras to the 'VIDEO IN' BNC ports (V1, V2, V3, V4) on the rear panel.
- Connect Monitor/TV: Connect a monitor or TV to the DVR using either the 'HDMI', 'VGA', or 'V-OUT' (BNC) port.
- Connect Audio (Optional): If using audio input, connect microphones to the 'AUDIO IN' ports. Connect speakers to the 'A-OUT' port for audio output.
- Connect Network (Optional): For remote access, connect an Ethernet cable from the 'LAN' port on the DVR to your router.
- Connect USB Mouse: Plug the included USB mouse into one of the USB ports.
- Connect Power: Connect the power adapter to the 'DC 12V' input on the DVR and then plug it into a power outlet. The DVR will power on automatically.
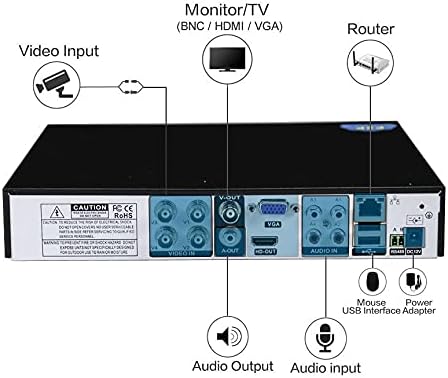
Figure 4.1: The rear panel of the Anspo DVR, illustrating the various input and output ports for video, audio, network, and power connections, along with the USB interface for the mouse.
4.2 Initial Configuration
Upon first power-on, the DVR may guide you through an initial setup wizard. Follow the on-screen prompts to set the language, date/time, network settings, and create an administrator password. It is crucial to set a strong password for security.
5. Operating Instructions
This section covers basic operation of your DVR.
5.1 Live View
After successful setup, the DVR will display the live view from connected cameras on your monitor. You can switch between single-camera view and multi-camera grid view using the on-screen interface or remote control.
5.2 Recording Modes
The DVR supports various recording modes:
- Continuous Recording: Records 24/7.
- Motion Detection Recording: Records only when motion is detected in the camera's field of view.
- Scheduled Recording: Records during specific times of the day or week.
- Manual Recording: Start and stop recording manually.
Configure these settings in the DVR's main menu under 'Record Settings' or 'Schedule'.
6. Remote Access and App Setup
Access your DVR remotely using the XMeye mobile application or a PC client.
6.1 XMeye App Download
Download the free XMeye app from your smartphone's app store:
- For Android devices: Google Play Store
- For iOS devices: Apple App Store

Figure 6.1: This image shows how to download the XMeye app using QR codes for both App Store and Google Play, and illustrates the live view interface on a smartphone.
6.2 Connecting to the DVR
After installing the app, create an account and add your DVR device using its unique ID (often found in the DVR's network settings or on a sticker on the device). Ensure your DVR is connected to the internet via the LAN port.

Figure 6.2: An illustration of the DVR's P2P Cloud technology, enabling remote viewing and playback from various devices including Internet Explorer, PC client software, and mobile phones (Android/iOS).
7. Playback Function
The DVR allows you to review recorded footage efficiently.
7.1 Smart Playback
The Smart Playback function helps you quickly locate specific events. Access playback from the main menu. You can filter recordings by date, time, and event type (e.g., motion detection). The system often provides a timeline with markers or thumbnails to easily navigate through recorded periods.
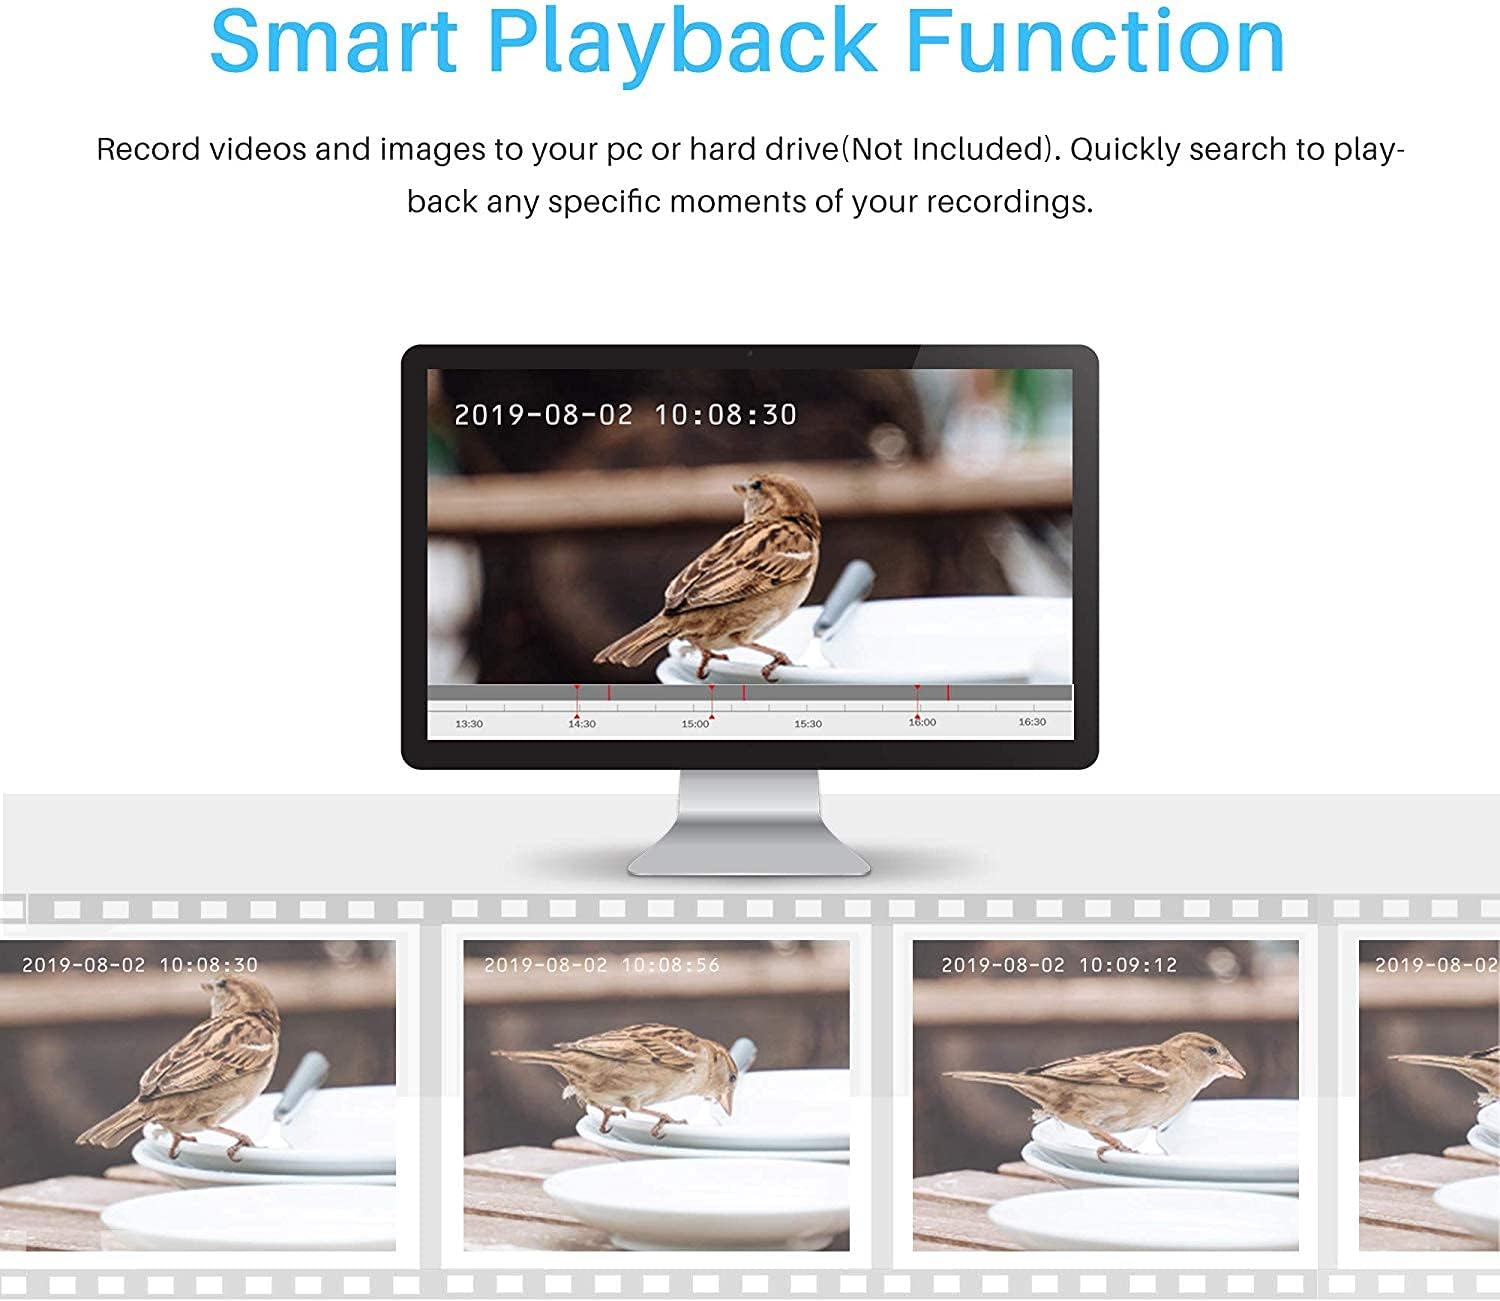
Figure 7.1: A screenshot of the Smart Playback interface, displaying a timeline with specific timestamps and thumbnail previews of recorded video segments, allowing for quick navigation and review of events.
8. Maintenance
Proper maintenance ensures the longevity and optimal performance of your DVR.
- Cleaning: Regularly clean the exterior of the DVR with a soft, dry cloth. Ensure ventilation openings are free from dust to prevent overheating. Do not use liquid cleaners directly on the device.
- Hard Drive Management: Periodically check the hard drive status in the DVR's menu. Ensure there is sufficient space for new recordings. The DVR typically overwrites the oldest footage when the disk is full.
- Firmware Updates: Check the manufacturer's website for available firmware updates. Updates can improve performance, add features, or fix bugs. Follow update instructions carefully to avoid damaging the device.
- Power Supply: Use only the original power adapter provided with the DVR.
9. Troubleshooting
This section addresses common issues you might encounter.
- No Video Output:
- Check all video cable connections (HDMI, VGA, BNC) to the monitor and DVR.
- Ensure the monitor is powered on and set to the correct input source.
- Try a different video cable or monitor.
- No Camera Image:
- Verify camera power supply and video cable connections.
- Ensure the camera type (AHD, TVI, CVI, Analog, IP) is compatible with the DVR and correctly configured in the DVR settings.
- Test the camera with another compatible device if possible.
- Remote Access Not Working:
- Ensure the DVR is connected to the internet via an Ethernet cable.
- Check network settings on the DVR (IP address, gateway, DNS).
- Verify your router's internet connection.
- Ensure the XMeye app is updated and the DVR device ID is correctly entered.
- No Recording:
- Check if a hard drive is installed and properly initialized.
- Verify recording schedules and motion detection settings.
- Ensure the hard drive is not full or corrupted.
10. Specifications
| Feature | Specification |
|---|---|
| Brand | Anspo |
| Model Number | ASP-8004XVR-1080N |
| Manufacturer | Justop Limited |
| Number of Channels | 4 |
| Video Compression | H.264 |
| Video Input | 4 x BNC (5-in-1: AHD/CVI/TVI/IP/Analog) |
| Video Output | 1 x HDMI, 1 x VGA, 1 x BNC (V-OUT) |
| Audio Input | Multiple (specific number not provided, typically 1-4) |
| Audio Output | 1 x RCA |
| Storage Capacity | 1 TB (supports 1 SATA HDD) |
| Network Interface | 1 x RJ45 (Ethernet) |
| USB Interface | Multiple (for mouse, USB backup) |
| Power Supply | DC 12V |
| Dimensions (Approx.) | 24.5 cm (W) x 20.5 cm (D) x 4 cm (H) |
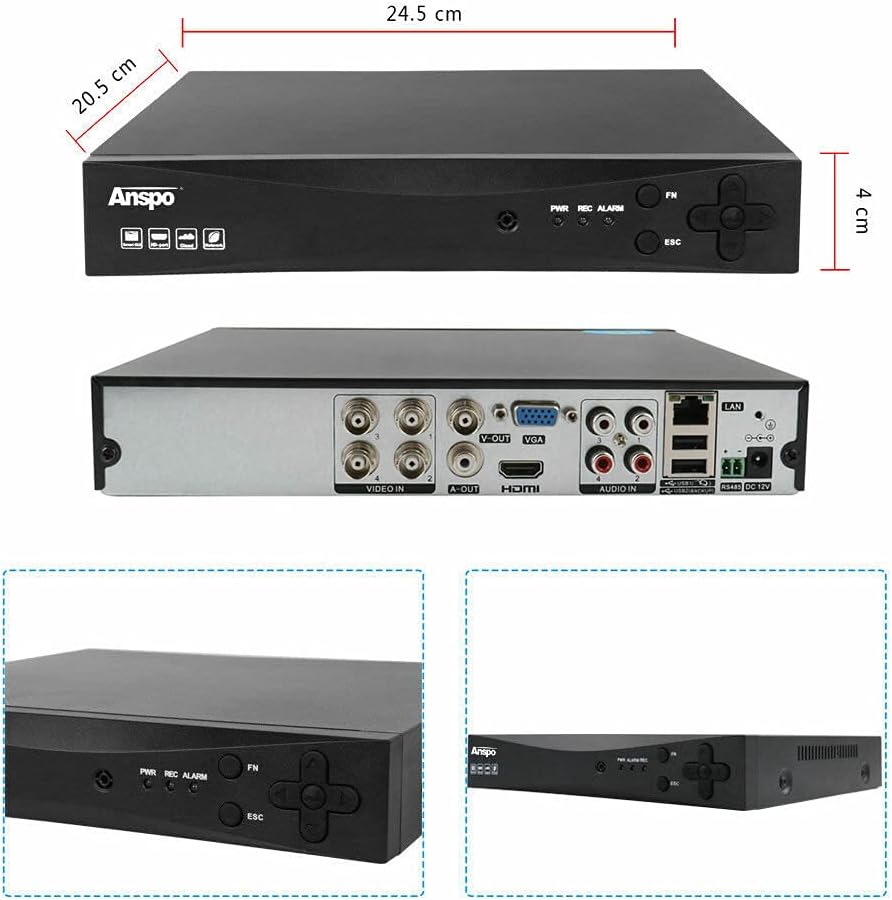
Figure 10.1: Top, rear, and detailed views of the Anspo DVR, including its approximate dimensions: 24.5 cm width, 20.5 cm depth, and 4 cm height.
11. Warranty and Support
For warranty information and technical support, please refer to the documentation provided with your purchase or contact your retailer. Keep your proof of purchase for warranty claims.