
1. Introduction
This manual provides detailed instructions for the installation, operation, and maintenance of your BATHLAVISH Matte Black Single Handle Bathroom Faucet, Model B-69308-B-1. Please read these instructions carefully before installation and retain them for future reference. Proper installation and care will ensure optimal performance and longevity of your faucet.
2. Safety Information
- Always turn off the main water supply before beginning any installation or repair work.
- Wear appropriate personal protective equipment, such as safety glasses and gloves, during installation.
- Ensure all connections are secure to prevent leaks. Do not overtighten.
- If you are unsure about any part of the installation process, consult a qualified plumber.
- Keep small parts away from children.
3. Package Contents
Verify that all components are present before beginning installation. If any parts are missing or damaged, contact customer support.

Figure 3.1: All Accessories Included. This image displays the complete set of components provided with the faucet, including the main faucet body, two water supply hoses, a pop-up drain assembly, mounting hardware, and a deck plate for 3-hole installations.
- Bathroom Faucet (1)
- Hoses (2)
- Pop Up Drain (1)
- Mounting Hardware (1 set)
- 6-inch Hole Cover Plate (1) (for 3-hole sinks)
4. Specifications
| Feature | Specification |
|---|---|
| Brand | BATHLAVISH |
| Model Number | B-69308-B-1 |
| Color | Matte Black |
| Material | Solid Brass |
| Mounting Type | Deck Mount, Single Hole |
| Number of Handles | 1 |
| Handle Type | Lever |
| Flow Rate | 1.8 Gallons Per Minute |
| Special Features | Leak Resistant, Pop Up Drain, Water Saving System |
| Spout Height | 3.78 Inches |
| Spout Reach | 5.31 Inches |
| Mounting Hole Diameter | 0.9 - 1.6 Inches |
| Hose Length | 24 Inches |
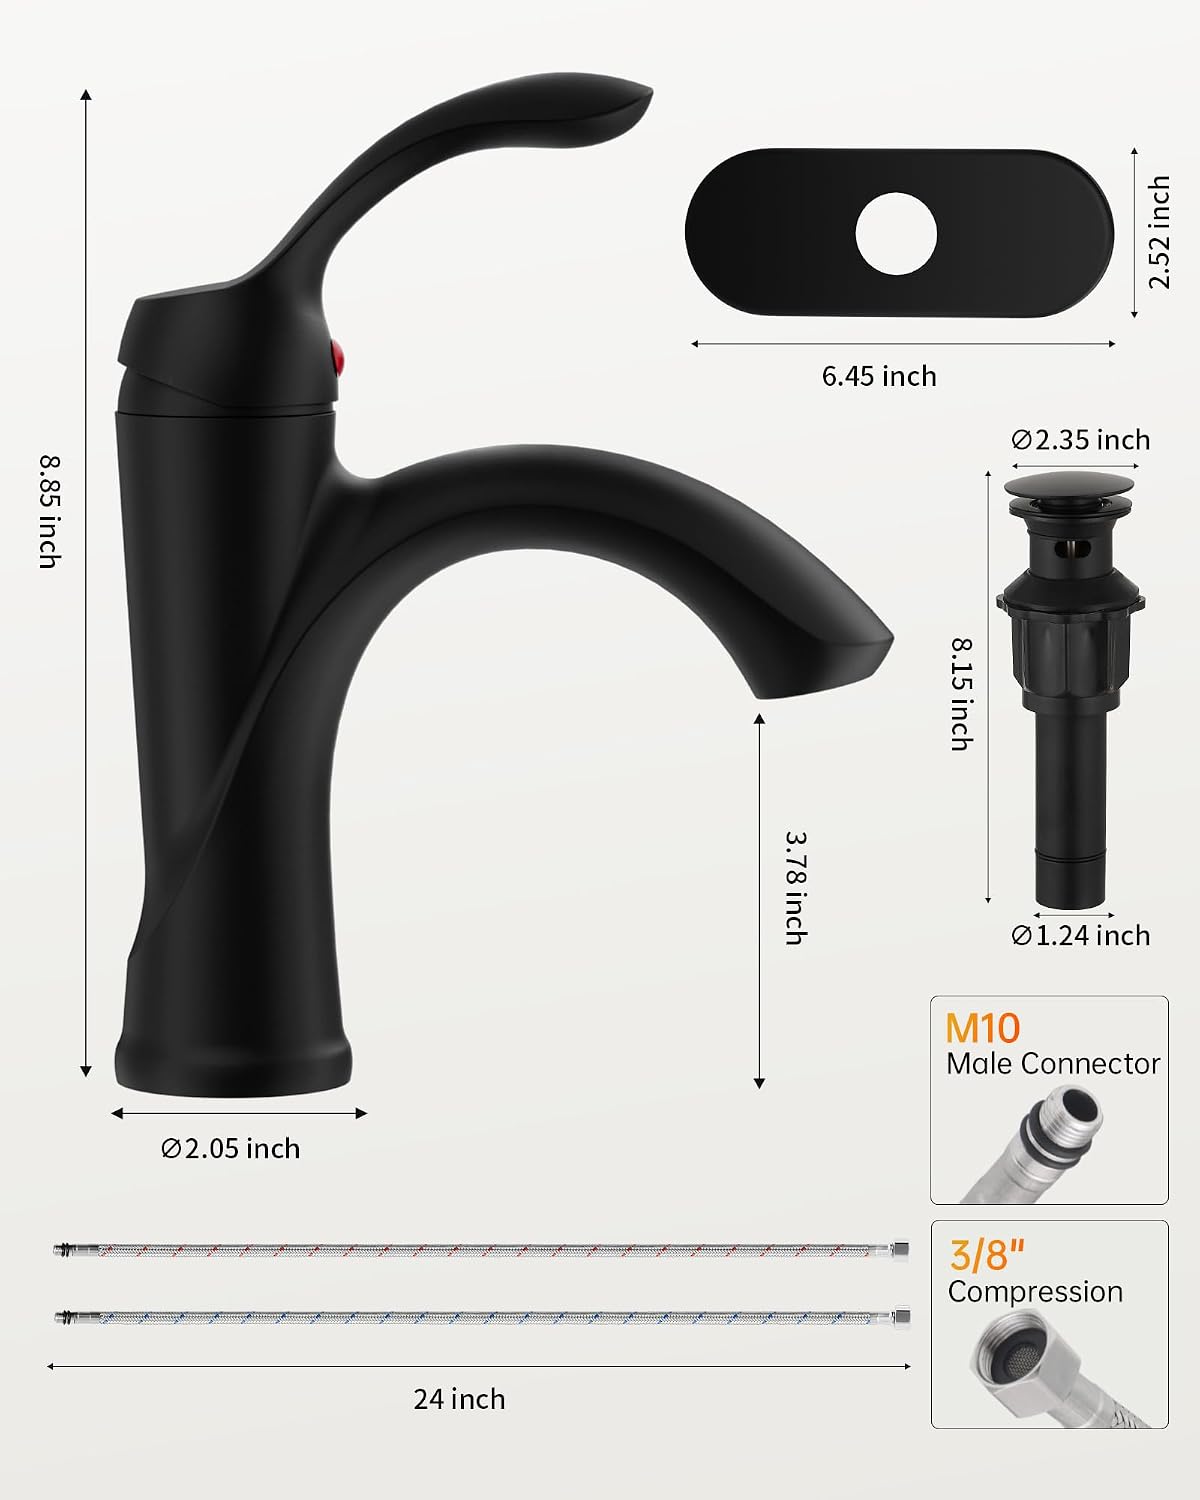
Figure 4.1: Product Dimensions. This diagram provides precise measurements for the faucet and pop-up drain, illustrating spout height, reach, and overall dimensions for installation planning.
5. Installation Instructions
Follow these steps for proper installation of your BATHLAVISH faucet. Ensure you have all necessary tools and components before starting.
5.1 Prepare the Sink

Figure 5.1: Sink Compatibility. The faucet is compatible with both single-hole and three-hole bathroom sinks. For three-hole sinks, use the included deck plate.
- Turn off the water supply to the sink.
- Remove any existing faucet and clean the mounting area.
- Ensure the mounting hole diameter is between 0.9 and 1.6 inches.
- If your sink has three holes, place the included 6-inch cover plate over the holes before installing the faucet.
5.2 Install the Faucet
- Insert the faucet body into the mounting hole on the sink or deck plate.
- From underneath the sink, secure the faucet using the provided mounting hardware (washer and locking nut). Hand-tighten first, then use a wrench to snug it, ensuring the faucet is aligned correctly.
- Connect the hot and cold water supply lines to the corresponding inlets on the faucet. The hoses are pre-installed to the faucet for convenience.
- Connect the other ends of the supply lines to your hot and cold water stops. Ensure a tight seal without overtightening.
Video 5.1: Faucet and Pop-Up Drain Installation Guide. This video demonstrates the step-by-step process for installing the bathroom sink faucet and the accompanying pop-up drain, providing visual guidance for a smooth setup.
5.3 Install the Pop-Up Drain
Video 5.2: Pop-Up Drain Assembly. This video segment, part of the full installation guide, specifically illustrates how to correctly assemble and install the pop-up drain with overflow, highlighting the components like the plastic washer, silicon gasket, and brass locking nut.
- Disassemble the pop-up drain components: drain body, plastic washer, silicon gasket, and brass locking nut.
- Insert the top part of the drain body into the sink drain hole from above.
- From underneath the sink, slide the silicon gasket, then the plastic washer, and finally the brass locking nut onto the drain body.
- Tighten the brass locking nut to secure the drain, ensuring the silicon gasket creates a watertight seal.
- Connect the P-trap to the bottom of the pop-up drain.

Figure 5.2: Pop-Up Drain with Overflow. This image clarifies that the included pop-up drain with overflow is designed for sinks equipped with a spillway hole. It shows the drain correctly installed in such a sink.
5.4 Test for Leaks
- Once all connections are made, slowly turn on the main water supply.
- Check all connections for any signs of leaks. Tighten connections as needed, but do not overtighten.
- Run water through the faucet for a few minutes to flush out any debris and ensure proper operation.
6. Operating Instructions
Your BATHLAVISH faucet features a single handle for easy control of water flow and temperature.

Figure 6.1: Faucet Features. This image points out key features of the faucet: the single handle for operation, the matte black finish, the aerator for water saving and splash reduction, and the 6.4-inch deck plate for versatile installation.
- Water Flow: Lift the handle to turn on the water and control the flow rate. Lower the handle to turn off the water.
- Temperature Control: Move the handle to the left for hot water and to the right for cold water. Adjust the handle position to achieve the desired water temperature.
- Aerator: The built-in aerator ensures a smooth water flow and helps conserve water while minimizing splashing. It can be removed for cleaning.
Video 6.1: Faucet Operation Demonstration. This video provides a brief demonstration of the BATHLAVISH Black Bathroom Sink Faucet in use, showcasing its single-handle operation and water flow.

Figure 6.2: No Splashing Spout Design. This image illustrates the faucet's spout design, which includes a built-in filter and removable aerator to ensure a smooth, splash-free water flow and water conservation.
7. Maintenance
Regular cleaning and maintenance will help preserve the finish and functionality of your faucet.
- Cleaning the Finish: Clean the matte black finish with a soft, damp cloth. Avoid abrasive cleaners, harsh chemicals, or scouring pads, as these can damage the finish.
- Cleaning the Aerator: If water flow decreases or becomes erratic, the aerator may be clogged. Unscrew the aerator from the spout, clean any debris or mineral deposits, and then reattach it.
- General Care: Periodically check all connections for tightness to prevent leaks.
8. Troubleshooting
Refer to the table below for common issues and their solutions.
| Problem | Possible Cause | Solution |
|---|---|---|
| Low Water Flow | Clogged aerator; partially closed water supply valve. | Clean the aerator. Ensure water supply valves are fully open. |
| Leaking from Faucet Base | Loose mounting nut; damaged O-ring. | Tighten the mounting nut. Inspect and replace O-rings if damaged. |
| Leaking from Spout | Worn cartridge. | Replace the ceramic cartridge. |
| Water Temperature Issues | Incorrect hot/cold supply connections; water heater issues. | Verify hot and cold lines are connected correctly. Check water heater settings. |
9. Warranty
The BATHLAVISH Matte Black Single Handle Bathroom Faucet comes with a limited warranty. Please refer to the warranty card included in your package for specific terms and conditions. Retain your proof of purchase for warranty claims.
10. Customer Support
For further assistance, technical support, or to order replacement parts, please contact BATHLAVISH customer service. Contact information can typically be found on the product packaging or the official BATHLAVISH website.
Online Store: BATHLAVISH Store on Amazon