1. Introduction
Thank you for choosing the Mitzu MCS-9956 Bluetooth Car Stereo. This manual provides essential information for the proper installation, operation, and maintenance of your new car stereo. Please read this manual thoroughly before using the product to ensure safe and optimal performance. Keep this manual for future reference.
The MCS-9956 features Bluetooth connectivity for hands-free calls and audio streaming, USB and SD card playback for MP3 files, an AUX input, and an LCD display with a pre-set equalizer and digital clock.
2. Safety Information
- Installation: Ensure professional installation to prevent damage to the unit or your vehicle. Incorrect wiring can cause fire or electrical shock.
- Power Supply: Connect the unit only to a 12V DC power supply with a negative ground.
- Volume Level: Avoid operating the unit at excessively high volume levels for extended periods to prevent hearing damage and to maintain awareness of traffic conditions.
- Cleaning: Use a soft, dry cloth for cleaning. Do not use abrasive cleaners or solvents.
- Moisture: Keep the unit away from water and excessive moisture.
- Operation While Driving: Do not operate complex functions or watch videos while driving. Distraction can lead to accidents.
3. Product Overview
3.1 Front Panel and Remote Control
The front panel provides access to all primary controls, including power, volume, mode selection, and media playback. The included remote control offers convenient access to these functions from a distance.

Image 3.1: Front view of the Mitzu MCS-9956 car stereo showing the main unit with its LCD display, control knob, buttons, USB, SD, and AUX ports, alongside the included remote control.
- Power/Mode Button: Press to turn on/off, short press to change mode (Radio, USB, SD, AUX, Bluetooth).
- Volume Knob: Rotate to adjust volume. Press to access audio settings (EQ, Bass, Treble, Balance, Fader).
- Display: LCD screen showing current status, time, track information, etc.
- USB Port: Connect USB flash drives for MP3 playback.
- SD Card Slot (TF): Insert Micro SD cards for MP3 playback.
- AUX Input: 3.5mm jack for connecting external audio devices.
- Microphone (MIC): Built-in microphone for hands-free calling.
- Band/APS Button: In radio mode, press to select radio band (FM1, FM2, FM3). Long press for automatic station scan.
- Mute Button: Mutes audio output.
- Navigation Buttons (<< / >>): Skip tracks, fast forward/rewind, tune radio stations.
- Preset Buttons (1-6): Store and recall radio stations. In media mode, these can also function as play/pause, repeat, random, and folder navigation.
3.2 Rear Panel Connections
The rear panel houses all necessary wiring connections for power, speakers, and external amplifiers.
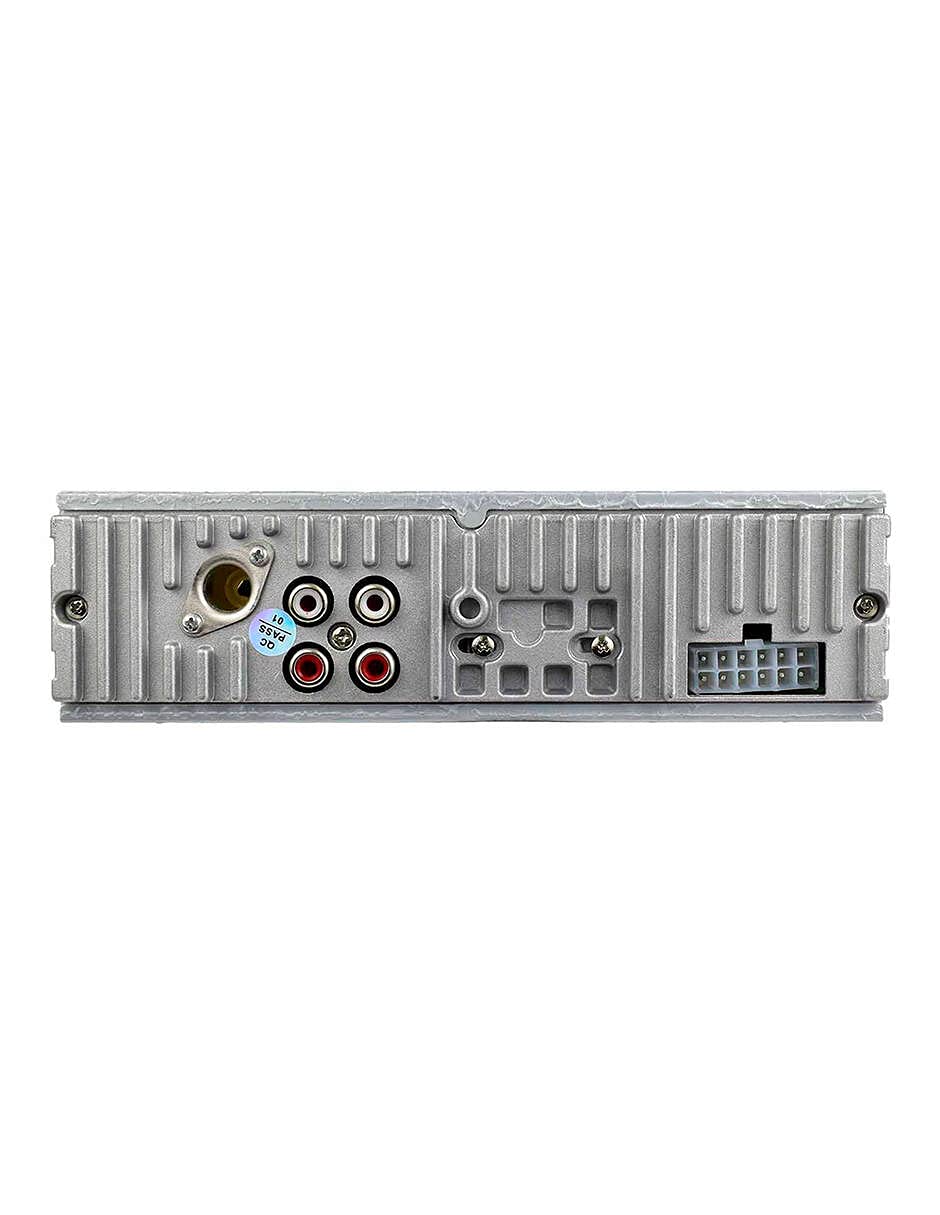
Image 3.2: Rear view of the Mitzu MCS-9956 car stereo, displaying the antenna input, RCA audio outputs, and the multi-pin wiring harness connector.
- Antenna Input: Connect your car's radio antenna here.
- RCA Audio Outputs: For connecting external amplifiers (Front Left/Right, Rear Left/Right).
- Wiring Harness Connector: Connects to the included wiring harness for power, ground, and speaker connections.
3.3 Side View
The side view illustrates the mounting points and heat dissipation design of the unit.
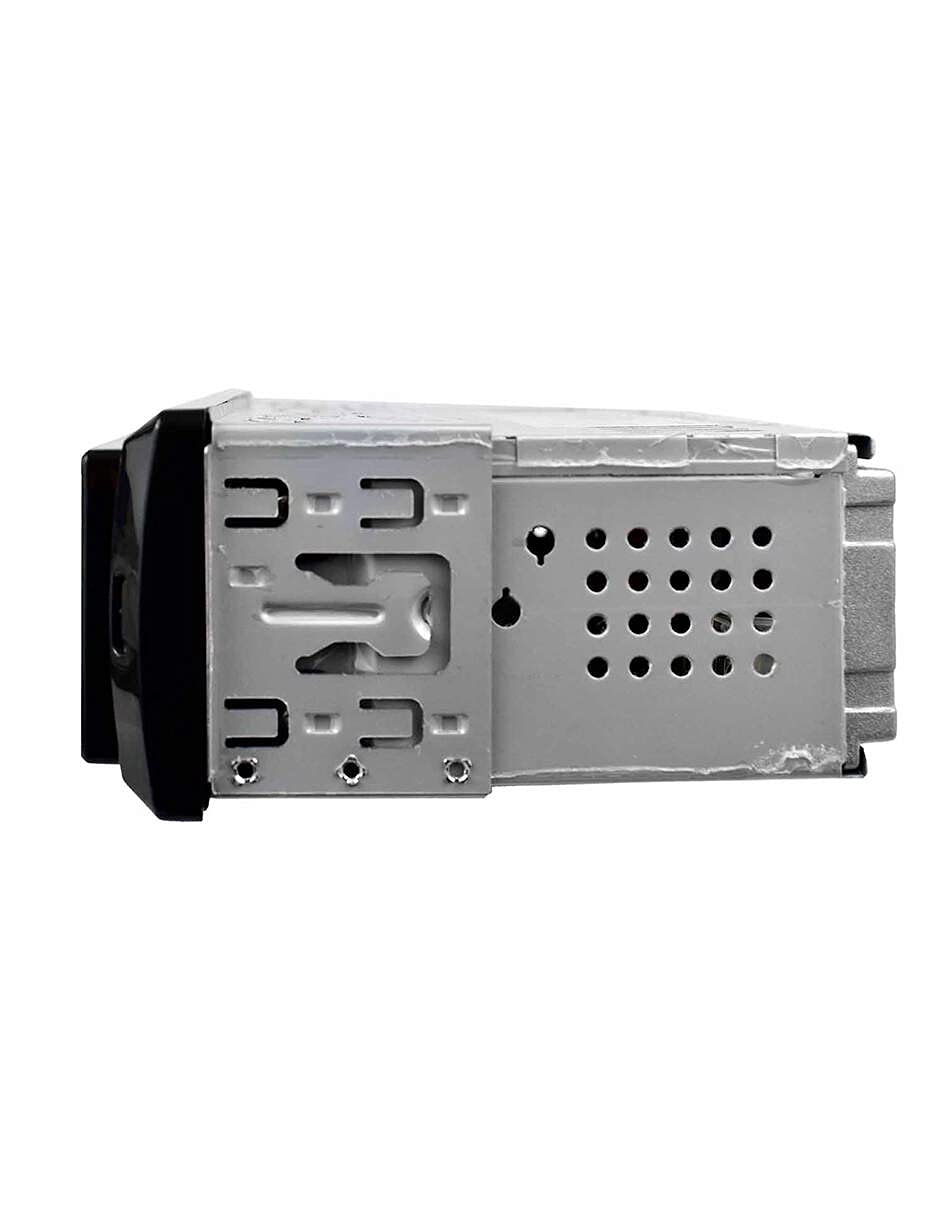
Image 3.3: Side view of the Mitzu MCS-9956 car stereo, highlighting the mounting brackets and ventilation holes for heat management.
4. Setup
4.1 Installation
Professional installation is highly recommended. Incorrect wiring can damage the unit or your vehicle's electrical system. Refer to your vehicle's service manual for specific dashboard removal and wiring instructions.
- Disconnect Battery: Before starting, disconnect the negative terminal of your car battery to prevent electrical shorts.
- Mounting: Install the car stereo into the dashboard opening using the provided mounting sleeve and brackets. Secure it firmly.
- Wiring Connections:
- Power: Connect the yellow wire (constant 12V) to a constant 12V power source, the red wire (accessory 12V) to a switched 12V source (ignition), and the black wire (ground) to a good chassis ground point.
- Speakers: Connect the speaker wires according to the color codes (e.g., White/White-Black for Front Left, Gray/Gray-Black for Front Right, Green/Green-Black for Rear Left, Purple/Purple-Black for Rear Right). Ensure correct polarity.
- Antenna: Connect the car's radio antenna cable to the antenna input on the rear of the unit.
- RCA Outputs (Optional): If using external amplifiers, connect RCA cables from the unit's RCA outputs to the amplifier's inputs.
- Reconnect Battery: Once all connections are secure, reconnect the car battery.
4.2 Initial Power On
After installation, turn on your vehicle's ignition. Press the Power/Mode button on the unit. The LCD display should illuminate. If not, check all wiring connections.
5. Operating Instructions
5.1 Basic Functions
- Power On/Off: Press the Power/Mode button to turn the unit on. Long press to turn off.
- Mode Selection: Short press the Power/Mode button to cycle through available modes: Radio (FM), USB, SD, AUX, Bluetooth.
- Volume Control: Rotate the Volume Knob clockwise to increase volume, counter-clockwise to decrease.
- Mute: Press the Mute button to silence the audio. Press again to restore.
5.2 Radio Operation
- Select Band: In Radio mode, press the BAND/APS button to switch between FM1, FM2, and FM3 bands.
- Manual Tuning: Short press the Navigation Buttons (<< / >>) to fine-tune frequencies.
- Automatic Scan: Long press the Navigation Buttons (<< / >>) to automatically search for the next strong station.
- Auto Store (APS): Long press the BAND/APS button to automatically scan and store the strongest stations into the preset memory.
- Preset Stations: Short press preset buttons (1-6) to recall stored stations. To store a station, tune to the desired frequency, then long press one of the preset buttons (1-6) until you hear a beep.
5.3 Bluetooth Operation
The unit supports Bluetooth for hands-free calling and audio streaming.
- Pairing:
- Ensure the car stereo is in Bluetooth mode (select via Mode button). The display will show "BT".
- On your mobile device, enable Bluetooth and search for available devices.
- Select "Mitzu MCS-9956" (or similar name) from the list. If prompted for a PIN, enter "0000".
- Once paired, the display will show "CONNECTED" or a Bluetooth icon.
- Hands-Free Calling:
- Answer Call: Press the SEL button (or green call button on remote) to answer an incoming call.
- End Call: Press the SEL button (or red call button on remote) to end a call.
- Dialing: Dial from your phone; audio will automatically transfer to the car stereo.
- Bluetooth Audio Streaming (A2DP):
- Once paired, play music on your mobile device. Audio will stream wirelessly to the car stereo.
- Use the Navigation Buttons (<< / >>) to skip tracks.
- Use the SEL button (or Play/Pause on remote) to play or pause.
5.4 USB/SD Playback
Insert a USB flash drive into the USB port or a Micro SD card into the TF slot. The unit will automatically switch to USB/SD mode and begin playing MP3 files.
- Play/Pause: Press the 1/PAU button (or Play/Pause on remote).
- Next/Previous Track: Short press the Navigation Buttons (<< / >>).
- Fast Forward/Rewind: Long press the Navigation Buttons (<< / >>).
- Repeat: Press the 2/INT button (or RPT on remote) to cycle through repeat modes (Repeat One, Repeat All).
- Random Play: Press the 3/RDM button (or RDM on remote) to enable/disable random playback.
- Folder Navigation: Use the -DIR and +DIR buttons to navigate between folders.
5.5 AUX Input
Connect an external audio device (e.g., smartphone, MP3 player) to the 3.5mm AUX input jack on the front panel using an audio cable. Switch the unit to AUX mode using the Mode button. Audio will play through the car speakers. Control playback from the connected device.
5.6 Audio Settings (EQ, Bass, Treble)
Press the Volume Knob to cycle through audio settings:
- EQ (Equalizer): Select from pre-set equalizer modes (e.g., POP, ROCK, CLASS, JAZZ, FLAT).
- BASS/TREBLE: Adjust bass and treble levels.
- BALANCE (BAL): Adjust audio balance between left and right speakers.
- FADER (FAD): Adjust audio balance between front and rear speakers.
Rotate the Volume Knob to change the value of the selected setting.
5.7 Clock Setting
Press the CLK button (or CLK on remote) to display the time. Long press the CLK button to enter clock setting mode. Use the Navigation Buttons (<< / >>) to adjust hours and minutes, and the Volume Knob to confirm and move between hour/minute settings. Press CLK again to exit.
6. Maintenance
- Cleaning the Unit: Use a soft, dry cloth to wipe the front panel. Do not use harsh chemicals, solvents, or abrasive cleaners, as they may damage the finish or display.
- USB/SD Card Care: Ensure USB drives and SD cards are clean and free of dust before insertion. Avoid forcing them into the slots.
- Temperature: Avoid exposing the unit to extreme temperatures, direct sunlight for prolonged periods, or high humidity.
7. Troubleshooting
| Problem | Possible Cause | Solution |
|---|---|---|
| No power | Incorrect wiring; Blown fuse; Loose connection. | Check power and ground wires. Inspect the fuse (usually located on the yellow wire). Ensure all connections are secure. |
| No sound | Volume too low; Mute activated; Incorrect speaker wiring; Faulty speakers. | Increase volume. Deactivate mute. Check speaker connections and polarity. Test with known good speakers. |
| Radio reception is poor | Antenna not connected; Damaged antenna; Weak signal area. | Ensure antenna is securely connected. Check antenna for damage. Try a different location. |
| Bluetooth not connecting | Bluetooth not enabled on device; Device too far; Incorrect pairing process. | Ensure Bluetooth is on and discoverable on your phone. Keep devices within 10 meters. Re-attempt pairing. Forget device on phone and pair again. |
| USB/SD not playing | Unsupported file format; Corrupted files; Incorrectly inserted media; Max capacity exceeded. | Ensure files are MP3 format. Check media for errors. Reinsert USB/SD card. Use media within supported capacity. |
8. Specifications
- Brand: Mitzu
- Model: MCS-9956
- Max Audio Output Power: 4 x 45 W
- Bluetooth Range: 10 meters (approx.)
- Display Technology: LCD
- Audio Output Mode: Stereo
- Compatible Devices: Smartphone
- Special Features: Equalizer, Hands-free calling
- Connectivity: Auxiliary (3.5mm), Bluetooth, USB, Micro SD card
- Supported Media Types: MP3
- Power Supply: 12V DC (Negative Ground)
- Package Dimensions: 21.1 x 15.5 x 7.9 cm
- Weight: 480 g
9. Warranty and Support
For warranty information, please refer to the warranty card included with your product or contact your retailer. For technical support, product inquiries, or service, please visit the official Mitzu website or contact their customer service department. Keep your purchase receipt as proof of purchase.
Mitzu Official Store: Visit Mitzu Store on Amazon