Sutinna 9305993141312
Sutinna 100MM LED Arcade Push Button User Manual
Model: 9305993141312
Brand: Sutinna
1. Introduction
This manual provides comprehensive instructions for the installation, operation, and maintenance of your Sutinna 100MM LED Arcade Push Button. Designed for video game machines, this large round button features an integrated LED light and a durable acrylic crystal shell, ensuring reliable performance and a classic arcade experience. Please read this manual thoroughly before use to ensure proper functionality and longevity of the product.

Image 1.1: The Sutinna 100MM LED Arcade Push Button, showcasing its 3D cassette button design, high-quality acrylic crystal shell, and strong wear resistance.
2. Safety Information
Please observe the following safety precautions to prevent damage to the product or injury to yourself:
- Ensure all power is disconnected from the arcade machine or circuit before installing or servicing the button.
- Verify that the operating voltage (DC12V) matches your system's requirements to prevent electrical damage.
- Handle components with care to avoid bending pins or damaging the microswitch.
- Keep the button and its components away from water or excessive moisture.
- Do not attempt to modify the button or its internal components.
3. Package Contents
The following items are included in your package:
- 1 x 100MM LED Push Button (Red)
- 1 x Bracket
- 1 x LED Light (integrated or separate, depending on model variant)
- 1 x Micro Switch

Image 3.1: All components included with the Sutinna 100MM LED Arcade Push Button: the main button, the micro switch, the LED light, and the bracket.
4. Specifications
| Feature | Description |
|---|---|
| Product Dimensions | 3.74 x 3.74 x 2.17 inches (9.5 x 9.5 x 5.5 cm) |
| Weight | 4.97 ounces (approx. 144.6g) |
| Material | ABS (Shell), Copper, Brass (Contacts) |
| Color | Red (button), White (base) |
| Operating Voltage | DC12V |
| Operation Mode | Push Button |
| Actuator Type | Push Button Switch |
| Contact Type | Normally Open |
| Connector Type | Screw Terminals |
| Circuit Type | 1-way |
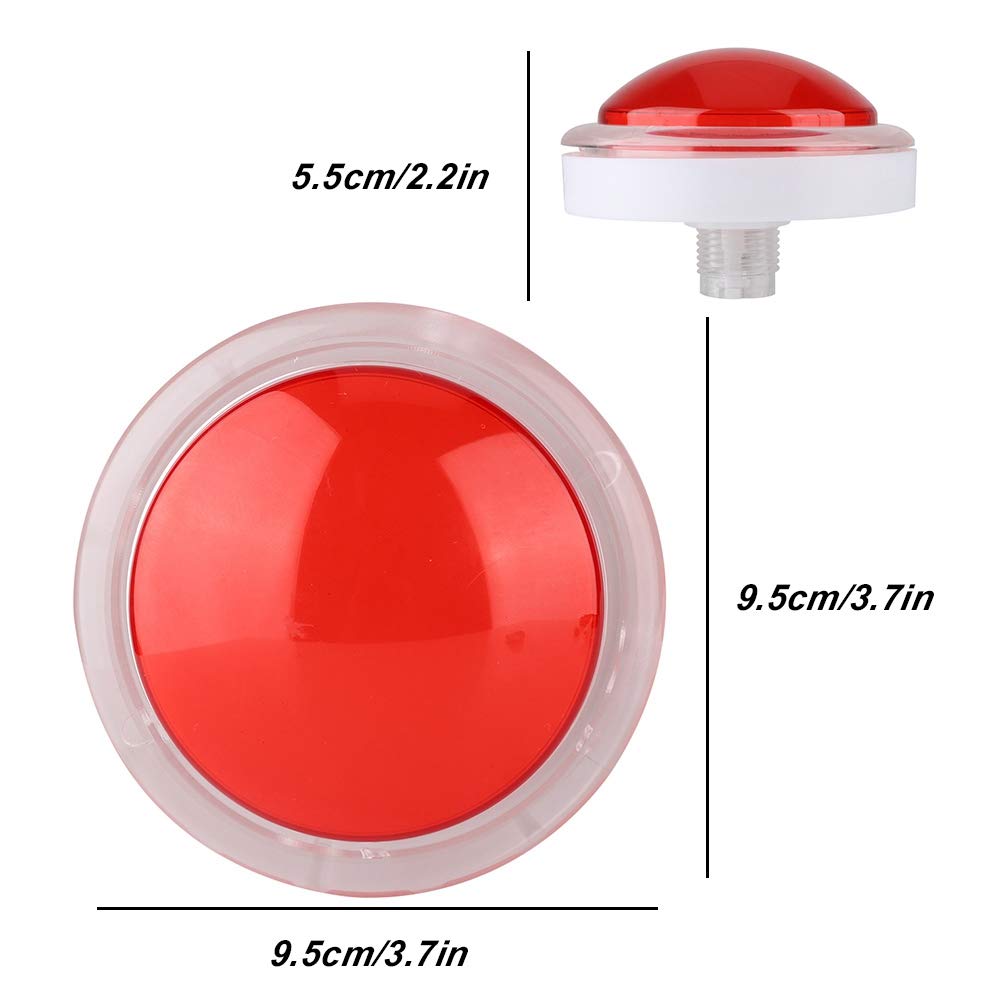
Image 4.1: Diagram illustrating the dimensions of the Sutinna 100MM LED Arcade Push Button, showing a diameter of 9.5cm (3.7 inches) and a height of 5.5cm (2.2 inches).
5. Setup and Installation
Follow these steps to properly install your Sutinna 100MM LED Arcade Push Button:
- Prepare the Mounting Hole: Ensure your arcade panel has a circular opening of approximately 95mm (3.7 inches) in diameter to accommodate the button.
- Insert the Button: Place the main button assembly through the mounting hole from the front of the panel.
- Secure with Bracket: From the back of the panel, slide the white plastic bracket onto the threaded base of the button. Rotate the bracket clockwise to tighten and secure the button firmly to the panel.
- Connect the Micro Switch: The micro switch has three terminals: COM (Common), NO (Normally Open), and NC (Normally Closed). For typical arcade button operation, connect your signal wire to the NO terminal and your ground wire to the COM terminal. The micro switch slides into the designated slot on the button's base.
- Connect the LED Light: The LED light typically has two wires (positive and negative). Connect these wires to a DC12V power source. Ensure correct polarity to illuminate the LED. The LED light assembly usually clips into the button's base.
- Test Connections: Before fully reassembling your arcade machine, perform a quick test to ensure the button registers input and the LED illuminates correctly.

Image 5.1: A detailed view of the white plastic bracket and the screw terminals for connecting the button's wiring.

Image 5.2: A close-up of the micro switch, showing its compact design and the COM, NO, and NC terminals for electrical connections.
6. Operating Instructions
Once properly installed and connected, the Sutinna 100MM LED Arcade Push Button operates as a standard momentary switch. When the button is pressed, the internal micro switch activates, sending a signal to your arcade system. Releasing the button deactivates the switch. The integrated LED light will illuminate when powered, providing visual feedback and enhancing the arcade aesthetic.

Image 6.1: Illustrates the operation of the button, where each touch can produce a sound effect, replicating the classic arcade room experience.
7. Maintenance
The Sutinna 100MM LED Arcade Push Button is designed for durability and requires minimal maintenance:
- Cleaning: Use a soft, damp cloth to wipe the surface of the button. Avoid abrasive cleaners or solvents that could damage the acrylic shell.
- Connection Check: Periodically inspect the electrical connections to the micro switch and LED light to ensure they remain secure. Loose connections can lead to intermittent operation.
- Component Replacement: In the event of a component failure (e.g., LED or micro switch), these parts are designed to be replaceable. Refer to the setup section for guidance on accessing and replacing components.
8. Troubleshooting
If you encounter issues with your arcade push button, refer to the following troubleshooting guide:
| Problem | Possible Cause | Solution |
|---|---|---|
| Button does not register input | Loose micro switch connection Faulty micro switch Incorrect wiring (COM/NO) | Check and secure micro switch connections. Test micro switch with a multimeter; replace if faulty. Verify signal wire is connected to NO and ground to COM. |
| LED light does not illuminate | No power to LED Incorrect LED polarity Faulty LED light | Ensure 12V DC power is supplied to the LED. Reverse LED wires to check polarity. Replace the LED light. |
| Button feels sticky or unresponsive | Debris under button cap Mechanical wear | Carefully remove button cap and clean any debris. If wear is significant, consider replacing the button assembly. |
9. Warranty and Support
Sutinna products are manufactured with quality and reliability in mind. For specific warranty information, please refer to the documentation provided at the time of purchase or contact your retailer. If you require technical assistance or have questions not covered in this manual, please reach out to Sutinna customer support through the contact information provided on the product packaging or the official Sutinna website.
Please have your product model number (9305993141312) and purchase details ready when contacting support.
Ask a question about this manual
Ask about setup, troubleshooting, compatibility, parts, safety, or missing instructions. Manuals+ will review the question and use this page’s manual context to help answer it.