PARK SIDE PHWW
Parkside PHWW Domestic Water Pump User Manual
Model: PHWW | Brand: PARK SIDE
1. Introduction
This manual provides essential information for the safe and efficient operation, installation, and maintenance of your Parkside PHWW Domestic Water Pump. This pump is designed for automatic water supply from wells and cisterns, and is also ideal for garden irrigation. Please read this manual thoroughly before first use and keep it for future reference.
The Parkside PHWW pump features a 1000W electric motor, a high delivery capacity of 3500 liters per hour, and a 19-liter pressure tank, ensuring constant pressure for a readily available water supply.
2. Safety Instructions
Always observe basic safety precautions when using electrical appliances to reduce the risk of fire, electric shock, and personal injury.
- Electrical Safety: Ensure the power supply matches the pump's specifications. Do not operate the pump with a damaged power cord or plug. Always disconnect the power before performing any maintenance or cleaning.
- Water Safety: Do not use the pump for drinking water unless specifically designed and certified for it. Ensure all water connections are secure to prevent leaks.
- Placement: Install the pump on a stable, level surface. Ensure adequate ventilation around the pump. Protect the pump from frost and direct sunlight.
- Personal Safety: Wear appropriate personal protective equipment (PPE) such as safety glasses and gloves when handling the pump or performing maintenance. Keep children and unauthorized persons away from the operating area.
- Intended Use: Use the pump only for its intended purpose as described in this manual. Do not pump flammable, corrosive, or explosive liquids.
3. Product Overview and Components
Familiarize yourself with the main components of your Parkside PHWW Domestic Water Pump.

Figure 3.1: Overall view of the Parkside PHWW Domestic Water Pump, showing the integrated pressure tank, motor, and connection points. This image provides a comprehensive look at the pump's design and main components.

Figure 3.2: Side view of the Parkside PHWW pump, highlighting its compact design and the various connection points for water inlet and outlet. This perspective helps in understanding the pump's physical dimensions and how it integrates into a system.
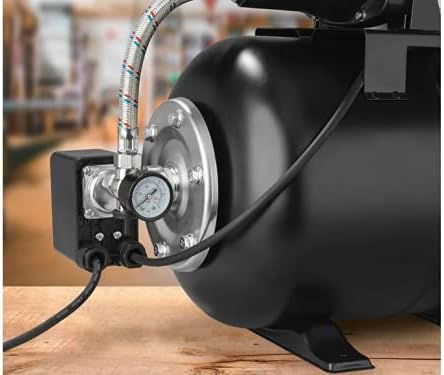
Figure 3.3: Close-up view of the pressure gauge and control unit on the Parkside PHWW pump. This image clearly shows the pressure display with bar and PSI scales, and the electrical connections, which are crucial for monitoring and operating the pump.
Key components include:
- Electric Motor (1000W)
- Pressure Tank (19 L capacity)
- Pressure Gauge (with bar and PSI scale)
- On/Off Switch (splash-proof)
- Suction Connection (G1 internal thread, 30.3 mm / 1")
- Discharge Connection (G1 internal thread, 30.3 mm / 1")
- Carrying Handle
- Mounting Feet with holes
4. Technical Specifications
| Feature | Specification |
|---|---|
| Power Consumption | 1000 W |
| Max. Flow Rate | 3500 l/h |
| Max. Delivery Head | 44 m (30 m pre-set) |
| Max. Suction Height | 7 m |
| Max. Feed Temperature | 35 °C |
| Max. Pressure | 4.4 bar (3 bar pre-set) |
| Start-up Pressure | 1.5 bar |
| Shut-off Pressure | 3 bar |
| Water Connection | Internal thread (G1) 30.3 mm (1") |
| Voltage | 230 Volts (AC) |
| Power Source | Electric Cable |
5. Setup and Installation
Proper installation is crucial for the pump's performance and longevity.
- Placement: Choose a dry, well-ventilated, and frost-free location. The pump should be placed as close as possible to the water source to minimize suction height. Secure the pump using the mounting feet if desired.
- Suction Line Connection: Connect a suction hose (not included) to the pump's suction inlet. Ensure the suction hose is airtight and has a foot valve with a filter at its end to prevent debris from entering the pump and to maintain prime. The maximum suction height is 7 meters.
- Discharge Line Connection: Connect the discharge hose or pipe to the pump's outlet. Ensure all connections are tight to prevent leaks.
- Priming the Pump: Before first use, the pump housing must be filled with water through the designated filling opening until it overflows. This is essential for the pump to create suction.
- Electrical Connection: Plug the pump into a properly grounded electrical outlet. Ensure the voltage matches the pump's requirements (230V AC). The on/off switch is splash-proof.

Figure 5.1: The Parkside PHWW pump installed in a typical utility room setting, demonstrating how it might be connected to a water source and a discharge hose for practical use. This image illustrates a common installation scenario.
6. Operating Instructions
Once installed and primed, operating the pump is straightforward.
- Starting the Pump: Ensure the pump is primed (filled with water). Turn the splash-proof On/Off switch to the 'On' position. The pump will start and build pressure.
- Automatic Operation: The pump is designed for automatic operation. It will switch on when the pressure drops below the start-up pressure (1.5 bar) and switch off when the shut-off pressure (3 bar) is reached.
- Monitoring: Regularly check the pressure gauge to ensure the pump is operating within its normal pressure range.
- Stopping the Pump: To manually stop the pump, turn the On/Off switch to the 'Off' position. If the pump is not going to be used for an extended period, disconnect it from the power supply.
7. Maintenance
Regular maintenance ensures the longevity and optimal performance of your pump.
- Cleaning: Periodically clean the exterior of the pump with a damp cloth. Do not use harsh detergents or solvents.
- Filter Check: Regularly check and clean the filter on the foot valve of the suction line to prevent blockages and ensure efficient water intake.
- Frost Protection: During winter or when temperatures drop below freezing, drain all water from the pump and hoses to prevent damage from freezing. Store the pump in a frost-free environment.
- Pressure Tank Maintenance: The pressure tank is designed to be low-maintenance. However, if you notice inconsistent pressure or frequent cycling, consult a qualified technician.
- General Inspection: Periodically inspect all hoses, connections, and the power cord for any signs of wear, damage, or leaks. Replace damaged parts immediately.
8. Troubleshooting
Before contacting customer support, try these common troubleshooting steps.
| Problem | Possible Cause | Solution |
|---|---|---|
| Pump does not start | No power supply On/Off switch is off Motor overload protection activated | Check power connection and fuse Turn switch to 'On' Allow motor to cool down, check for blockages |
| Pump runs but no water is delivered | Pump not primed Air in suction line Suction height too high Foot valve clogged or stuck | Fill pump housing with water Check suction line for leaks, tighten connections Reduce suction height Clean or replace foot valve |
| Insufficient pressure or flow | Partial blockage in suction/discharge line Filter clogged Air in system | Check and clear lines Clean foot valve filter Re-prime pump, check connections |
| Pump cycles on and off frequently | Leak in system Pressure tank air pressure too low | Check all connections for leaks Consult a qualified technician to check/adjust tank pressure |
9. Disposal
Do not dispose of the appliance with household waste. This product is subject to the European Directive 2012/19/EU on Waste Electrical and Electronic Equipment (WEEE). Dispose of the product through an approved disposal company or at your municipal waste disposal facility. Observe all applicable local regulations.
10. Warranty and Customer Support
This Parkside product comes with a standard manufacturer's warranty. Please refer to the warranty card included with your purchase for specific terms and conditions, including the warranty period and coverage details. Keep your proof of purchase for warranty claims.
For technical support, spare parts, or warranty inquiries, please contact the manufacturer's customer service. Contact information can typically be found on the product packaging or the manufacturer's official website.
Related Documents - PHWW
 |
PARKSIDE Plant Irrigation Pot with Lid (Olla) - User Manual & Guide Official user manual and guide for the PARKSIDE Plant Irrigation Pot with Lid (Olla). Learn how to use, refill, and dispose of this innovative watering solution for your plants. Includes instructions, notes, and service information. |
 |
PARKSIDE Plant Irrigation Cones with Hose - User Manual Instructions for use, setup, and disposal of the PARKSIDE Plant Irrigation Cones with Hose. Learn how to water your plants automatically. |
 |
PARKSIDE Programmable Watering Timer PBCG B2 User Manual Get detailed instructions and safety information for the PARKSIDE Programmable Watering Timer PBCG B2 (Model HG09709, IAN 471864_2407). Learn how to set up, operate, and maintain your garden watering system. |
 |
Parkside PBCM B1 Programmable Watering Timer Manual User manual for the Parkside PBCM B1 programmable watering timer, covering setup, operation, safety instructions, and troubleshooting. |
 |
PARKSIDE Wandschlauchaufroller: Bedienungsanleitung & Sicherheit Umfassende Anleitung für den PARKSIDE Wandschlauchaufroller (IAN 479248_2410). Enthält Montage-, Bedienungs-, Sicherheits- und Wartungshinweise für Ihren Gartenschlauchaufroller. |
 |
Parkside PBCM B1 Programmable Watering Timer Manual Comprehensive guide to the Parkside PBCM B1 programmable watering timer, covering setup, operation, safety, and troubleshooting. |