1. Introduction
This manual provides detailed instructions for the setup, operation, and maintenance of your Waveshare 7.9-inch Capacitive Touch Screen LCD Monitor. This display features a 400x1280 hardware resolution, IPS panel, and capacitive touch control, making it suitable for various applications including Raspberry Pi, Jetson Nano, and PC systems.

Image 1: Front view of the Waveshare 7.9-inch Capacitive Touch Screen LCD Monitor.
2. Features
- 7.9-inch IPS LCD screen with a hardware resolution of 400x1280 pixels.
- Capacitive touch control for intuitive interaction.
- Supports Raspbian, Ubuntu, Kali, and Retropie with Raspberry Pi (driver-free).
- Functions as a computer monitor with Windows 10/8.1/8/7, offering five-point touch (driver-free).
- Includes 3.5mm audio jack for HDMI audio output.
- Toughened glass cover for enhanced durability.
3. Package Contents
Verify that all items listed below are included in your package:
- 7.9inch HDMI LCD x1
- HDMI cable x1
- USB A to MicroB cable x1
- HDMI Adapter (B) x1
- USB Adapter (B) x1
- HDMI Adapter (C) x1
- USB Adapter (C) x1
- Screws pack x1
4. Specifications
| Specification | Value |
|---|---|
| Brand | Waveshare |
| Screen Size | 7.9 Inches |
| Screen Surface Description | Glossy |
| Special Feature | Touchscreen |
| Connectivity Technology | HDMI, USB |
| Screen Finish | Glossy |
| Model Number | 7.9inch HDMI LCD |
| UPC | 761722109180 |
| Manufacturer | TOP1 |
| Total Number of HDMI Ports | 1 |
| Total USB Ports | 1 |
| Additional Features | Touchscreen |
| Mounting Type | Wall Mount |
| Item Weight | 0.38 Kilograms |
| Native Resolution | 1280 x 800 pixels (Note: Default is 400x1280 portrait) |
| Hardware Connectivity | HDMI, USB |
5. System Compatibility
The Waveshare 7.9-inch LCD monitor offers broad compatibility:
- Raspberry Pi: Supports Raspbian (5-point touch, driver-free), Ubuntu/Kali/WIN10 IoT (single-point touch, driver-free), and Retropie (driver-free). Compatible with all versions of Raspberry Pi.
- Jetson Nano: Supports Ubuntu (single-point touch, driver-free).
- PC: Supports Windows 10/8.1/8/7 (5-point touch, driver-free).
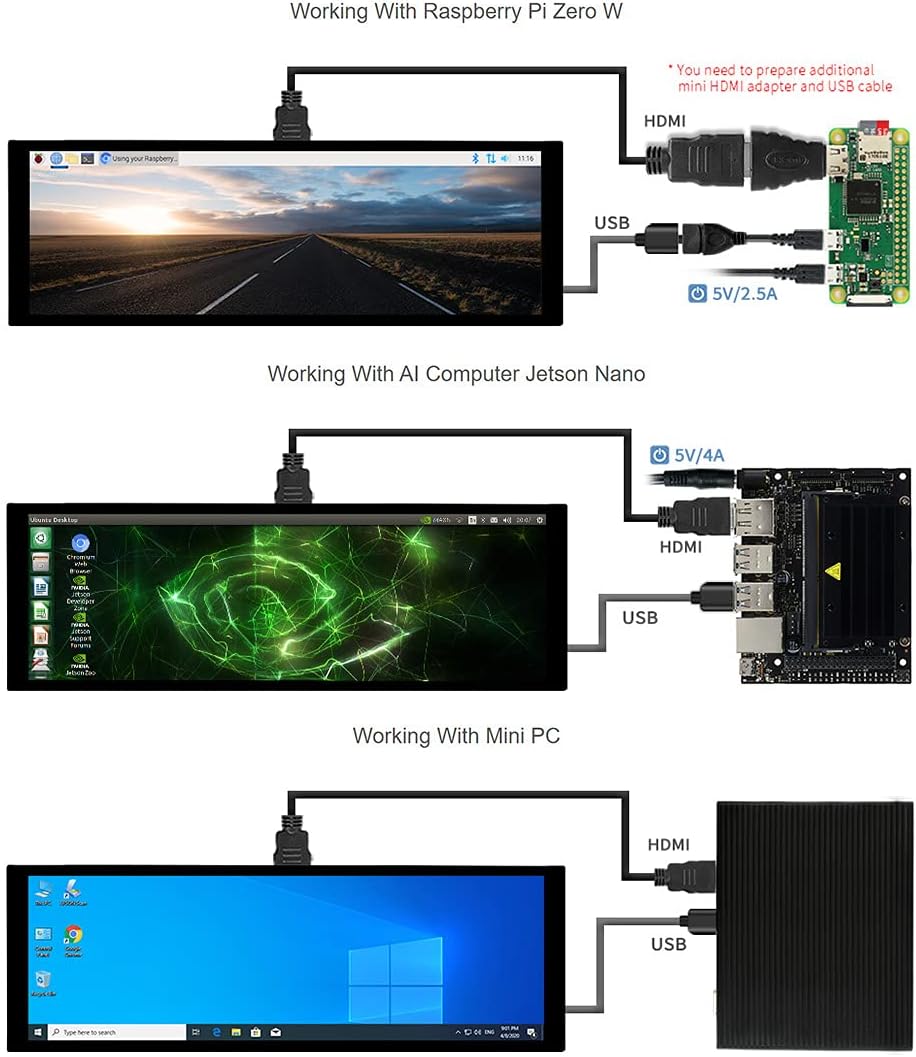
Image 2: Connection examples for Raspberry Pi Zero W, Jetson Nano, and Mini PC.
6. Setup Instructions
Follow these steps to set up your Waveshare 7.9-inch LCD monitor:
- Physical Connection:
- Connect the display to your host device (Raspberry Pi, Jetson Nano, or PC) using the provided HDMI cable for video output.
- Connect the display to your host device using the provided USB A to MicroB cable for touch functionality and power. Ensure the USB connection provides sufficient power.
- For Raspberry Pi, use the appropriate HDMI and USB adapters (B or C) as needed for your specific Pi model.
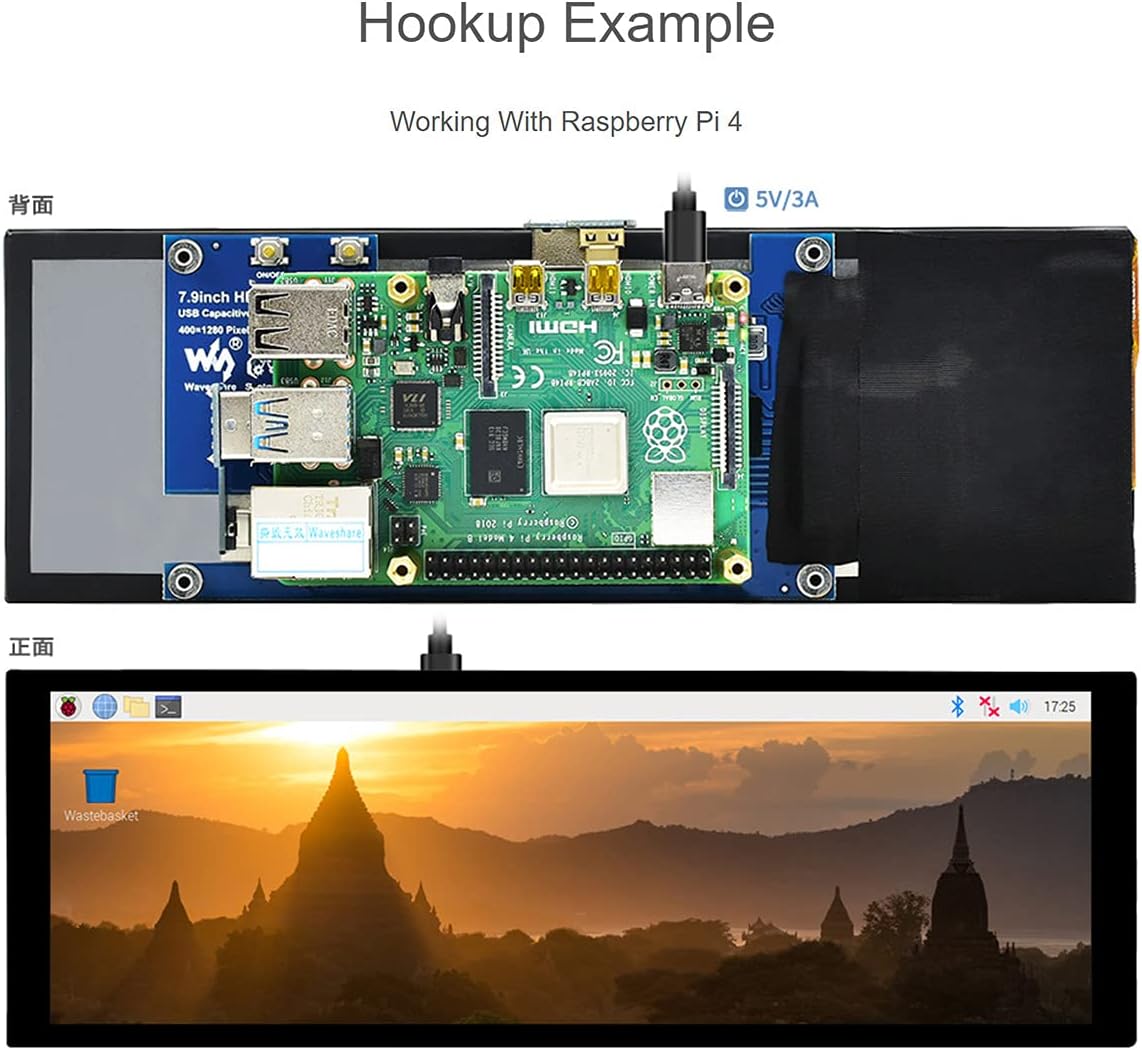
Image 3: Example of connecting the display to a Raspberry Pi 4.
- Power On: Once connected, power on your host device. The display should automatically turn on and show the output.
- Driver Installation (if necessary): For most supported systems (Raspberry Pi, Jetson Nano, Windows), the display and touch functions are driver-free. If you encounter issues, refer to the Waveshare official documentation for specific driver or configuration details for your operating system.
The back of the display features various ports and controls:

Image 4: Rear view of the display highlighting the HDMI port, USB touch/power port, audio jack, and control buttons.

Image 5: Labeled diagram of the display's ports and buttons, including On/Off & Brightness Adjustment, Rotate Touch Orientation, Audio Jack, HDMI Port, Power Port, and Touch Port.
7. Operation
The display offers capacitive touch control and adjustable orientation.
- Touch Control: The display supports capacitive touch. For Windows, it supports five-point touch. For Raspberry Pi and Jetson Nano, it typically supports single-point touch, with Raspbian supporting five-point touch.
- Audio Output: The display supports HDMI audio output via its 3.5mm audio jack.

Image 6: Visual representation of the 170-degree IPS viewing angle and capacitive touch capabilities.
Video 1: Demonstration of the 7.9-inch Capacitive Touch Screen LCD in use with Raspberry Pi and Jetson Nano, showcasing touch functionality and display features.
8. Display Orientation Configuration
The display orientation is portrait by default (400x1280 HxV). To change to landscape mode, you will need to modify the software configuration on your host device. Refer to the operating system's documentation or Waveshare's official wiki for specific instructions on how to adjust display orientation for your system (e.g., editing config.txt for Raspberry Pi).
The touch orientation can be adjusted using a physical button on the display's control board, as indicated in Image 5.
9. Troubleshooting
- No Display: Ensure both HDMI and USB cables are securely connected. Verify the host device is powered on and outputting video. Try a different HDMI port or cable if available.
- No Touch Functionality: Confirm the USB cable is connected to both the display and the host device. Ensure the host device's operating system supports touch input and that no conflicting drivers are installed.
- Incorrect Display Orientation: Adjust the software configuration on your host device for display orientation. Use the physical button on the display to rotate touch orientation if needed.
- Flickering Screen: Check power supply to both the display and the host device. Ensure cables are not damaged.
10. Warranty and Support
For warranty information, technical support, or further assistance, please refer to the official Waveshare website or contact their customer service directly. Keep your purchase receipt for warranty claims.