1. Important Safety Information
Read all safety warnings, instructions, illustrations, and specifications provided with this power tool. Failure to follow all instructions listed below may result in electric shock, fire, and/or serious injury. Save all warnings and instructions for future reference.
- Always wear eye protection and hearing protection when operating power tools.
- Keep your work area clean and well-lit. Cluttered or dark areas invite accidents.
- Do not operate power tools in explosive atmospheres, such as in the presence of flammable liquids, gases, or dust.
- Keep children and bystanders away while operating a power tool. Distractions can cause you to lose control.
- Ensure the battery is fully charged before use and removed when not in use or during maintenance.
- Use the correct tool for your application. Do not force the tool.
2. Package Contents
Verify that all items are present upon unpacking. If any parts are missing or damaged, contact VEVOR customer service.
- 1 x VEVOR 20V Cordless Drill
- 1 x VEVOR 20V Cordless Impact Driver
- 2 x 20V / 2.0Ah Lithium-Ion Batteries
- 1 x Fast Charger
- 1 x Set of Drill Bits
- 1 x Set of Screwdriver Bits

Figure 2.1: Included 20V/2.0Ah batteries and bit sets.
3. Product Overview
This combo kit includes a cordless drill and a cordless impact driver, designed for various drilling and fastening tasks. Both tools feature ergonomic designs and powerful performance.
3.1 Cordless Drill Features
- Torque Settings: 21+1 position clutch for precise torque control, up to 35 Nm (310 in-lbs).
- Speed Settings: Two-speed gearbox (0-400 RPM and 0-1500 RPM) for versatile applications.
- Chuck: 2/5" (10mm) keyless chuck for quick and easy bit changes.
- LED Light: Integrated LED light illuminates the work area.
- Grip: Ergonomic rubberized grip for comfort and reduced vibration.
3.2 Cordless Impact Driver Features
- Torque: High performance motor delivering up to 140 Nm (1239 in-lbs) of torque.
- Speed: Variable speed trigger with a maximum speed of 2900 RPM.
- Chuck: 1/4" hex keyless chuck for quick bit insertion.
- LED Light: Integrated LED light for improved visibility.
- Grip: Ergonomic rubberized grip for comfortable handling.
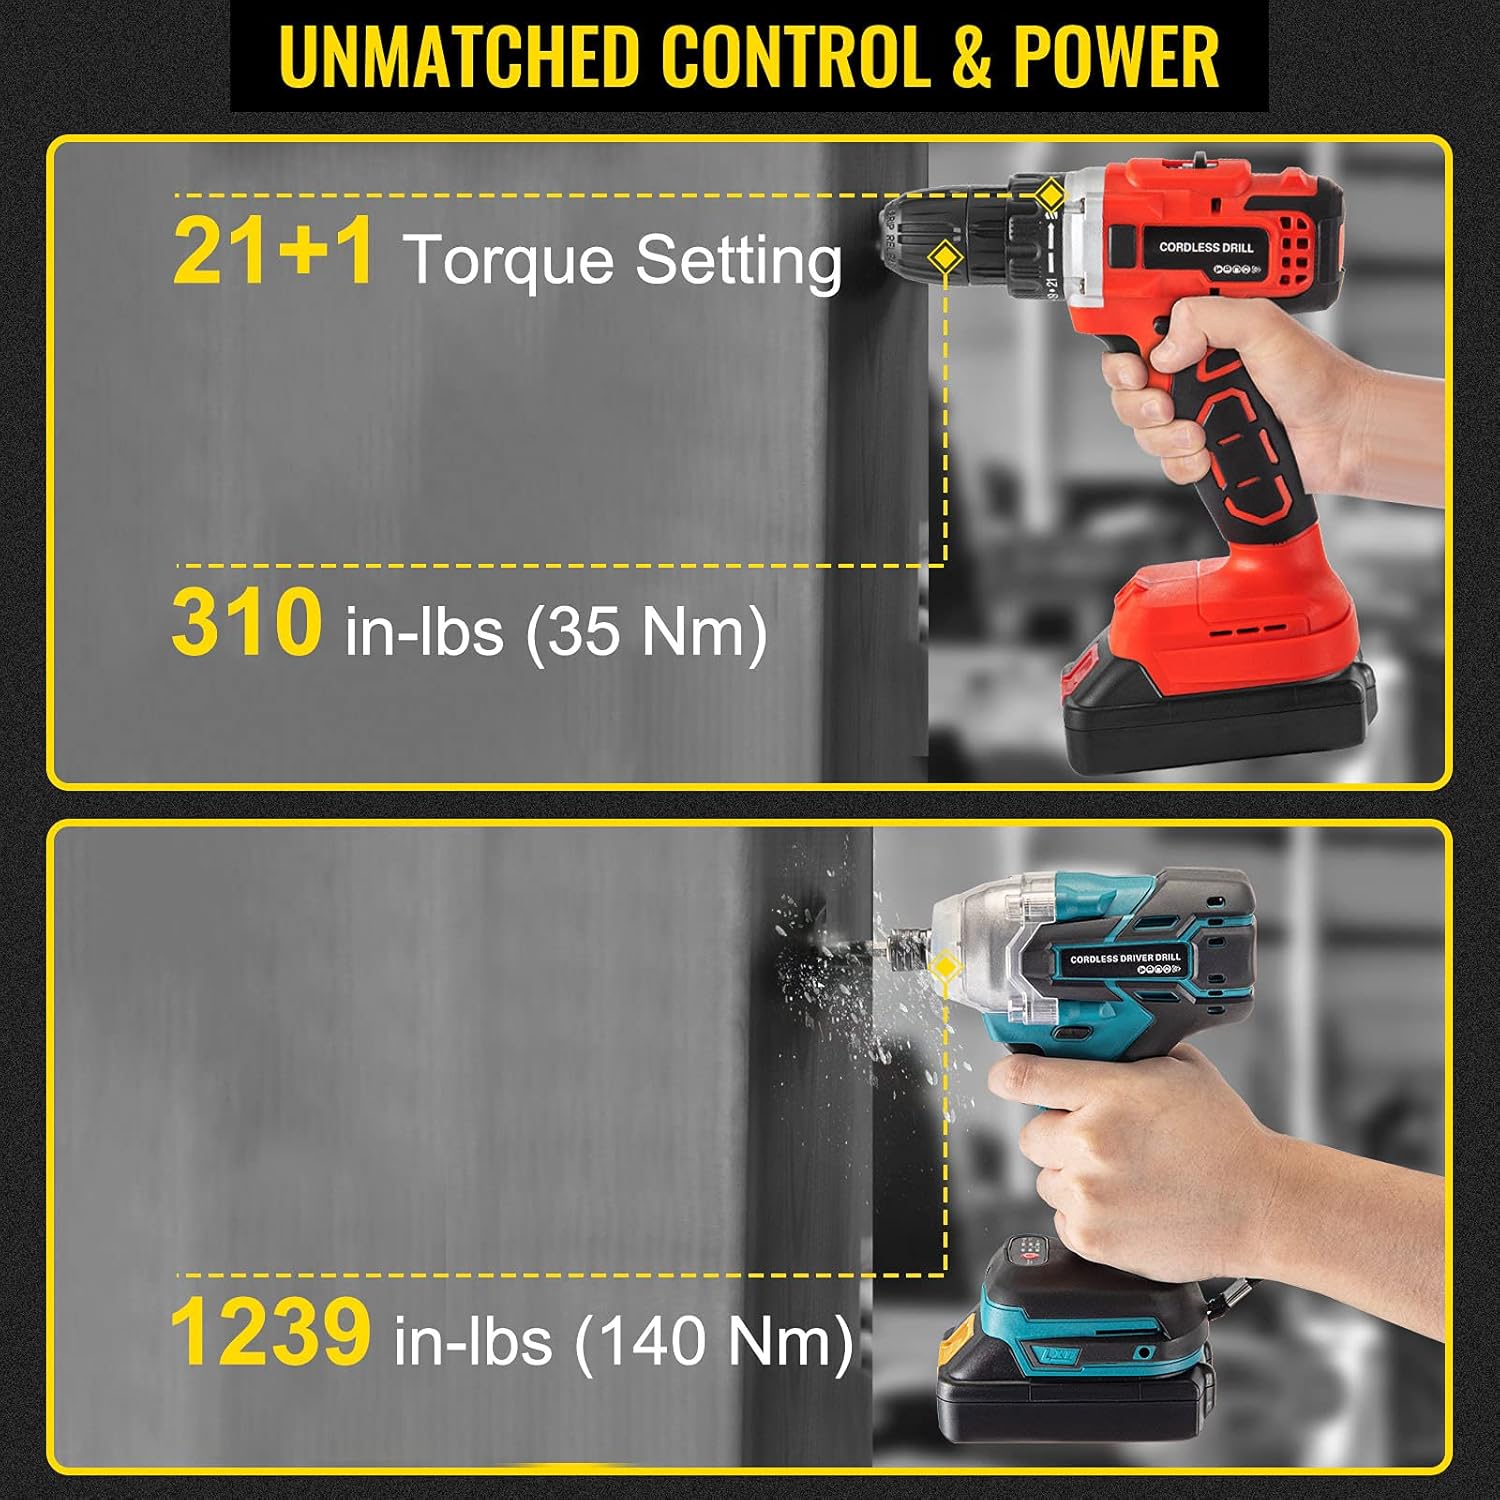
Figure 3.1: Torque capabilities of the drill and impact driver.

Figure 3.2: Speed ranges for both tools.
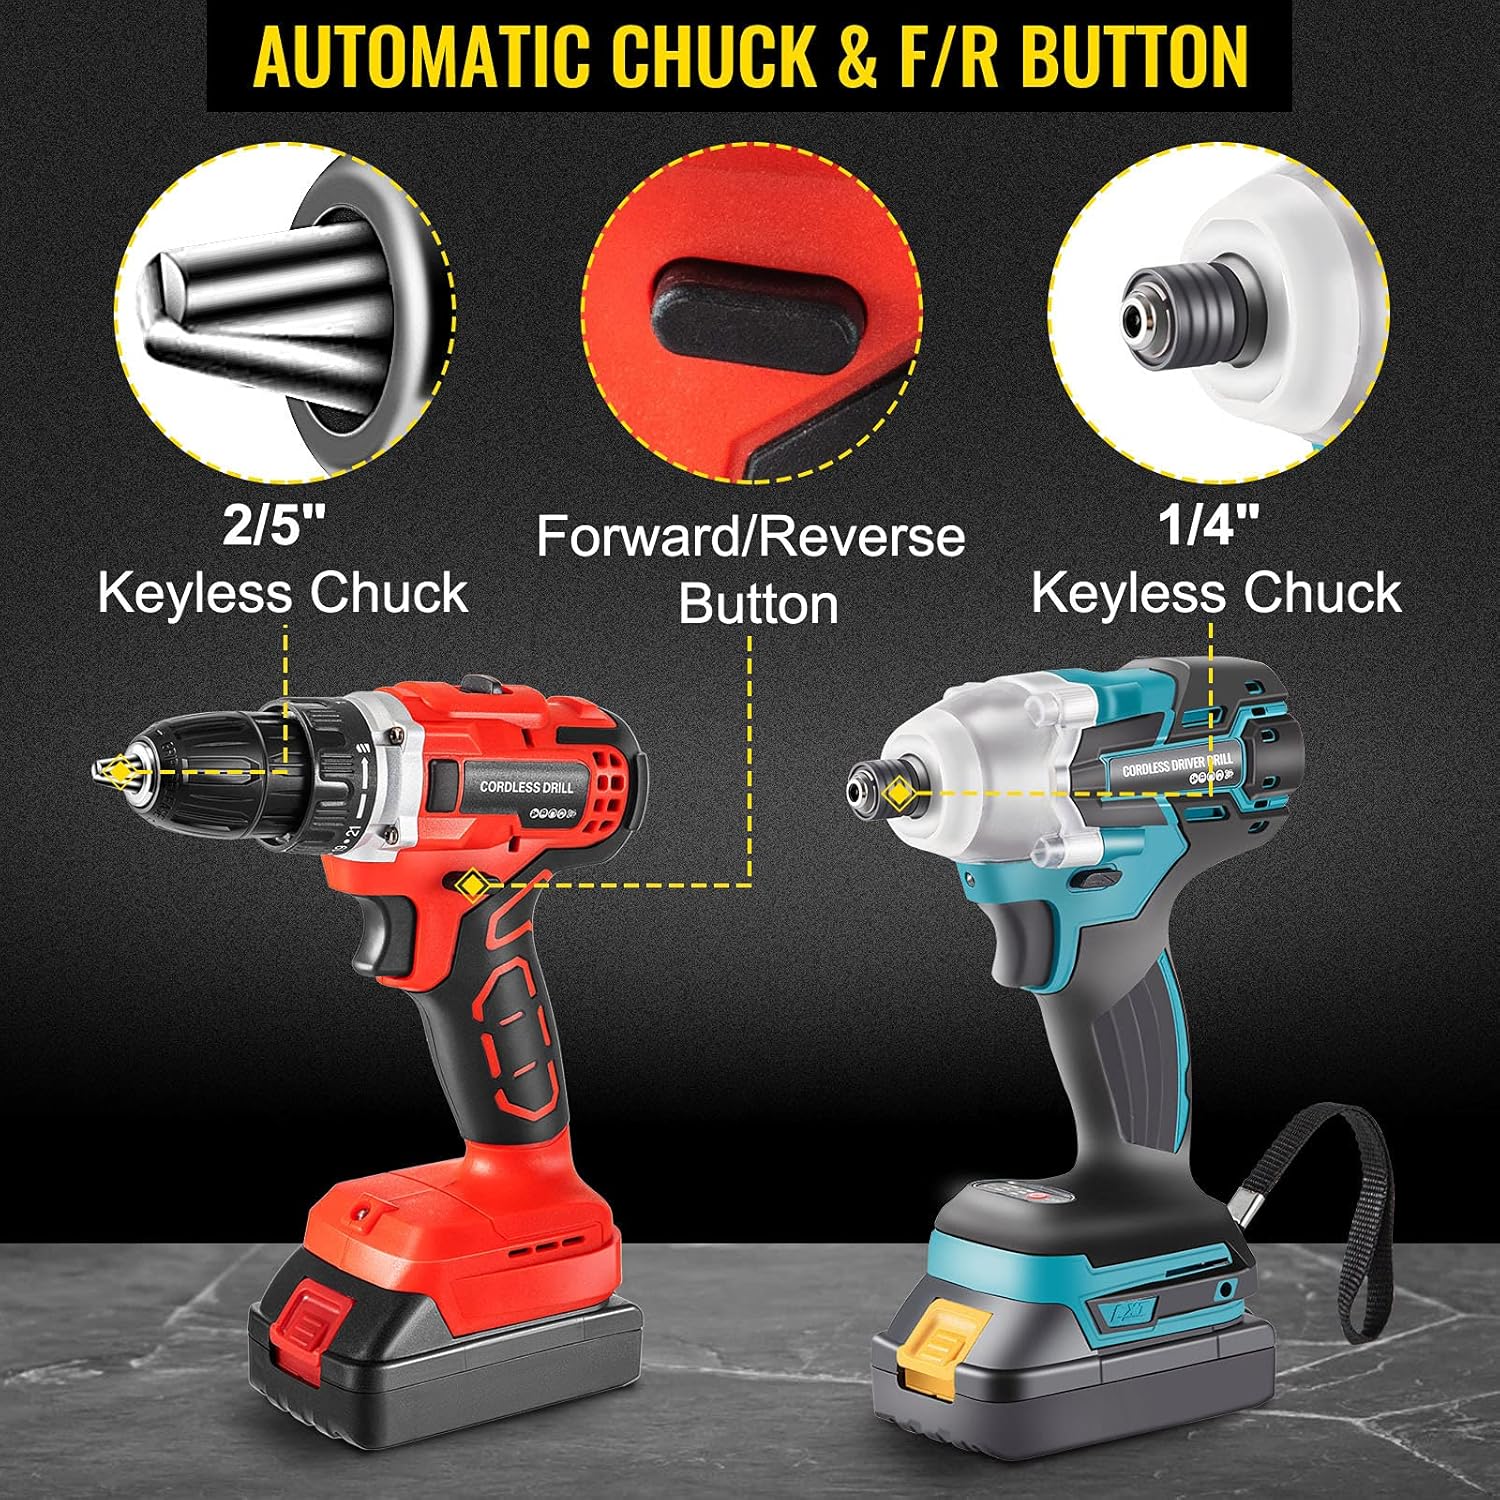
Figure 3.3: Chuck types and forward/reverse button.

Figure 3.4: LED light and rubber grip feature.
4. Setup
4.1 Charging the Battery
- Connect the charger to a standard power outlet.
- Slide the battery pack onto the charger until it clicks into place.
- The charger indicator light will show the charging status. A full charge typically takes approximately 1 hour.
- Once fully charged, remove the battery from the charger.
4.2 Installing/Removing the Battery
- To Install: Align the battery pack with the base of the tool handle and slide it in until it locks securely.
- To Remove: Press the battery release button (usually located on the front or sides of the battery) and slide the battery pack out.
4.3 Installing Drill/Screwdriver Bits
- For Cordless Drill (2/5" Keyless Chuck): Rotate the chuck counter-clockwise to open the jaws. Insert the desired drill bit or screwdriver bit into the chuck. Rotate the chuck clockwise to tighten the jaws firmly around the bit. Ensure the bit is centered and secure.
- For Cordless Impact Driver (1/4" Hex Chuck): Pull the chuck collar forward. Insert the 1/4" hex shank bit into the chuck. Release the collar to lock the bit in place. Pull on the bit to ensure it is securely fastened.
5. Operating Instructions
5.1 Powering On/Off
Press the trigger switch to turn the tool on. Release the trigger switch to turn the tool off. The integrated LED light will activate when the trigger is pressed.
5.2 Adjusting Speed (Cordless Drill)
The cordless drill has a two-speed selector switch located on top of the tool. Position '1' provides lower speed (0-400 RPM) for higher torque applications like driving screws or drilling larger holes. Position '2' provides higher speed (0-1500 RPM) for faster drilling in softer materials.
5.3 Adjusting Torque (Cordless Drill)
The torque adjustment collar on the cordless drill allows you to select from 21 torque settings plus a drill mode. Rotate the collar to the desired setting. Lower settings are for driving small screws or working with soft materials, while higher settings are for larger screws or harder materials. The drill mode (indicated by a drill bit icon) bypasses the clutch for maximum drilling power.
5.4 Forward/Reverse Rotation
The forward/reverse selector switch is located above the trigger. Push the switch to the left for forward rotation (tightening screws, drilling). Push it to the right for reverse rotation (loosening screws, removing bits). Center the switch to lock the trigger and prevent accidental starting.
5.5 Applications
- Drilling: Use the cordless drill for drilling holes in wood, metal, plastic, and masonry (with appropriate drill bits and hammer function if available).
- Driving: Use either tool for driving screws. The impact driver is ideal for long screws or tough materials due to its high torque and impact mechanism.

Figure 5.1: Versatile applications of the VEVOR combo kit.
6. Maintenance
6.1 Cleaning
- Always disconnect the battery pack before performing any cleaning or maintenance.
- Use a soft, damp cloth to clean the exterior of the tools. Do not use harsh chemicals or abrasive cleaners.
- Keep the ventilation openings clear of dust and debris to prevent overheating. Use compressed air if necessary.
6.2 Battery Care
- Store batteries in a cool, dry place away from direct sunlight and extreme temperatures.
- Do not store batteries in a discharged state for extended periods. Recharge them periodically if not in use.
- Do not expose batteries to water or moisture.
6.3 Storage
When not in use, store the tools and batteries in a secure, dry place, out of reach of children. Remove batteries from the tools before storage.
7. Troubleshooting
| Problem | Possible Cause | Solution |
|---|---|---|
| Tool does not start | Battery not charged or improperly installed; Forward/Reverse switch in center (locked) position. | Charge battery and ensure it is securely installed; Move F/R switch to forward or reverse position. |
| Battery not charging | Charger not plugged in; Faulty battery or charger. | Check power connection; Contact VEVOR support for replacement if faulty. |
| Poor drilling/driving performance | Dull or incorrect bit; Incorrect speed/torque setting; Low battery charge. | Replace bit or use appropriate type; Adjust speed/torque; Recharge battery. |
| Tool overheats | Overload; Blocked ventilation slots. | Reduce load; Clear ventilation slots; Allow tool to cool down. |
8. Specifications
| Feature | Specification |
|---|---|
| Manufacturer | VEVOR |
| Model Number | Cordless Drill Combo Kit, 20V |
| Product Weight | 2.72 kg (6 lbs) |
| Product Dimensions | 48.51 x 30.99 x 9.91 cm (19.1 x 12.2 x 3.9 inches) |
| Battery Type | Lithium-Ion |
| Battery Voltage | 20 Volts |
| Battery Capacity | 2.0 Amp-hour |
| Drill Max Torque | 35 Nm (310 in-lbs) |
| Drill Speed (No Load) | 0-400 RPM / 0-1500 RPM |
| Impact Driver Max Torque | 140 Nm (1239 in-lbs) |
| Impact Driver Speed (No Load) | 0-2900 RPM |
| Drill Chuck Size | 2/5" (10mm) Keyless |
| Impact Driver Chuck Size | 1/4" Hex Keyless |
| Special Features | Compact, Lightweight, LED Light, Rubber Grip |

Figure 8.1: Dimensions of the Cordless Drill and Impact Driver.
9. Warranty and Support
VEVOR products are designed for durability and performance. For warranty information, technical support, or service inquiries, please refer to the warranty card included with your product or visit the official VEVOR website. Please have your model number and purchase date available when contacting support.