Product Overview
This manual provides essential information for the installation and maintenance of The ROP Shop Water Pump Impeller Kit. This kit is designed for specific Evinrude and Johnson outboard motors, ensuring proper water circulation for engine cooling.

Image: All components of the water pump impeller kit, including the impeller, housing, gaskets, and hardware.
Compatibility
This water pump impeller kit is compatible with 1980-1981 Evinrude and Johnson 50, 55, 60 HP Outboard engines. It also fits various Johnson, Evinrude, OMC, and BRP 35 - 60 HP 2-stroke outboards manufactured prior to 1995.
To ensure correct fitment, it is crucial to verify your engine's OEM part number, model, specification, type/code, and serial number. If you are uncertain about compatibility, it is recommended to consult a qualified technician or contact the manufacturer with your engine's detailed information.
Components Included
The ROP Shop Water Pump Impeller Kit includes the following components:
- (1) Impeller
- (1) Housing
- (1) Wear Plate
- (1) Wear Plate Gasket
- (1) Grommet
- (1) Seal
- (1) O-Ring
- (2) Wedge Keys
- (4) Bolts
- (4) Washers

Image: Close-up of the impeller and the metal wear ring.
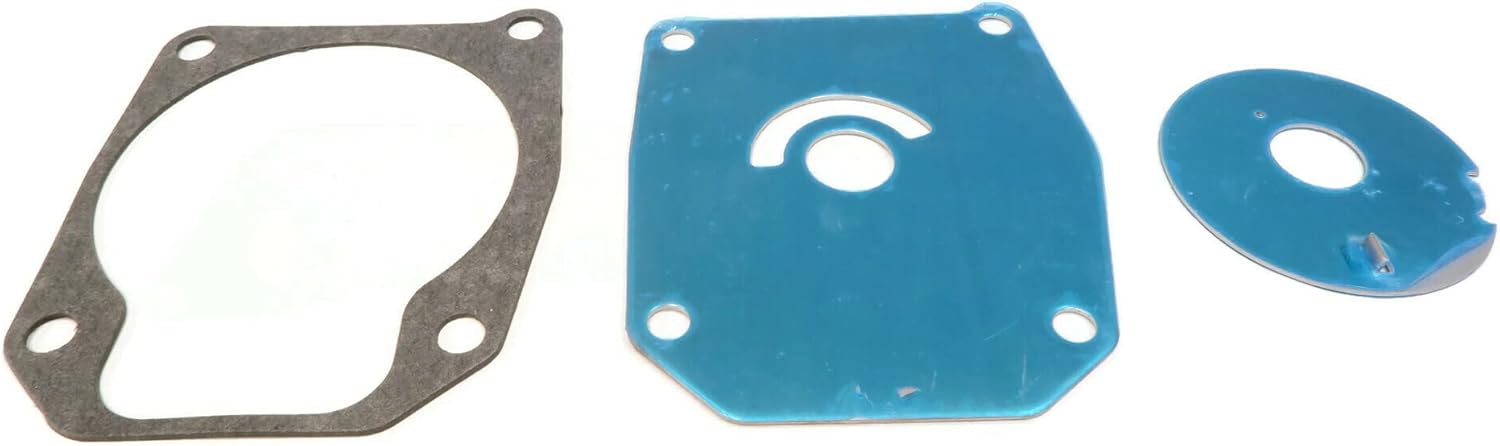
Image: Various gaskets and the wear plate included in the kit.

Image: Small components including O-rings, a seal, a grommet, and two wedge keys.

Image: Four bolts and four washers, part of the mounting hardware.
Specifications
Key specifications for the water pump impeller kit components:
| Attribute | Value |
|---|---|
| Brand | The ROP Shop |
| Material | Metal (components vary) |
| Item Weight | 1.03 Pounds |
| Product Dimensions | 13 x 5.5 x 4 inches (packaging) |
| Manufacturer Part Number | 101608_77 |
| UPC | 193979476003 |
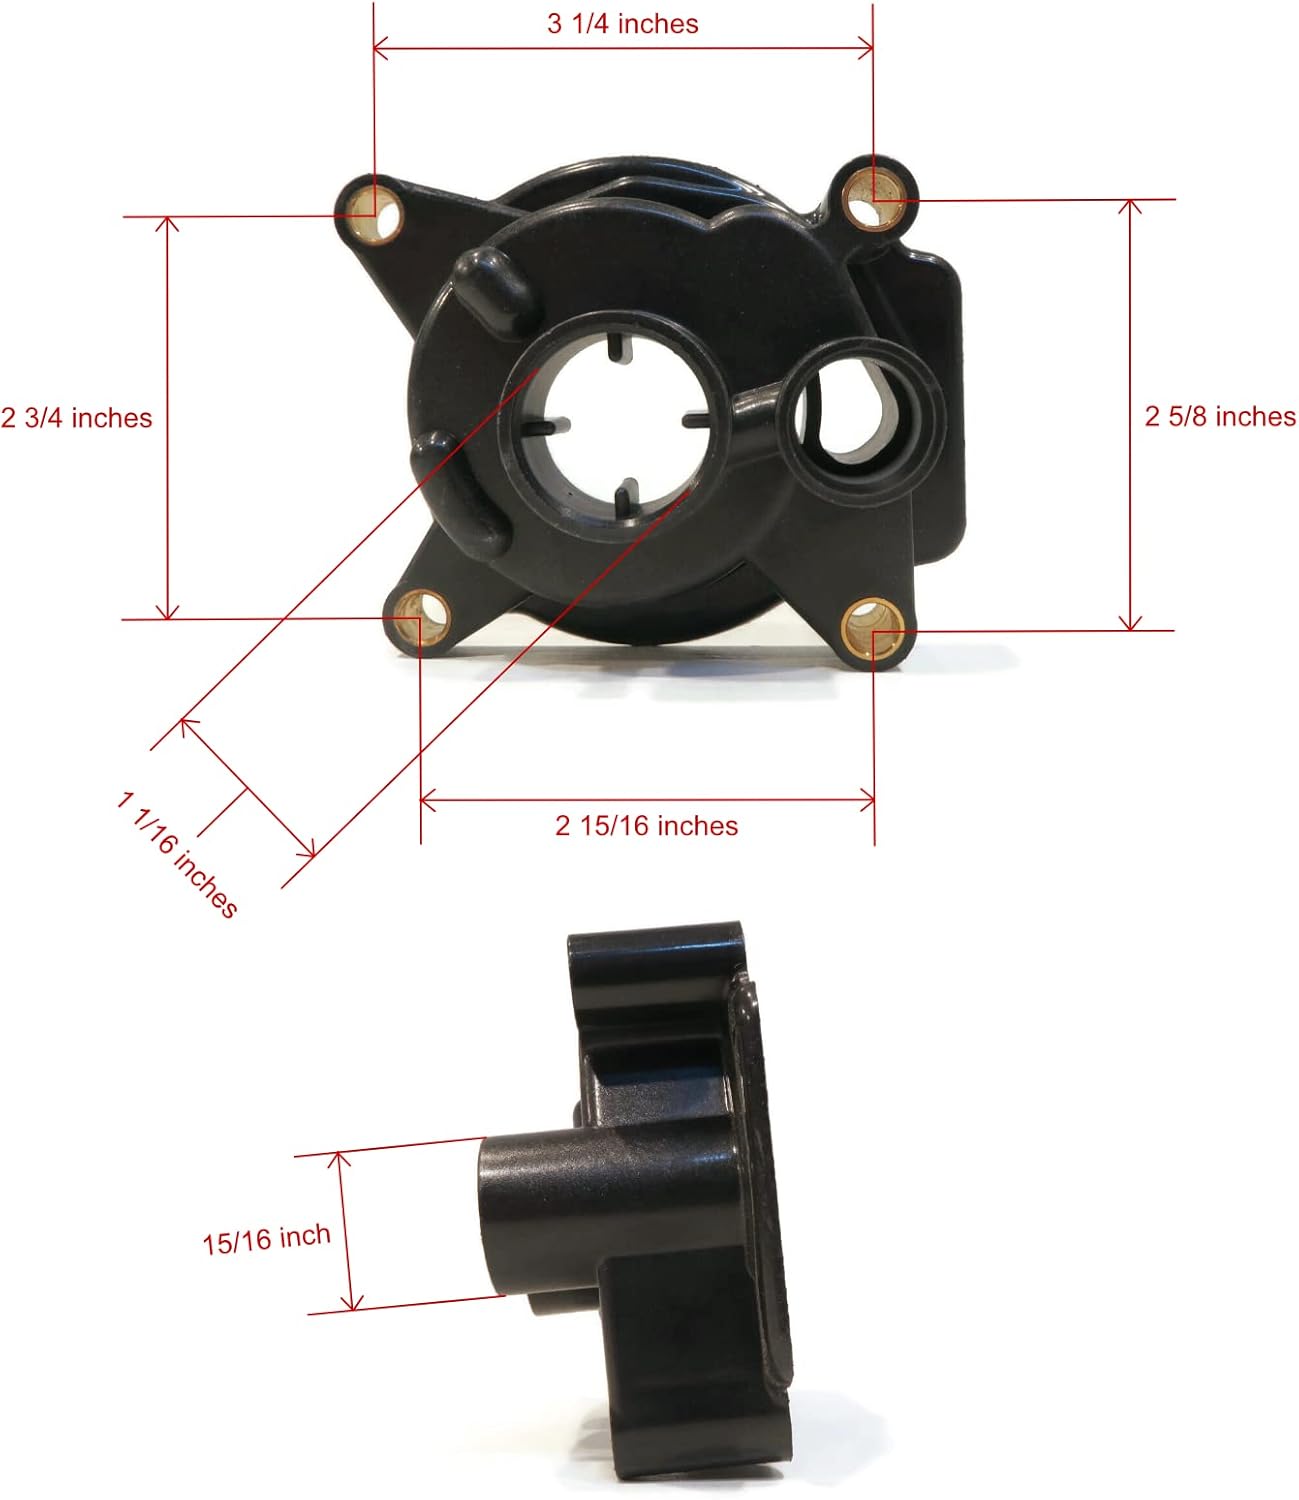
Image: Detailed dimensions of the water pump housing, including width, height, and depth measurements.
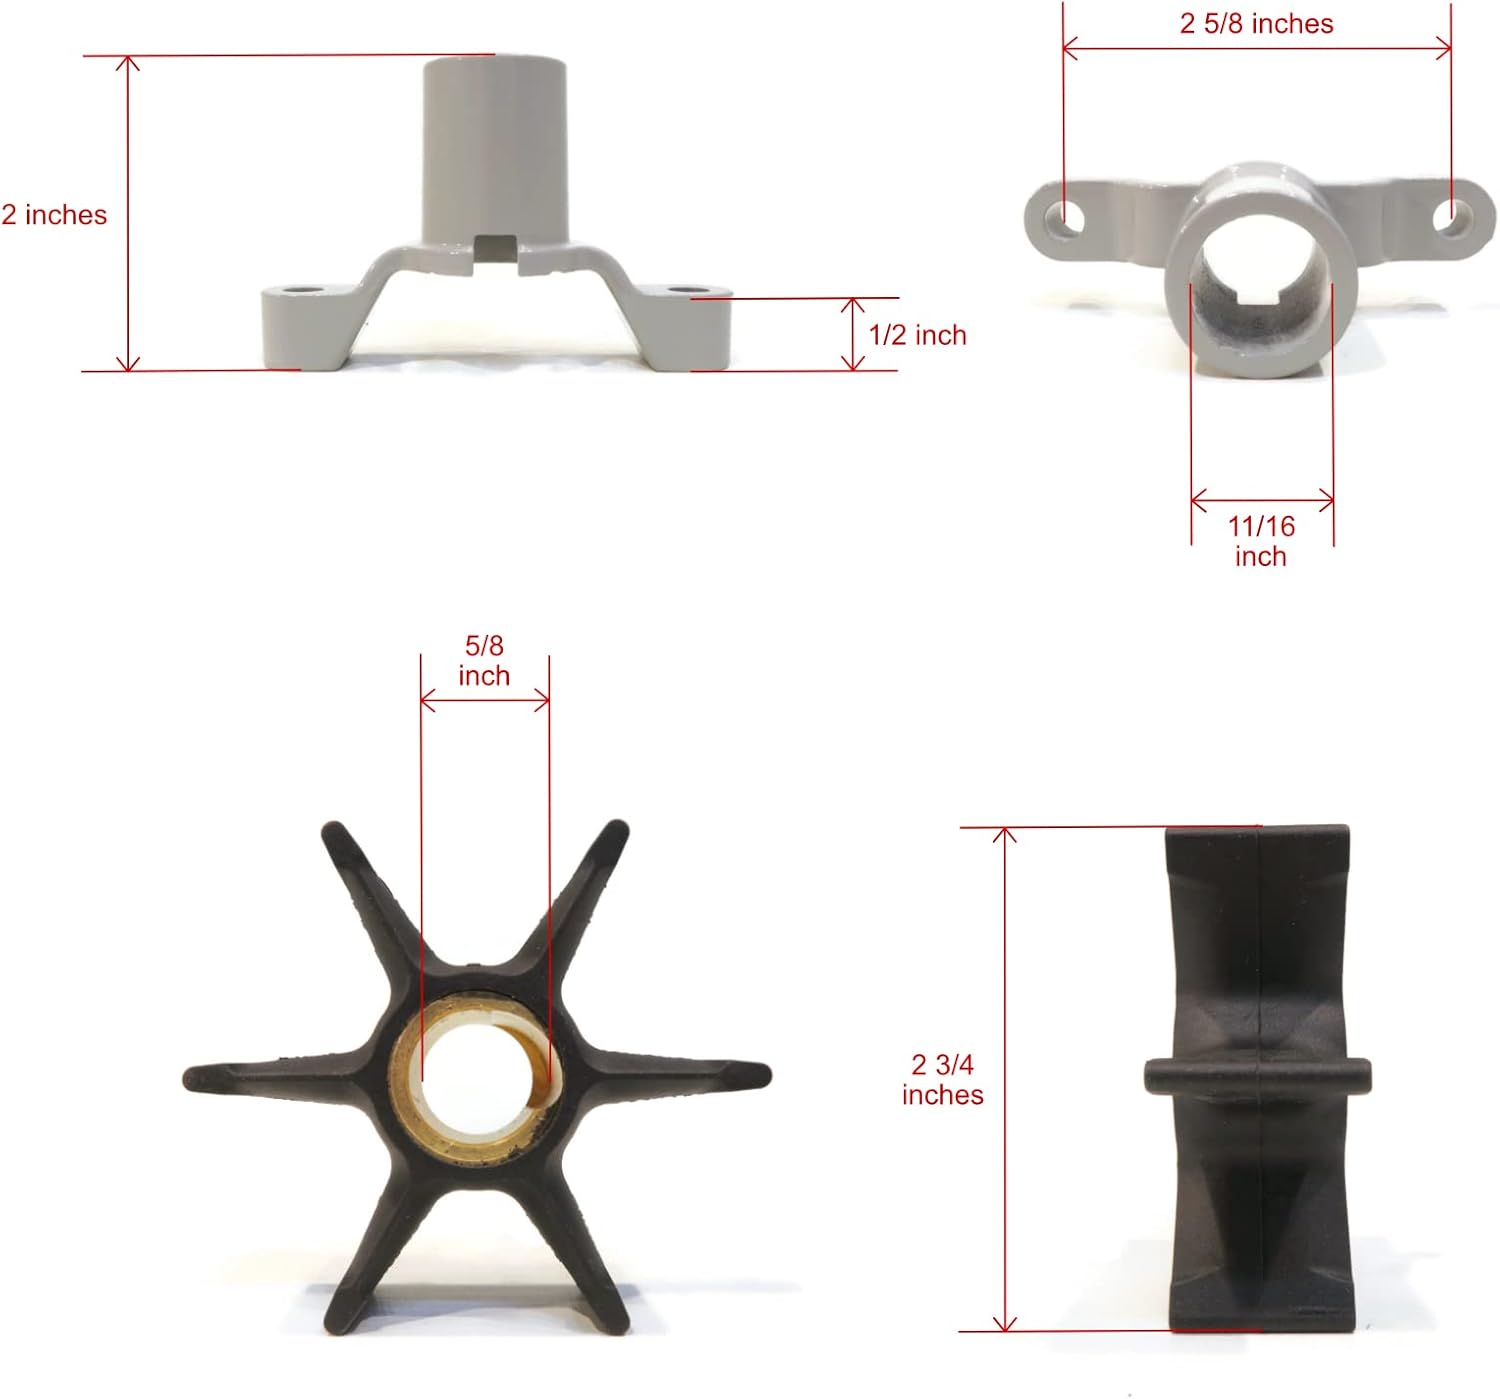
Image: Dimensions of the impeller and other associated components, such as the drive shaft adapter.
Installation Guide
Installation of a water pump impeller kit requires mechanical aptitude and specific tools. It is highly recommended to consult your outboard engine's official service manual for detailed, model-specific instructions and safety precautions. The following is a general overview and not a substitute for a professional service manual.
- Preparation: Ensure the engine is off and cooled. Disconnect the battery. Place the outboard in a position that allows safe access to the lower unit.
- Drain Gearcase Oil: If necessary, drain the gearcase oil according to your engine's service manual.
- Remove Lower Unit: Carefully remove the lower unit from the outboard engine. This typically involves removing several bolts and disconnecting the shift linkage.
- Disassemble Water Pump Housing: Locate the existing water pump housing on the lower unit. Remove the bolts securing the housing and carefully disassemble it, noting the orientation of all components.
- Remove Old Components: Remove the old impeller, wear plate, gaskets, and seals. Inspect the water pump cavity for any debris or corrosion and clean thoroughly.
- Install New Components: Install the new components from the kit in the reverse order of removal.
- Place the new wear plate gasket, then the new wear plate.
- Install the new housing, ensuring proper alignment.
- Lubricate the new impeller with water or a suitable lubricant and install it into the housing, ensuring the impeller vanes are bent in the correct direction of rotation.
- Install the new O-rings, seals, grommet, and wedge keys as per your service manual.
- Reassemble Water Pump Housing: Secure the water pump housing with the new bolts and washers provided, tightening them to the manufacturer's specified torque.
- Reattach Lower Unit: Reattach the lower unit to the outboard engine, ensuring the shift linkage is correctly connected and all bolts are tightened to specification.
- Refill Gearcase Oil: If drained, refill the gearcase oil to the correct level.
- Test: Before operating in open water, perform a test run in a controlled environment (e.g., with muffs and a water supply) to ensure proper water flow from the tell-tale (pee hole) and no leaks.
Important: Always refer to your specific engine's service manual for precise torque specifications and detailed procedures. Improper installation can lead to engine damage.
Operating Considerations
After installing the new water pump impeller kit, ensure that your outboard engine is receiving adequate cooling water. Always check the tell-tale (water indicator stream) for a strong, consistent flow whenever the engine is running. A weak or absent stream indicates a potential cooling system issue that requires immediate attention to prevent engine overheating and damage.
Maintenance
Regular maintenance of your outboard's water pump is crucial for engine longevity. The impeller is a wear item and should be inspected or replaced periodically, typically every 100 hours of operation or annually, whichever comes first. Operating in sandy or silty conditions may necessitate more frequent inspection and replacement.
- Visual Inspection: Periodically check the tell-tale stream for strong flow.
- Impeller Replacement: Replace the impeller and associated gaskets as part of routine maintenance, even if no issues are apparent.
- Flush Cooling System: After use in saltwater or dirty water, flush the engine's cooling system with fresh water to prevent salt buildup and corrosion.
Troubleshooting Common Issues
If you experience issues with your outboard's cooling system after installing the water pump impeller kit, consider the following:
| Symptom | Possible Cause | Solution |
|---|---|---|
| No or weak tell-tale stream | Clogged tell-tale, improperly installed impeller, air leak, damaged water tube, debris in water pump. | Clear tell-tale, re-inspect impeller installation, check for leaks, inspect water tube, clean water pump. |
| Engine overheating | Insufficient water flow, thermostat issue, blocked cooling passages. | Verify water pump function, check thermostat, flush cooling system. |
| Water pump noise | Worn bearings, debris, improper assembly. | Disassemble and inspect water pump, replace worn parts. |
If troubleshooting steps do not resolve the issue, it is advisable to seek assistance from a certified marine mechanic.
Support and Warranty Information
For product support, technical assistance, or inquiries regarding compatibility, please contact The ROP Shop directly. When contacting support, please have your product model number (101608_77) and engine details readily available.
Regarding returns, the product is subject to a 30-day return policy for refund or replacement. Please refer to your purchase documentation or the seller's policy for specific terms and conditions related to warranty and returns.
Manufacturer: The ROP Shop
Model Number: 101608_77