1. Introduction
This manual provides detailed instructions for the proper installation, operation, maintenance, and troubleshooting of the HOBBYWING XERUN XR10 Justock G3 Combo. This combo includes the XERUN XR10 Justock G3 Electronic Speed Controller (ESC) and the Justock 10.5T Brushless Motor, designed for remote-controlled vehicles. Please read this manual thoroughly before using the product to ensure correct usage and optimal performance.
2. Safety Precautions
- Always disconnect the battery from the ESC when not in use to prevent accidental activation.
- Ensure all connections are secure and correctly polarized to avoid damage to the components.
- Keep the ESC and motor away from water and moisture unless specifically designed for waterproof operation.
- Avoid operating the motor and ESC in extremely high temperatures. Ensure adequate ventilation.
- Use only recommended battery types and voltages (e.g., 2S LiPo) to prevent over-discharge or over-voltage damage.
- Children should operate this product under adult supervision.
- Do not modify the ESC or motor. Unauthorized modifications can lead to malfunction and void the warranty.
3. Product Overview
The HOBBYWING XERUN XR10 Justock G3 Combo consists of a high-performance electronic speed controller and a sensored brushless motor, optimized for stock class racing. The ESC features advanced timing options and a robust power delivery system, while the motor provides consistent power output.
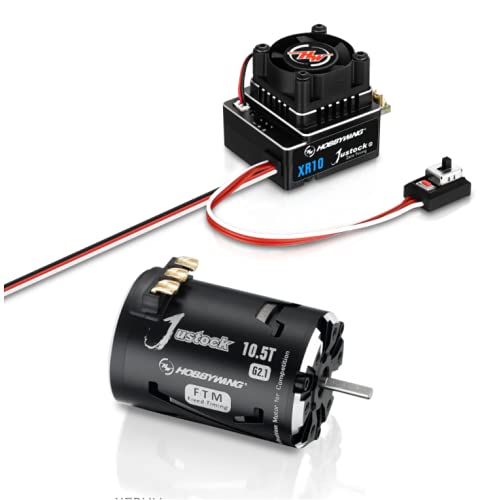
This image displays the HOBBYWING XERUN XR10 Justock G3 electronic speed controller (ESC) and the Justock 10.5T brushless motor. The ESC features a cooling fan and multiple connection ports, while the motor is a black cylindrical unit with 'Justock 10.5T' branding.
4. Setup
Follow these steps for proper installation of the ESC and motor in your RC vehicle.
- Mounting the ESC: Securely mount the XR10 Justock G3 ESC in your vehicle using double-sided tape or screws. Ensure it is in a location with good airflow for cooling.
- Mounting the Motor: Install the Justock 10.5T motor into the motor mount of your vehicle. Ensure the pinion gear meshes correctly with the spur gear, allowing for a small amount of play.
- Connecting the Motor to the ESC: Connect the three motor wires (A, B, C) from the motor to the corresponding output terminals (A, B, C) on the ESC. Ensure the connections are firm. For sensored motors, connect the sensor cable from the motor to the 'Sensor' port on the ESC.
- Connecting the ESC to the Receiver: Plug the throttle cable (usually a black, red, white wire) from the ESC into the throttle channel (CH2) of your RC receiver.
- Connecting the ESC to the Battery: Connect the battery connector from the ESC to your vehicle's battery pack. Ensure correct polarity (red to positive, black to negative).
- Installing the Cooling Fan: If not pre-installed, attach the cooling fan to the ESC and plug its connector into the designated fan port on the ESC.
5. Operating
Before operating your vehicle, perform the following steps for initial setup and calibration.
- Throttle Range Calibration:
- Turn on your transmitter and ensure the throttle trim is at neutral.
- With the ESC off and connected to the battery, press and hold the SET button on the ESC.
- Release the SET button when the red LED flashes.
- Pull the throttle trigger to full forward (full throttle) and press the SET button. The green LED will flash.
- Push the throttle trigger to full reverse (full brake) and press the SET button. The green LED will flash.
- Release the throttle trigger to the neutral position and press the SET button. The green LED will flash, indicating successful calibration.
- Programming Parameters: The XR10 Justock G3 ESC can be programmed using a HOBBYWING LED Program Box or LCD Program Box. Refer to the program box manual for detailed instructions on adjusting parameters such as running mode, drag brake force, voltage cut-off, and timing.
- Powering On/Off: To power on, connect the battery and press the power button on the ESC. To power off, press and hold the power button until the LEDs turn off, then disconnect the battery.
6. Maintenance
Regular maintenance ensures the longevity and optimal performance of your HOBBYWING XERUN XR10 Justock G3 Combo.
- Cleaning: After each use, especially in dusty or dirty conditions, gently clean the ESC and motor with a soft brush or compressed air. Avoid using solvents or harsh chemicals.
- Inspection: Periodically check all wires and connectors for signs of wear, fraying, or corrosion. Ensure the motor's bearings are smooth and free of debris. Inspect the cooling fan for proper operation.
- Storage: Store the ESC and motor in a dry, cool place away from direct sunlight and extreme temperatures. Disconnect the battery before storage.
7. Troubleshooting
This section addresses common issues you might encounter with your HOBBYWING XERUN XR10 Justock G3 Combo.
| Problem | Possible Cause | Solution |
|---|---|---|
| Motor does not run or runs intermittently. | Loose connections, incorrect calibration, low battery, damaged motor/ESC. | Check all wiring, recalibrate throttle range, charge battery, inspect components for damage. |
| ESC overheats. | Poor ventilation, incorrect gearing, excessive load, faulty fan. | Ensure proper airflow, adjust gearing, reduce load, check fan operation. |
| Motor runs in the wrong direction. | Incorrect motor wire connection. | Swap any two of the three motor wires (A, B, C) between the ESC and motor. |
| No response from throttle. | Transmitter/receiver not paired, throttle channel incorrect, ESC not calibrated. | Ensure transmitter and receiver are bound, check receiver connection, recalibrate ESC throttle range. |
8. Specifications
Key technical specifications for the HOBBYWING XERUN XR10 Justock G3 Combo (Model: 38020319).
| Specification | Value |
|---|---|
| Product Dimensions | 6.5 x 4.88 x 2.13 inches |
| Item Weight | 1.06 pounds |
| Manufacturer | Hobbywing |
| ASIN | B094LTQNZ4 |
| Item model number | 38020319 |
| Brand | HW HOBBYWING |
| Voltage | 7.4 Volts (2S LiPo compatible) |
| Material | Aluminum |
| UPC | 088718516433 |
9. Warranty and Support
For warranty information and technical support, please contact HW HOBBYWING directly through their official website or authorized distributors. Keep your purchase receipt as proof of purchase for any warranty claims.