Assistive Technology Services HD700
Assistive Technology Services Life Guardian Medical Alarm Emergency Alert Phone System HD700 User Manual
1. Introduction
This manual provides detailed instructions for the setup, operation, maintenance, and troubleshooting of the Assistive Technology Services Life Guardian Medical Alarm Emergency Alert Phone System HD700. This system is designed to provide an independent emergency alert solution, utilizing a standard home phone line to contact pre-programmed individuals or emergency services without monthly monitoring fees.
2. Package Contents
Verify that all items listed below are present in your package:
- HD700 Base Unit
- Wrist Panic Button
- Necklace Panic Button
- Power Adapter
- Telephone Line Cord
- CR123A Battery (pre-installed or included separately for base unit)
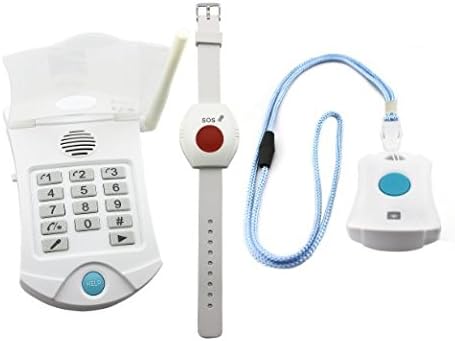
Image 2.1: Overview of the HD700 base unit, wrist panic button, and necklace panic button.
3. Setup Instructions
Follow these steps to set up your HD700 system:
- Connect Power: Plug the power adapter into the HD700 base unit and then into a standard electrical outlet.
- Connect to Phone Line: Connect one end of the telephone line cord to the 'LINE' port on the HD700 base unit and the other end to your home phone wall jack. If you have an existing phone, connect it to the 'PHONE' port on the HD700 base unit. The system requires a standard landline phone connection.
- Install Battery: Ensure the CR123A battery is correctly installed in the base unit. This battery provides backup power during outages.
- Record Emergency Message: Press and hold the 'RECORD' button on the base unit. Speak your personalized emergency message clearly into the microphone for up to 7 seconds. A typical message might be: "This is [Your Name], I need help. Please respond." Release the 'RECORD' button when finished.
- Program Phone Numbers: The system can store up to three emergency contact numbers. Refer to the detailed programming section in the full manual for specific key sequences to enter and save each number. It is recommended to program 911 as the third number.
- Test System: After programming, perform a test by pressing one of the panic buttons. Verify that the system dials the programmed numbers and plays your recorded message. Ensure the recipient can press a key to establish two-way communication.

Image 3.1: The HD700 system showing the base unit, panic buttons, power adapter, and phone cables for connection.
4. Operating Instructions
The HD700 system is designed for simple operation during an emergency.
4.1 Activating an Emergency Alert
To activate an emergency alert, press and hold the large red button on either the wrist panic button or the necklace panic button for approximately 2 seconds. The base unit will then initiate the emergency call sequence.
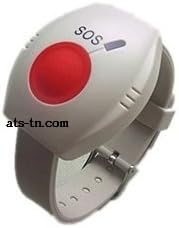
Image 4.1: The wrist panic button, featuring a prominent red SOS button for emergency activation.
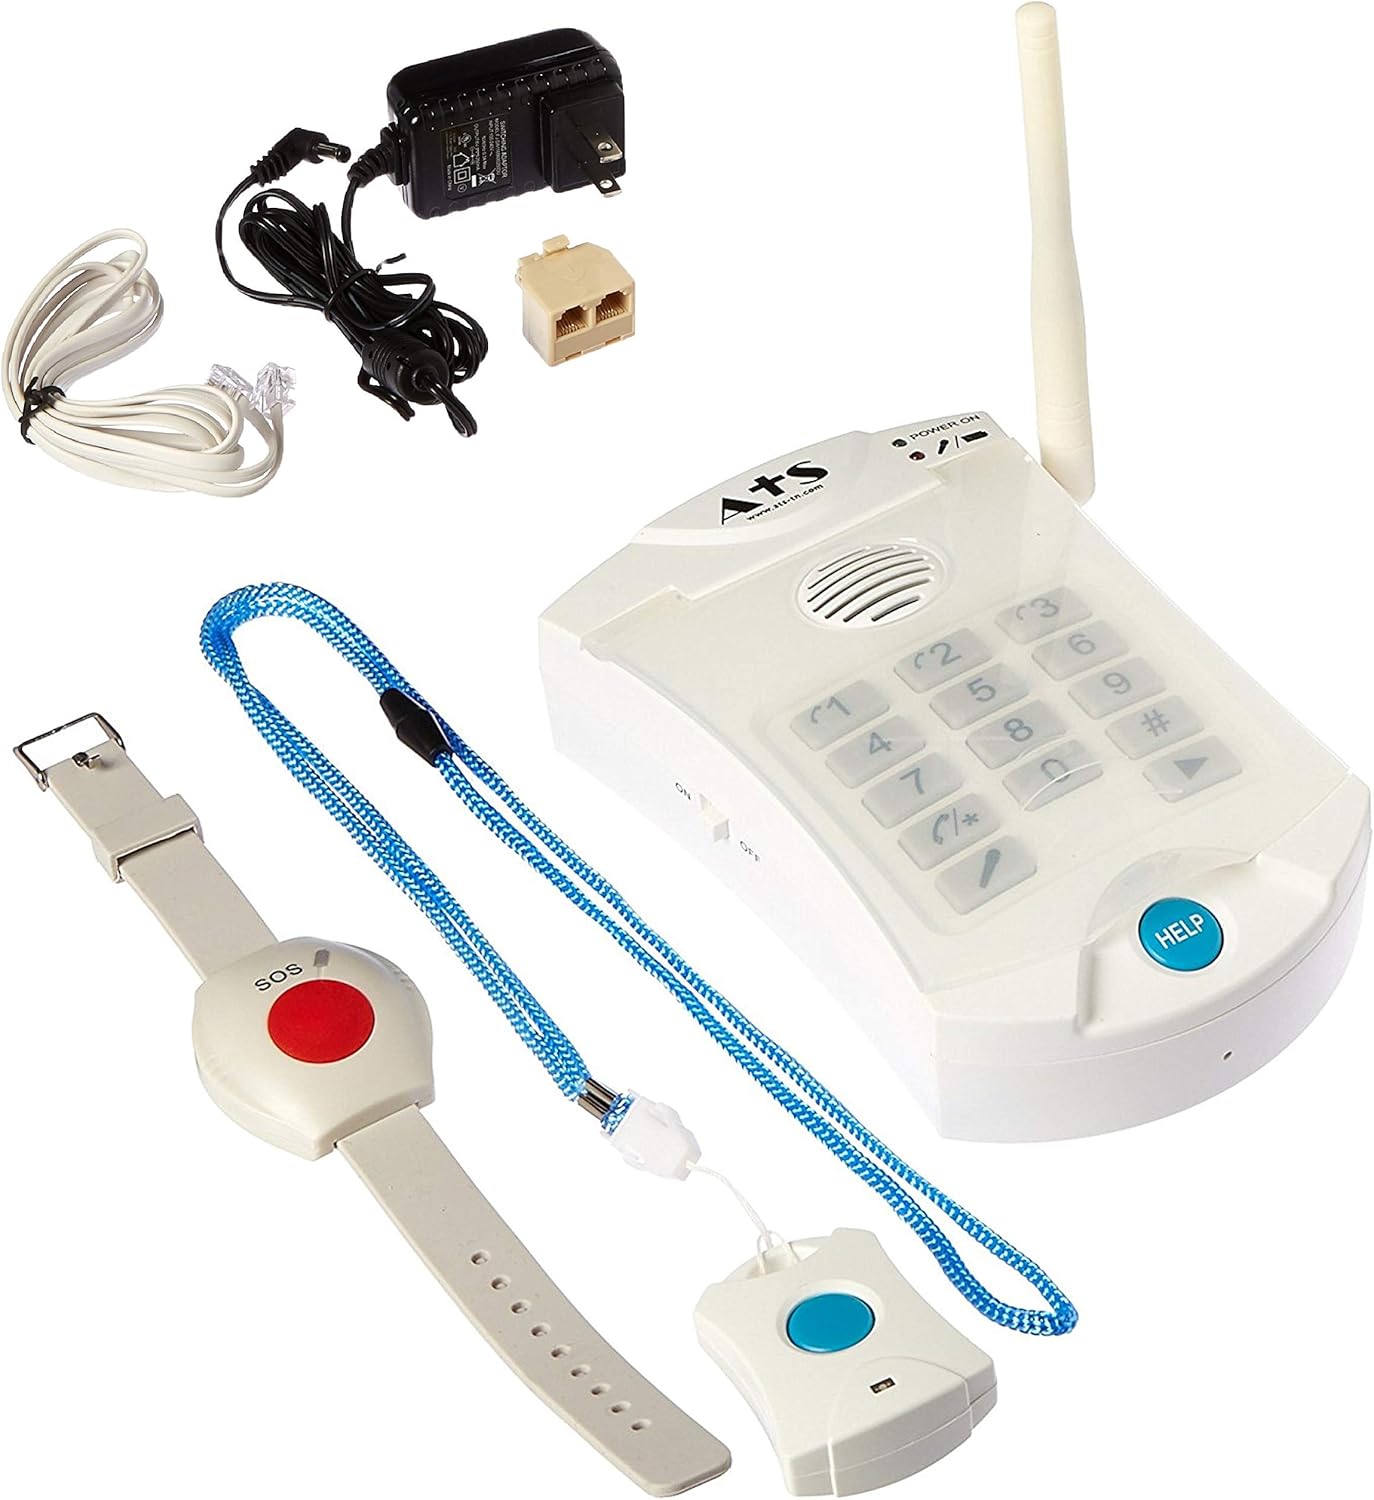
Image 4.2: The necklace panic button, designed for easy access and activation.
4.2 Emergency Call Sequence
- Upon activation, the HD700 base unit will sequentially dial the pre-programmed phone numbers.
- When a call is answered, the system plays your personalized emergency message.
- The recipient must press any key on their phone to acknowledge the call and open two-way communication through the base unit's speakerphone.
- If no key is pressed, or if the line is busy/unanswered, the system will hang up and dial the next programmed number in sequence.
- The panic buttons have a range of approximately 100 feet from the base unit.
4.3 Panic Button Features
- Wrist Panic Button: This button is water-resistant, allowing it to be worn during showering or bathing. It is also pacemaker safe.
- Necklace Panic Button: This button is not waterproof and should not be exposed to water. It is also pacemaker safe.
5. Maintenance
5.1 Battery Replacement
The HD700 base unit uses one CR123A battery for backup power. Replace this battery periodically or when the low battery indicator illuminates. Refer to the base unit's battery compartment for specific replacement instructions. Panic button batteries are typically long-lasting and may require professional replacement or a new unit if depleted.
5.2 Cleaning
Clean the base unit and panic buttons with a soft, dry cloth. Do not use abrasive cleaners or immerse any part of the system in water (except for the water-resistant wrist button as specified).
5.3 Regular Testing
It is recommended to test the system monthly to ensure proper functionality. This includes verifying that the panic buttons activate the base unit, the system dials the correct numbers, and two-way communication can be established.
6. Troubleshooting
- System Not Dialing:
- Ensure the base unit is powered on and connected to a working phone line.
- Verify that emergency numbers are correctly programmed.
- Check for a dial tone on the phone line.
- Poor Audio Quality During Two-Way Communication:
- Ensure the microphone was close to your mouth when recording the emergency message.
- Adjust the volume on the base unit if applicable.
- Ensure there are no obstructions near the base unit's speaker or microphone.
- False Alarms:
- Ensure panic buttons are stored or worn in a way that prevents accidental pressing.
- No Direct 911 Call:
- The system dials pre-programmed numbers sequentially. To contact 911, it must be programmed as one of the emergency contact numbers.
- Note that if using a VOIP phone service, 911 calls may not automatically provide your exact location to the operator.
7. Specifications
| Brand | Assistive Technology Services |
| Model | HD700 |
| Power Source | Adapter |
| Number of Batteries | 1 CR123A (included) |
| Battery Description | Lithium |
| Control Method | Touch |
| Mounting Type | Tabletop Mount |
| Maximum Range (Panic Buttons) | 100 Feet |
| Item Weight | 1.26 pounds |
| Package Dimensions | 12.91 x 5.94 x 2.36 inches |
8. Warranty and Support
For information regarding product warranty or technical support, please contact Assistive Technology Services directly. Refer to the product packaging or the manufacturer's website for current contact details.