Introduction
This manual provides detailed instructions for the setup, operation, and maintenance of your RCECAOSHAN replacement remote control for Mitsubishi Electric Air Conditioners. Please read this manual thoroughly before use to ensure proper functionality and to maximize the lifespan of your device.
Product Overview
The RCECAOSHAN replacement remote control is designed to operate various Mitsubishi Electric Air Conditioner models. It features a clear display, ergonomic design, and essential functions for controlling your air conditioning unit.
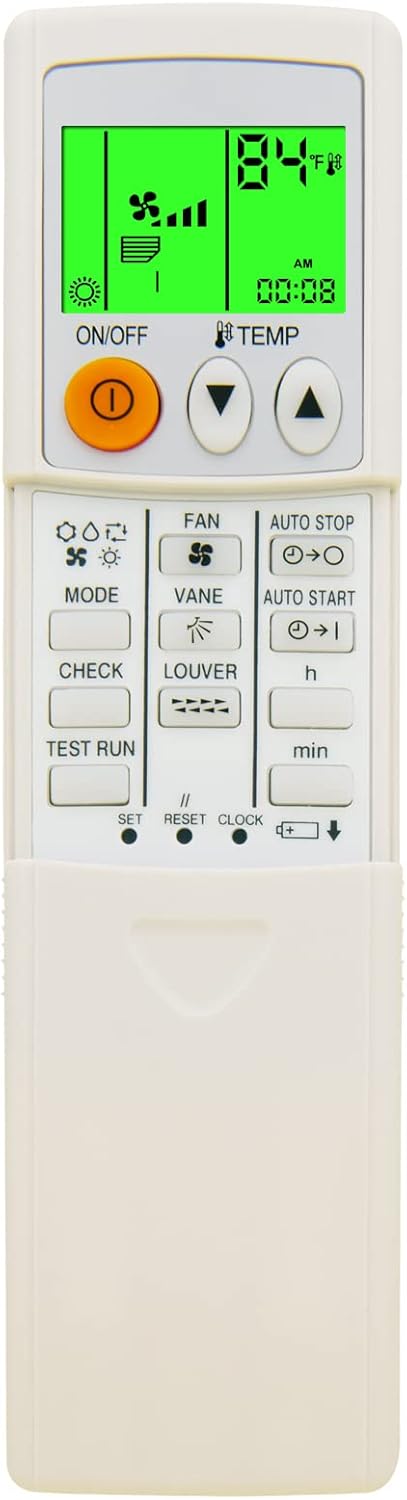
Image 1: Front view of the RCECAOSHAN replacement remote control. The display shows 84°F, fan speed, and current time. Buttons for ON/OFF, TEMP, MODE, FAN, VANE, LOUVER, AUTO STOP, AUTO START, CHECK, TEST RUN, SET, RESET, CLOCK, and battery indicator are visible.
Compatible Models:
- PKFY-P12NHMU-E2
- PKFY-P15NHMU-E
- PKFY-P15NHMU-E2
- PKFY-P18NHMU-E
- PKFY-P18NHMU-E2
Setup
1. Battery Installation
- Locate the battery compartment on the back of the remote control.
- Slide the battery cover open.
- Insert two AAA batteries (not included), ensuring the correct polarity (+/-) as indicated inside the compartment.
- Close the battery cover securely.

Image 2: Rear view of the remote control, highlighting the battery compartment cover.
2. Initial Power On
After installing batteries, the remote control should power on automatically, displaying default settings. No programming is typically required for this replacement unit; it should function directly with compatible Mitsubishi Electric Air Conditioners.
Operating Instructions
Familiarize yourself with the buttons and their functions:

Image 3: This image illustrates the remote's display, showing both Fahrenheit and Celsius temperature readings, and highlights the green backlight feature for improved visibility in low light conditions.
- ON/OFF Button (Orange Button): Press to turn the air conditioner unit on or off.
- TEMP Buttons (▲ / ▼): Adjust the desired temperature setting. The display supports both Fahrenheit and Celsius.
- MODE Button: Cycle through operating modes (e.g., Cool, Heat, Fan, Dry, Auto).
- FAN Button: Adjust the fan speed (e.g., Low, Medium, High, Auto).
- VANE Button: Control the vertical airflow direction.
- LOUVER Button: Control the horizontal airflow direction.
- AUTO STOP Button: Set a timer for the unit to automatically turn off. Use 'h' and 'min' buttons to adjust time.
- AUTO START Button: Set a timer for the unit to automatically turn on. Use 'h' and 'min' buttons to adjust time.
- CHECK Button: Used for system diagnostics (refer to your AC unit's manual for specific codes).
- TEST RUN Button: Initiates a test operation of the AC unit.
- SET Button: Confirms settings or enters setup modes.
- RESET Button: Resets the remote to default settings.
- CLOCK Button: Set the current time on the remote's display.
Temperature Unit Conversion (Fahrenheit/Celsius)
The remote control supports displaying temperature in both Fahrenheit (°F) and Celsius (°C). The method for switching between these units is typically done by pressing a combination of buttons, often the MODE and TEMP ▲ buttons simultaneously, or a dedicated button if present. Refer to the display for the current unit.
Green Backlight Feature
The remote control features a green backlight for the display, enhancing visibility in low-light conditions. This backlight activates automatically when buttons are pressed and typically turns off after a few seconds of inactivity to conserve battery life.
Maintenance
Cleaning the Remote Control
- Wipe the remote control with a soft, dry cloth.
- Do not use liquid cleaners, sprays, or abrasive materials, as these can damage the remote's surface or internal components.
Battery Replacement
- Replace batteries when the display becomes dim or the remote's response becomes inconsistent.
- Always replace both batteries at the same time with new AAA batteries.
- Remove batteries if the remote will not be used for an extended period to prevent leakage.
Troubleshooting
| Problem | Possible Cause | Solution |
|---|---|---|
| Remote not responding | Dead or incorrectly installed batteries. Obstruction between remote and AC unit. Remote out of range. | Replace batteries, ensuring correct polarity. Remove any obstructions. Move closer to the AC unit. |
| AC unit not responding to commands | Remote not compatible with AC unit. AC unit power issue. | Verify AC unit model is listed as compatible. Check AC unit's power supply. |
| Display is dim or blank | Low battery power. | Replace batteries. |
Specifications
- Model Number: 12021050901-A1-02
- Brand: RCECAOSHAN
- Compatible Devices: Mitsubishi Electric Air Conditioners (PKFY-P12NHMU-E2, PKFY-P15NHMU-E, PKFY-P15NHMU-E2, PKFY-P18NHMU-E, PKFY-P18NHMU-E2)
- Power Source: 2 x AAA Batteries (not included)
- Special Feature: Green Backlight, Ergonomic Design, Fahrenheit/Celsius Display
- Dimensions: Approximately 8.31 x 3.39 x 1.5 inches
- Weight: Approximately 3.2 ounces (without batteries)
Warranty and Support
This product is a replacement remote control. For specific warranty information, please refer to the retailer or the original purchase documentation. For technical support or further inquiries, please contact the seller directly through the platform where the purchase was made.
Note: This remote is a replacement part and not an original Mitsubishi Electric product.