1. Introduction
This manual provides detailed instructions for the installation, operation, and maintenance of your new MAG Turntable headshell, cartridge, and stylus assembly. This product is designed to provide high-quality audio reproduction for compatible Denon DP series turntables. Please read this manual thoroughly before installation to ensure proper setup and optimal performance.
2. Product Overview
The MAG Turntable headshell and cartridge assembly is a pre-mounted unit, simplifying the installation process. It features a moving magnet (MM) cartridge with a diamond stylus needle, engineered for excellent sound quality and tracking ability.
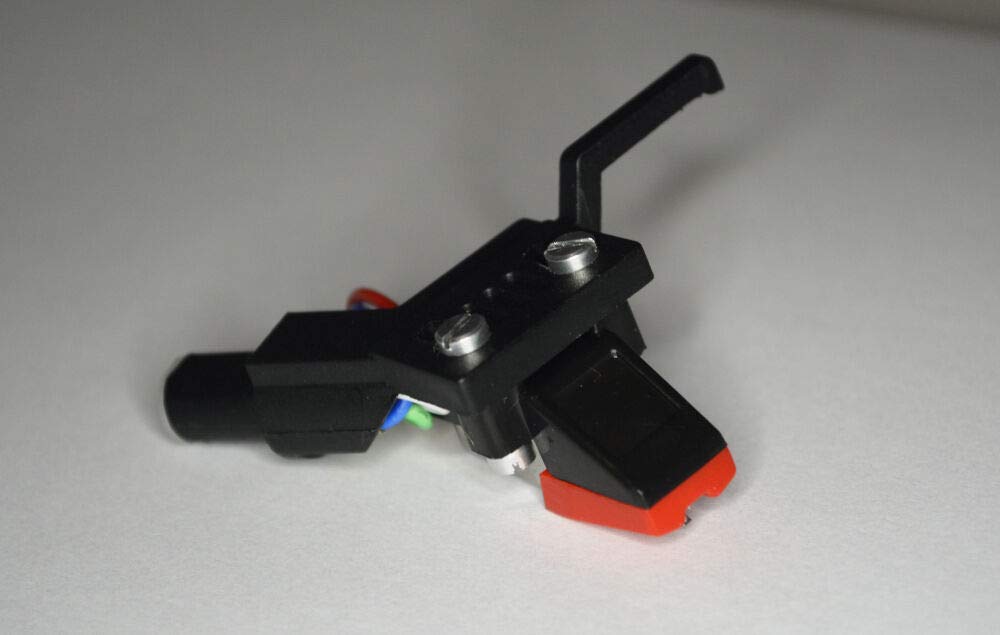
Figure 1: The MAG Turntable headshell and cartridge assembly. This image shows the complete unit, including the black headshell, the white cartridge body, and the colored wiring connecting to the gold-plated pins. The stylus is visible at the bottom of the cartridge.
Included Components:
- Pre-mounted Cartridge
- Headshell
- Diamond Stylus
3. Compatibility
This headshell and cartridge assembly is specifically designed for use with the following Denon turntable models:
- Denon DP 47F
- Denon DP 51F
- Denon DP 52F
- Denon DP 23F
Important: This headshell is designed for straight tonearms only. It is not suitable for "S" shaped tonearms. Please verify your turntable's tonearm type before installation. The headshell is secured by a top screw.
4. Setup and Installation
Follow these steps to properly install the headshell and cartridge onto your compatible Denon turntable.
- Power Off: Ensure your turntable is powered off and unplugged from the mains electricity supply before beginning installation.
- Remove Old Headshell (if applicable): Carefully remove the existing headshell from your turntable's tonearm. Typically, this involves unscrewing a locking collar at the tonearm's end and gently pulling the headshell straight out.
- Inspect New Headshell: Examine the MAG Turntable headshell and cartridge assembly. Ensure the stylus guard is in place to protect the needle during installation.
- Attach Headshell: Align the pins of the new headshell with the receptacle on the tonearm. Gently push the headshell straight into the tonearm until it is fully seated.
- Secure Headshell: Tighten the locking collar or top screw on the tonearm to secure the headshell firmly in place. Do not overtighten.
- Balance Tonearm: Follow your turntable's specific instructions for balancing the tonearm. This usually involves adjusting the counterweight until the tonearm floats freely and level.
- Set Tracking Force: Set the tracking force to 3.0 grams. The recommended range is 2.5 to 3.5 grams. Refer to your turntable's manual for precise tracking force adjustment procedures.
- Set Anti-Skate: Adjust the anti-skate setting on your turntable, typically to match the tracking force (e.g., 3.0).
- Remove Stylus Guard: Carefully remove the stylus guard from the cartridge by pulling it forward. Be gentle to avoid damaging the stylus.
- Test Playback: Reconnect your turntable to your audio system and power it on. Play a record to verify proper installation and sound quality.
5. Operating Instructions
Once installed, operate your turntable as usual. The cartridge is designed for standard vinyl record playback.
- Always ensure records are clean before playing to prevent stylus wear and improve sound quality.
- Use the tonearm lift mechanism to gently lower and raise the stylus onto and off the record. Avoid dropping the tonearm manually.
- When not in use, engage the tonearm lock and, if desired, replace the stylus guard for added protection.
6. Maintenance
Proper maintenance will extend the life of your stylus and ensure consistent sound quality.
- Stylus Cleaning: Periodically clean the stylus using a soft stylus brush, brushing gently from back to front (in the direction of play). Do not brush side-to-side. Use a specialized stylus cleaning fluid if necessary, applied sparingly to the brush, not directly to the stylus.
- Cartridge Body: Keep the cartridge body free from dust and debris. Use a soft, dry cloth.
- Stylus Replacement: The diamond stylus will wear over time. Replace the stylus when you notice a degradation in sound quality, increased surface noise, or distortion. Consult your retailer for replacement stylus options.
7. Troubleshooting
If you encounter issues, refer to the following common problems and solutions.
| Problem | Possible Cause | Solution |
|---|---|---|
| No sound or very low sound | Incorrect wiring connections; Stylus not making contact; Amplifier input incorrect. | Check all wiring connections between the headshell, tonearm, and amplifier. Ensure the stylus is properly seated and making contact with the record. Verify the amplifier is set to the correct "Phono" input. |
| Distorted or muffled sound | Dirty stylus; Incorrect tracking force; Worn stylus; Damaged record. | Clean the stylus. Re-check and adjust the tracking force to 3.0g. Inspect the stylus for wear or damage; replace if necessary. Try a different record. |
| Skipping or jumping | Incorrect tracking force; Incorrect anti-skate; Dirty stylus; Damaged record; Turntable not level. | Adjust tracking force and anti-skate. Clean the stylus. Inspect the record for scratches or debris. Ensure the turntable is on a level, stable surface. |
If problems persist after attempting these solutions, please contact your retailer for further assistance.
8. Specifications
| Feature | Specification |
|---|---|
| Cartridge Type | Moving Magnet (MM) |
| Stylus Tip | Stereo Spherical Diamond Tip |
| Output Voltage (at 1kHz, 5 cm/sec) | 5.5 mV ± 3dB |
| Channel Balance (at 1kHz) | Below 1 dB |
| Channel Separation (at 1kHz) | More than 15 dB |
| Frequency Response | 20 ~ 20k Hz |
| Tracking Force | 3.0g (recommended range: 2.5 ~ 3.5g) |
| Headshell Material | Metal, Plastic |
| Color | Black (Headshell) |
9. Warranty and Support
For warranty information or technical support, please contact the retailer from whom you purchased this product. Keep your proof of purchase for any warranty claims.
Additional protection plans may be available from your retailer at the time of purchase. Please refer to the terms and conditions of any such plans for details.