1. Introduction
This manual provides essential information for the safe and efficient installation, operation, and maintenance of your Cuilvu 2HP Electric Motor. Please read these instructions thoroughly before attempting to install or operate the motor. Retain this manual for future reference.
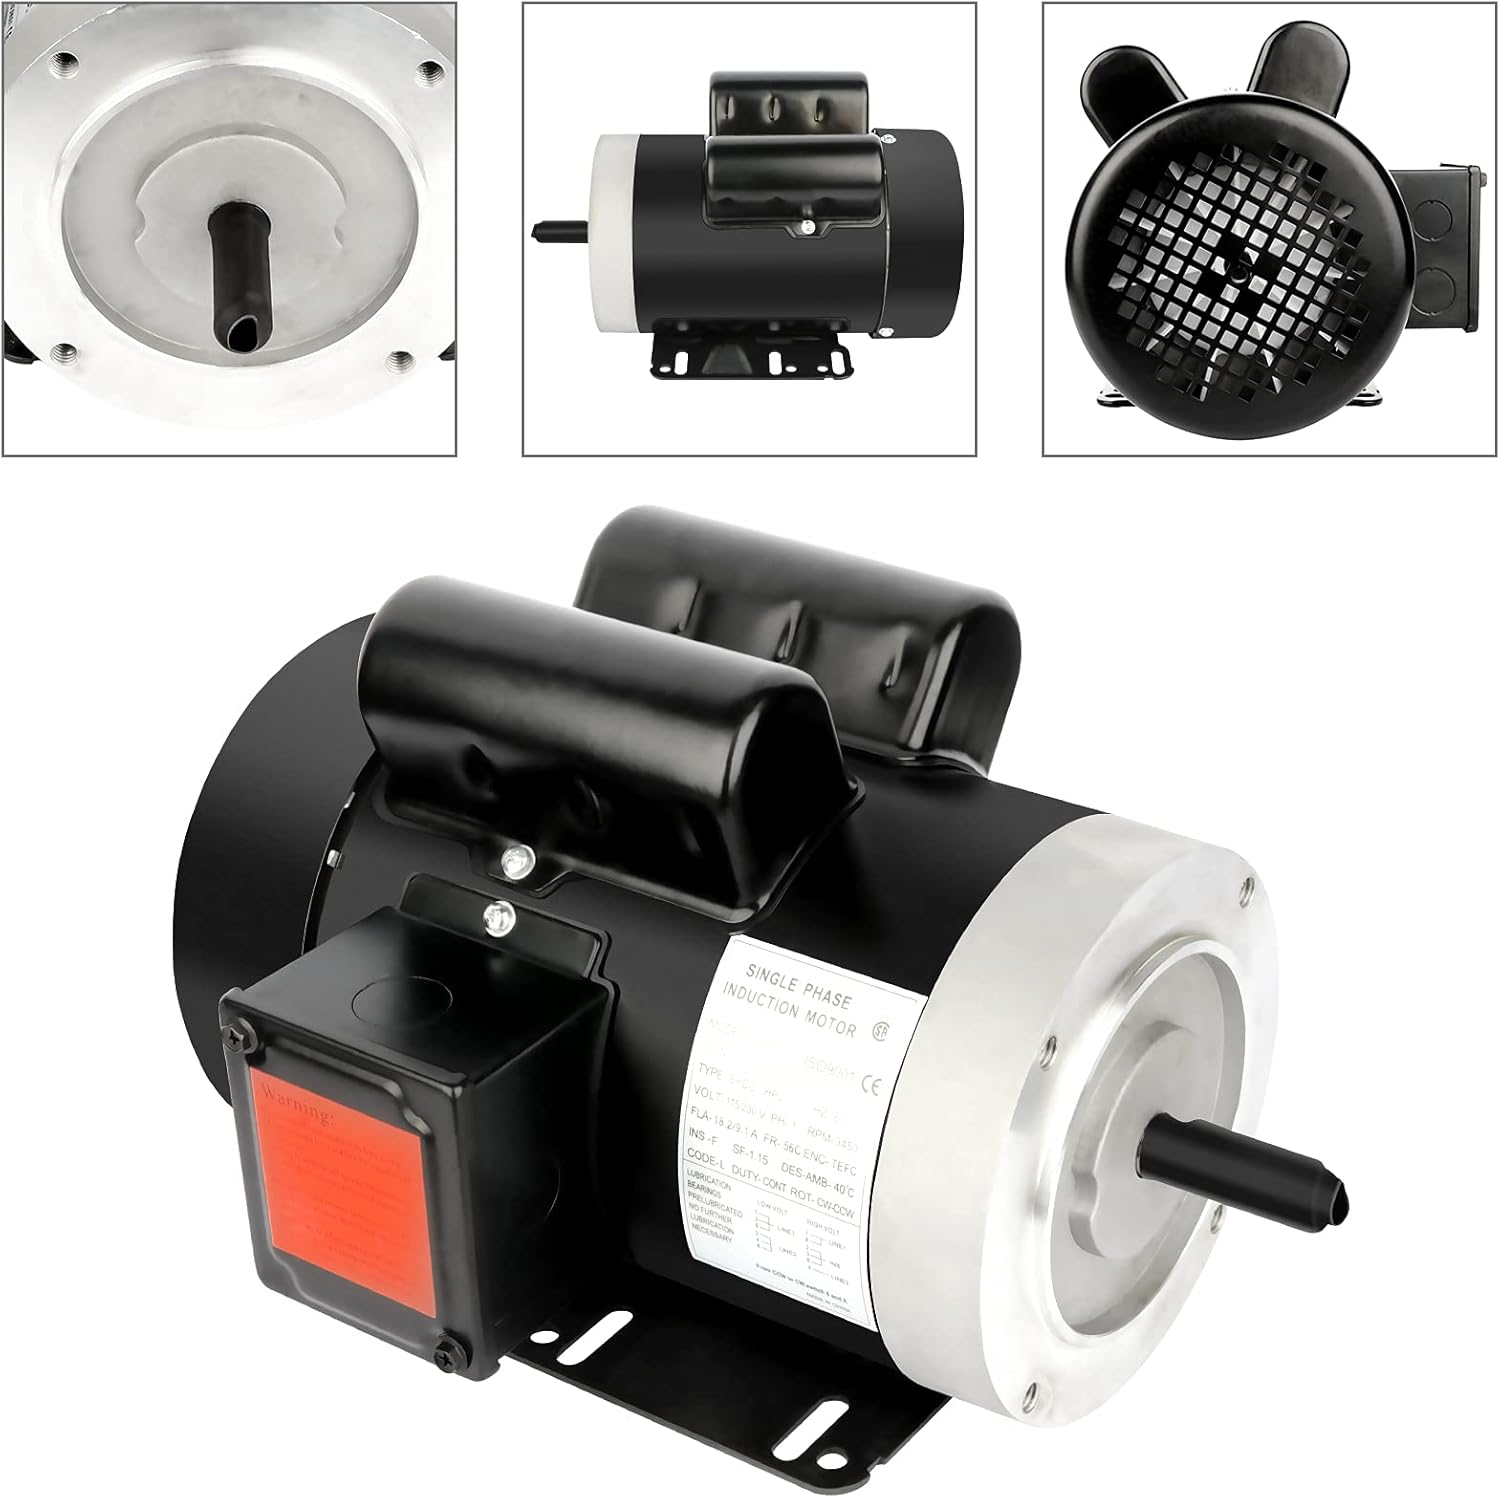
Image 1.1: General view of the Cuilvu 2HP Electric Motor. This motor is designed for various applications, including air compressors, and features a robust rolled steel shell.
2. Safety Instructions
Always observe the following safety precautions to prevent injury and damage to the equipment.
- Electrical Safety: Disconnect all power before installation, maintenance, or inspection. Ensure proper grounding according to local electrical codes. All wiring should be performed by a qualified electrician.
- Personal Protective Equipment (PPE): Wear appropriate safety gear, including safety glasses, gloves, and protective clothing, when working with the motor.
- Moving Parts: Keep hands, clothing, and tools clear of rotating parts during operation. Ensure all guards are in place before starting the motor.
- Ventilation: Ensure adequate ventilation around the motor to prevent overheating. Do not block air inlets or outlets.
- Environment: Do not operate the motor in wet or explosive atmospheres unless it is specifically rated for such conditions.
- Overload Protection: Install appropriate overload protection devices to prevent motor damage from excessive current.
3. Product Features and Components
The Cuilvu 2HP Electric Motor is a single-phase induction motor designed for reliable performance. Key features include:
- Power: 2 Horsepower
- Phase: Single Phase
- Speed: 3450 RPM
- Frame: 56C
- Voltage: 115V/230V (Dual Voltage)
- Shaft Diameter: 5/8 inch
- Enclosure: TEFC (Totally Enclosed Fan Cooled)
- Shell Material: Rolled Steel

Image 3.1: The motor features a durable rolled steel shell, providing protection and structural integrity.

Image 3.2: Various views of the motor, highlighting the mounting base, fan cover, and output shaft.
4. Specifications
Detailed technical specifications for the Cuilvu 2HP Electric Motor:
| Parameter | Value |
|---|---|
| Horsepower (HP) | 2 HP |
| Phase | Single Phase |
| Poles | 2 |
| Frame | 56C |
| Frequency | 60 Hz |
| Rated Speed | 3450 RPM |
| Voltage | 115V / 230V (AC) |
| Amperage (115V) | 18.2A |
| Amperage (230V) | 9.1A |
| Shaft Diameter | 5/8 inch (0.63 inches) |
| Shaft Length | 1.88 inch |
| Enclosure (ENC) | TEFC (Totally Enclosed Fan Cooled) |
| Insulation Class (INS) | F |
| IP Rating | 55 |
| Rotation | CW/CCW (Not Reversible) |
| Material | Alloy Steel (Shell) |
| Item Weight | 15.9 kg (40.79 lbs Gross) |
| Product Dimensions | 33.5 x 21.84 x 20.19 cm |
| Model Number | 108067-5334-1418278761 |

Image 4.1: The motor's nameplate displays critical operational specifications and safety warnings.

Image 4.2: Close-up view of the motor shaft, indicating its diameter and length for coupling purposes.
5. Installation and Setup
Proper installation is crucial for the motor's performance and longevity.
5.1 Mounting
- Mount the motor on a rigid, level surface capable of supporting its weight and resisting vibration.
- Ensure the mounting bolts are securely tightened to prevent movement during operation.
- Allow sufficient clearance around the motor for proper airflow and cooling.
5.2 Electrical Connection
This motor supports dual voltage operation (115V or 230V). Refer to the motor's wiring diagram (typically found on the motor nameplate or inside the terminal box cover) for correct connections. Always ensure power is disconnected before making any electrical connections.
- Connect the motor to a dedicated circuit with appropriate circuit breakers or fuses.
- Ensure all wiring complies with national and local electrical codes.
- Verify the voltage selection matches your power supply. Incorrect voltage can damage the motor.
- Properly ground the motor frame to prevent electrical shock.
5.3 Shaft Coupling
- Ensure the driven equipment's shaft is properly aligned with the motor shaft to minimize vibration and premature bearing wear.
- Use a suitable coupling device that matches the 5/8 inch shaft diameter.
- Avoid excessive force when installing pulleys or couplings onto the shaft to prevent damage to the motor bearings.
6. Operation
Once installed and wired correctly, the motor is ready for operation.
6.1 Starting the Motor
- Before starting, ensure all safety guards are in place and no obstructions are near moving parts.
- Apply power to the motor. The motor should start smoothly and reach its rated speed quickly.
- Monitor for unusual noises, vibrations, or excessive heat during the initial startup. If any abnormalities are detected, immediately shut off power and investigate.
6.2 Rotation Direction
The motor's rotation is CW/CCW (Counter-Clockwise when viewed from the shaft end). This motor is NOT reversible. Ensure this rotation direction is compatible with your application.
6.3 Stopping the Motor
- To stop the motor, simply remove power from the circuit.
- Allow the motor to come to a complete stop before performing any inspections or maintenance.
7. Maintenance
Regular maintenance helps ensure the longevity and reliable operation of your motor. Always disconnect power before performing any maintenance.
- Cleaning: Keep the motor's exterior clean and free of dust, dirt, and debris. Pay special attention to the cooling fins and fan cover to ensure proper heat dissipation.
- Ventilation: Periodically check that the motor's ventilation openings are clear and unobstructed.
- Connections: Inspect electrical connections for tightness and signs of corrosion or damage.
- Vibration and Noise: Listen for any unusual noises or vibrations. These could indicate issues with mounting, coupling, or internal components.
- Bearings: This motor typically uses sealed bearings that do not require lubrication. If unusual bearing noise is detected, professional service may be required.
8. Troubleshooting
This section provides solutions to common operational issues. For problems not listed here, contact customer support.
| Problem | Possible Cause | Solution |
|---|---|---|
| Motor does not start | No power supply Incorrect wiring Overload protection tripped Motor seized | Check power source and circuit breaker Verify wiring against diagram Reset overload, check for cause of overload Inspect for mechanical obstruction |
| Motor overheats | Overload Insufficient ventilation Incorrect voltage Bearing issues | Reduce load Clear obstructions, ensure airflow Verify correct voltage supply Contact service professional |
| Excessive noise or vibration | Loose mounting Misaligned coupling Damaged bearings Unbalanced load | Tighten mounting bolts Realign coupling Contact service professional Check driven equipment for balance |
| Motor runs slowly | Low voltage Overload Damaged windings | Verify voltage supply Reduce load Contact service professional |
9. Customer Support
For technical assistance, warranty information, or replacement parts, please contact Cuilvu customer support through your original point of purchase or visit the official Cuilvu website.